“There is nothing in the world so irresistibly contagious
as laughter and good humor.” ~Charles Dickens
Tina leads this week and invites us to share some humor with our photos, by providing our first reaction. Many times, when I capture photos of birds or animals, I already have some catchy caption in mind. Follow along and you’ll see what I mean.
Let’s talk about horses. Those wonderful, graceful creatures that have deep souls and sometimes quirky personalities:
“I sure do wish the judges would hurry up! I’m sleepy.”
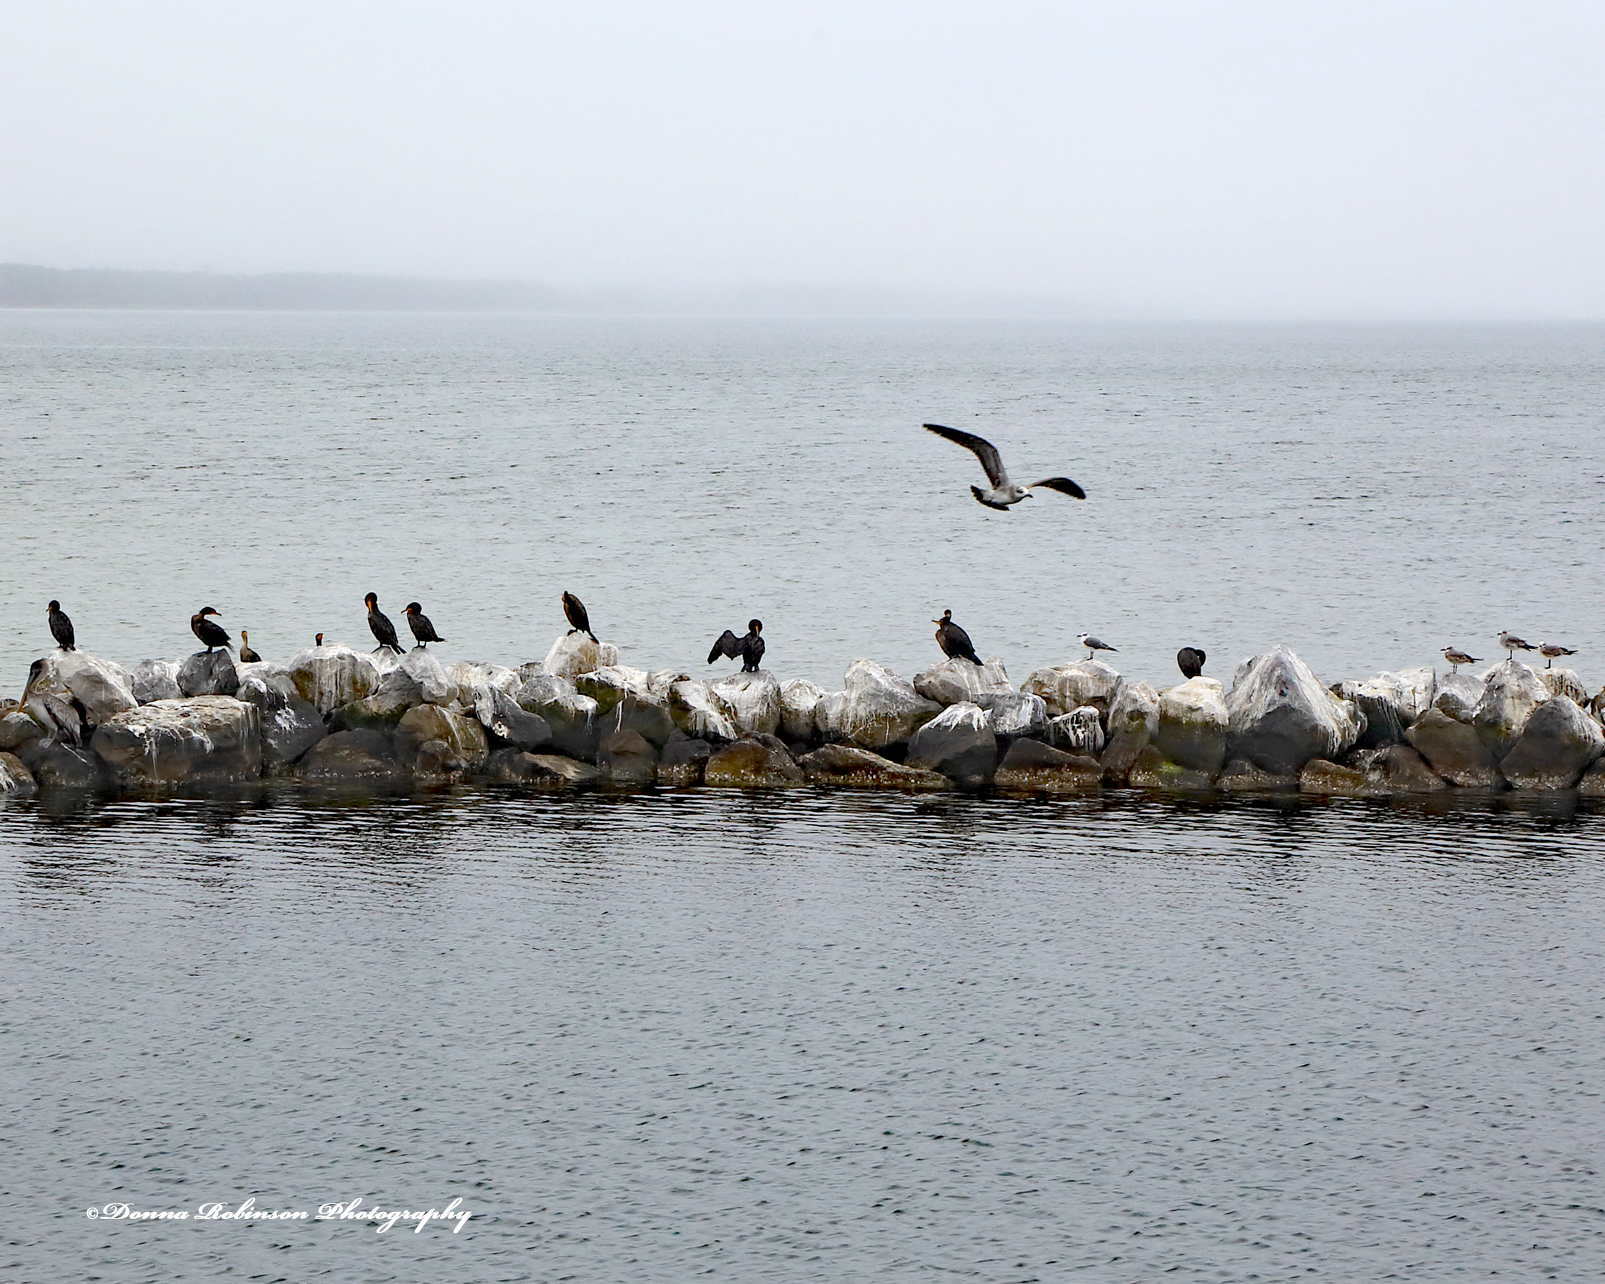
Who says birds have to be “of a feather” to flock together?
Meeting of the Minds
Perhaps they’re also a little on the shy side and like hanging out by themselves, especially during bathtime.
Splish Splash I was Taking a Bath
“If we couldn’t laugh we would all go insane.”
~ Robert Frost
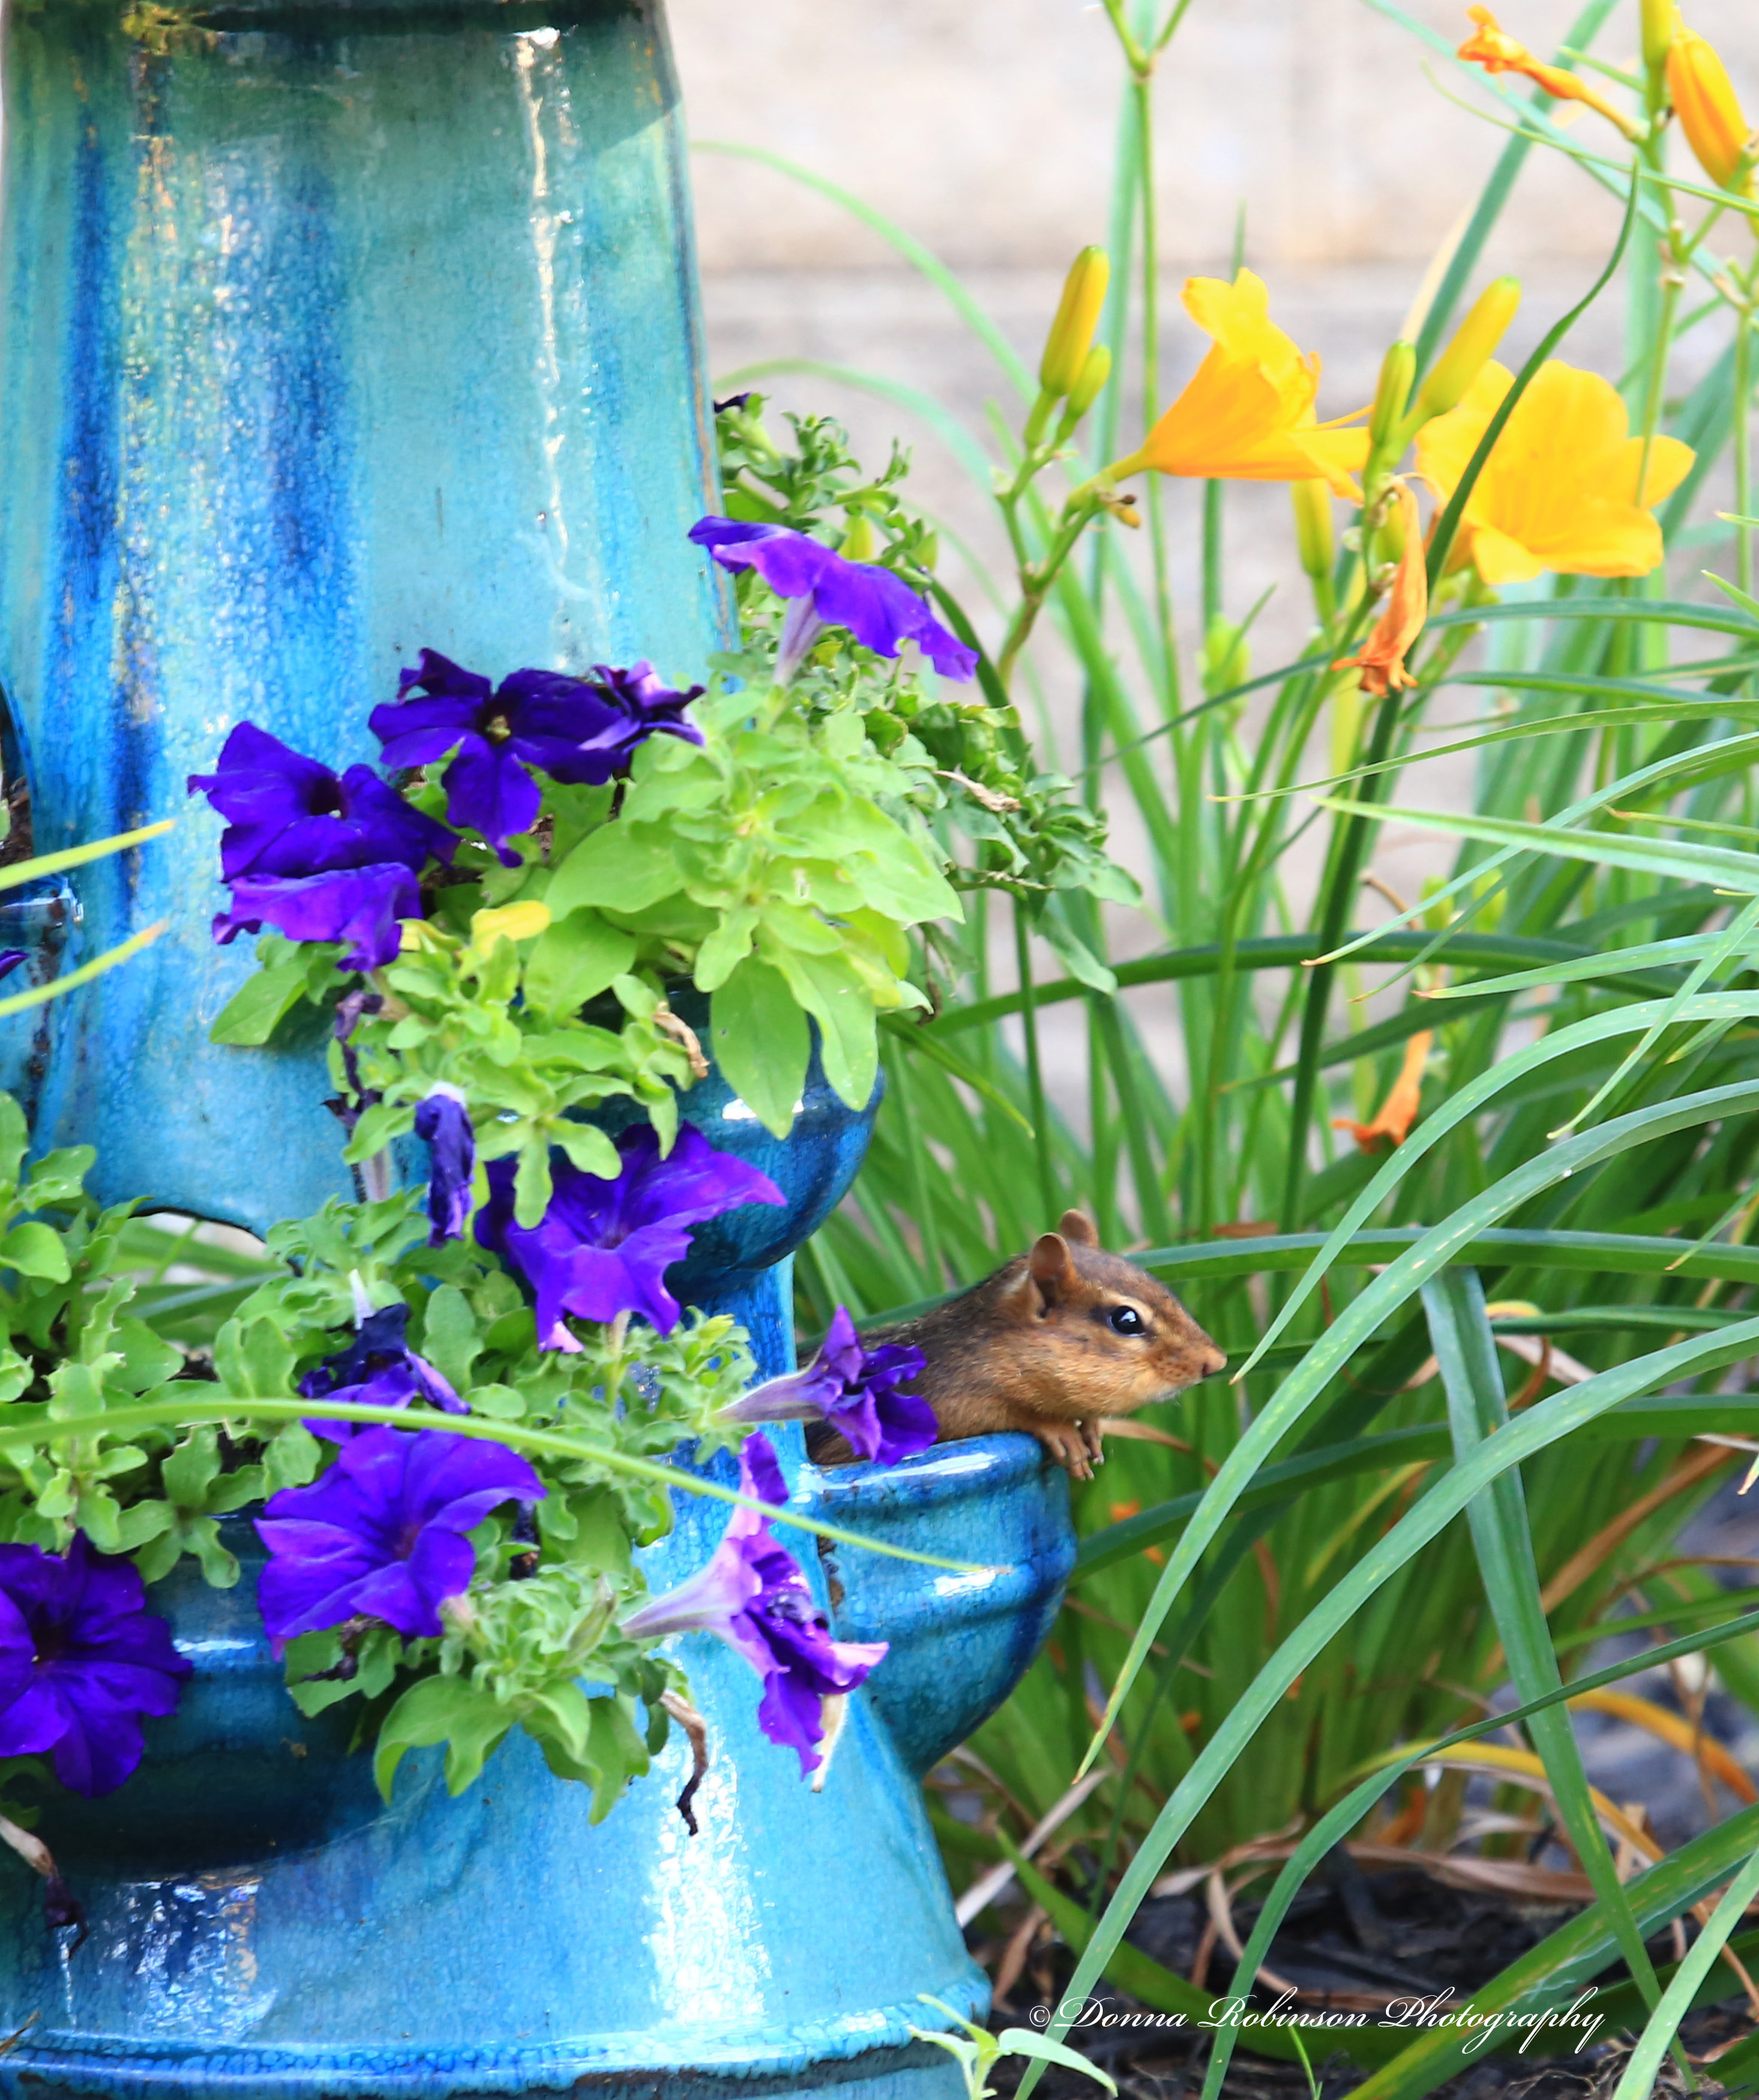
Let’s not forget the chipmunks. We could sit for hours watching them scurry around the yard gathering food.
Peek a Boo!
Dogs do the darndest things, too!
Always Waiting on a Woman
Thank you, Tina for encouraging us to find the humor in our images.
If you’d like to participate in this week’s challenge, be sure to link back to Tina’soriginal post and use the Lens-Artist Tag.
Did someone say, “break the rules?” Why, YES! Yes, they did! Ritva leads this week, and she is challenging us to break the rules of photography! As Ritva goes on to say in her challenge, “Photography is as much about emotion and instinct to me as it is about technical skill. In those moments when we abandon the constraints of traditional guidelines, we open ourselves up to unexpected and beautiful outcomes in my case many times by mistake.”
So, what rules have I broken?
Perfect Patterns: This little seagull greeted us one morning when we were in Malibu many years ago. He was so cute, and I couldn’t resist taking the photo before he flew away. Goodness knows I wasn’t even thinking about the rules I was breaking (look at all the squares, lines, rectangles and diamonds). I just wanted the shot.
Rule of Thirds: Next up, a macro shot gone bad. During a visit to the Atlanta Botanical Gardens, I was experimenting with my new macro lens. I don’t remember what type of plant this was, I just saw an opportunity to practice shooting macro from a top-down view of the bud. The end result looks a little bit like something floating in outer space. I still thought it was a pretty cool shot, so I kept it.
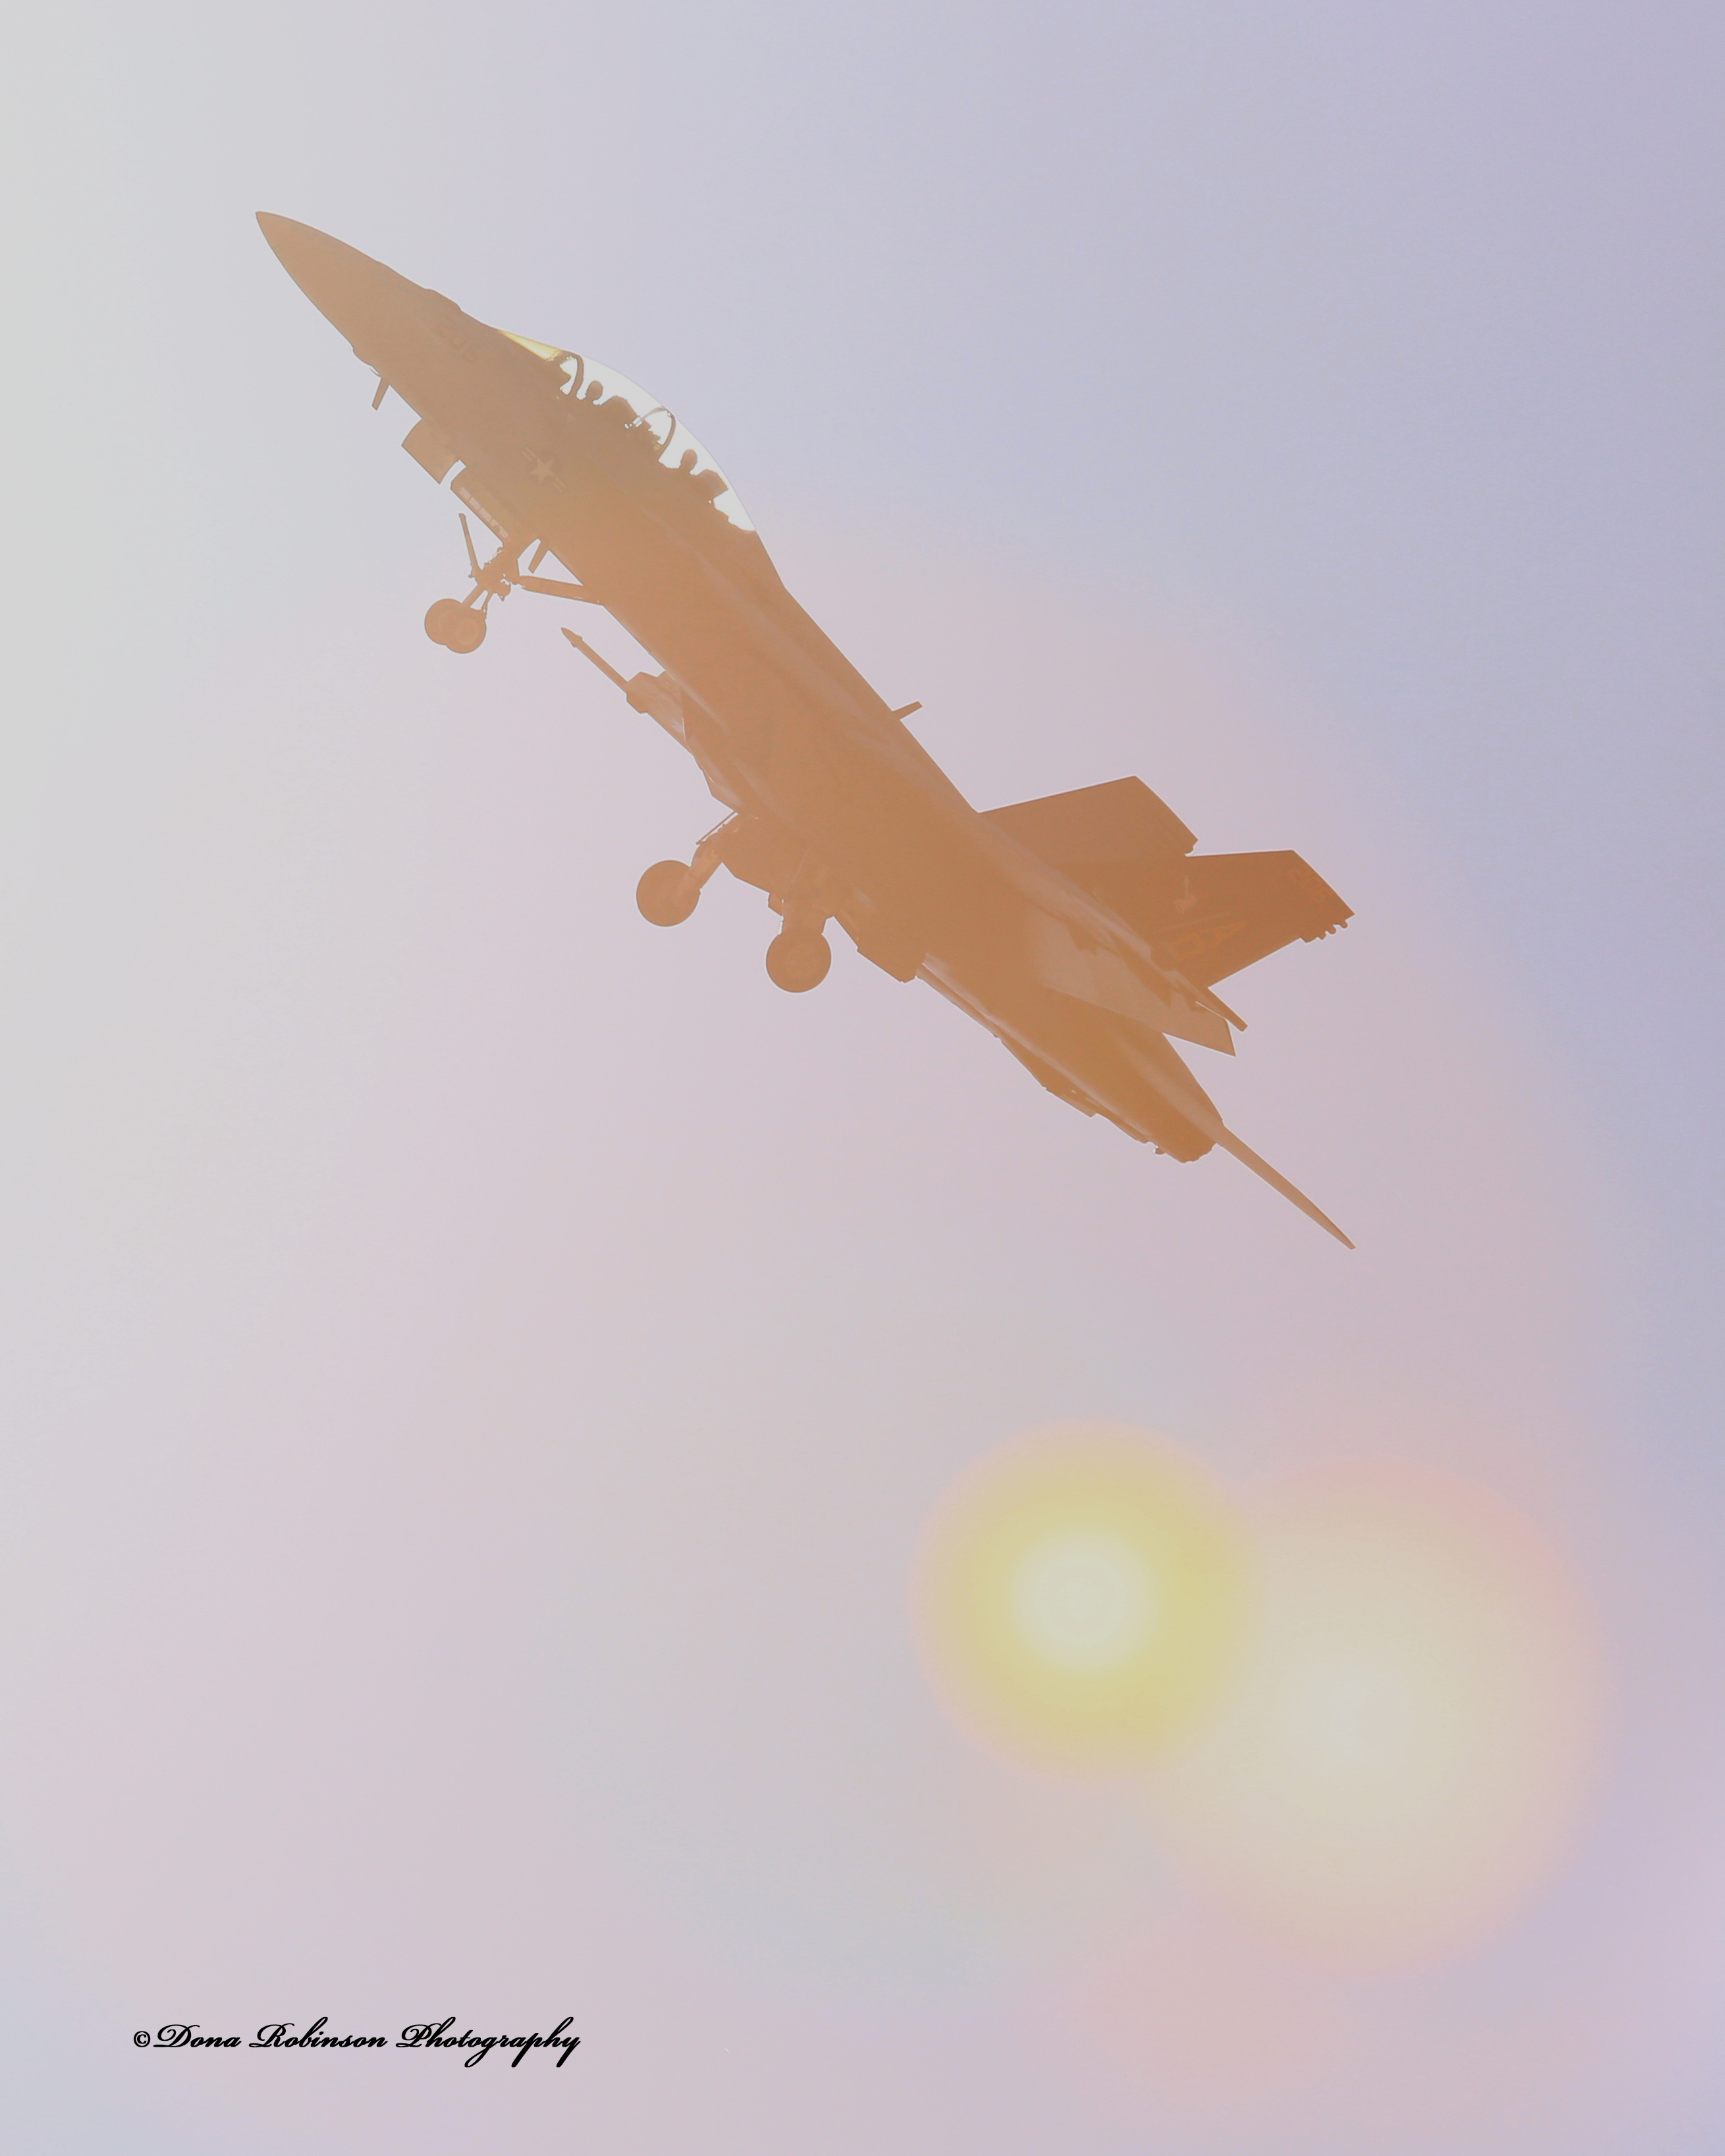
Don’t Shoot into the Sun: A very BIG rule was broken on the next image, but quite honestly it couldn’t be helped. When you’re lucky enough to have an airshow fly directly over your house you have no time to think and have to be very quick with your shot. Because they are flying directly above you, it’s almost impossible not to shoot into the sun. What really works about this image is the silhouette of the pilots.
Blurry Photos: My last image of broken rules was a poor attempt at catching a Mourning Dove bathing in the bird bath. Instead, he took off and I caught him in mid-flight. Yep, the image is blurry, but do you see what I see?
What photography rules have you broken lately where you opened yourself up to an unexpected and beautiful outcome?
Be sure to check-out Ritva’s original post to view her wonderful examples of broken rules. Next week, Edigio (Through Brazilian Eyes) leads.
If you want to know more about the Lens-Artists Challenge, please click here.
I have to admit, I don’t think I’ve ever consciously thought about shooting cinematic photos. But after reading Sofia’s challenge and pouring through my archives I found that sometimes my photos do have a “cinematic” feel to them. Sofia writes, “There are a few things that give a photo that cinematic feel: camera angles, bold and high-contrast colors, light, locations, just to name a few. The main objective is to take a shot that is part of a story, there’s mood and a sense of location; our image is but a snapshot of a much wider situation.” You can read Sofia’s challenge, here.
So, what did I uncover in my archives? Let’s take a look.
I’ve always loved this photo. It was taken during a sunrise over Atlanta, probably during the Fall season, because of the mist rising from the Chattahoochee River. I love the varied colors and how the sun gives them a slightly golden tone. This photo could easily be an opening or closing scene in a movie.
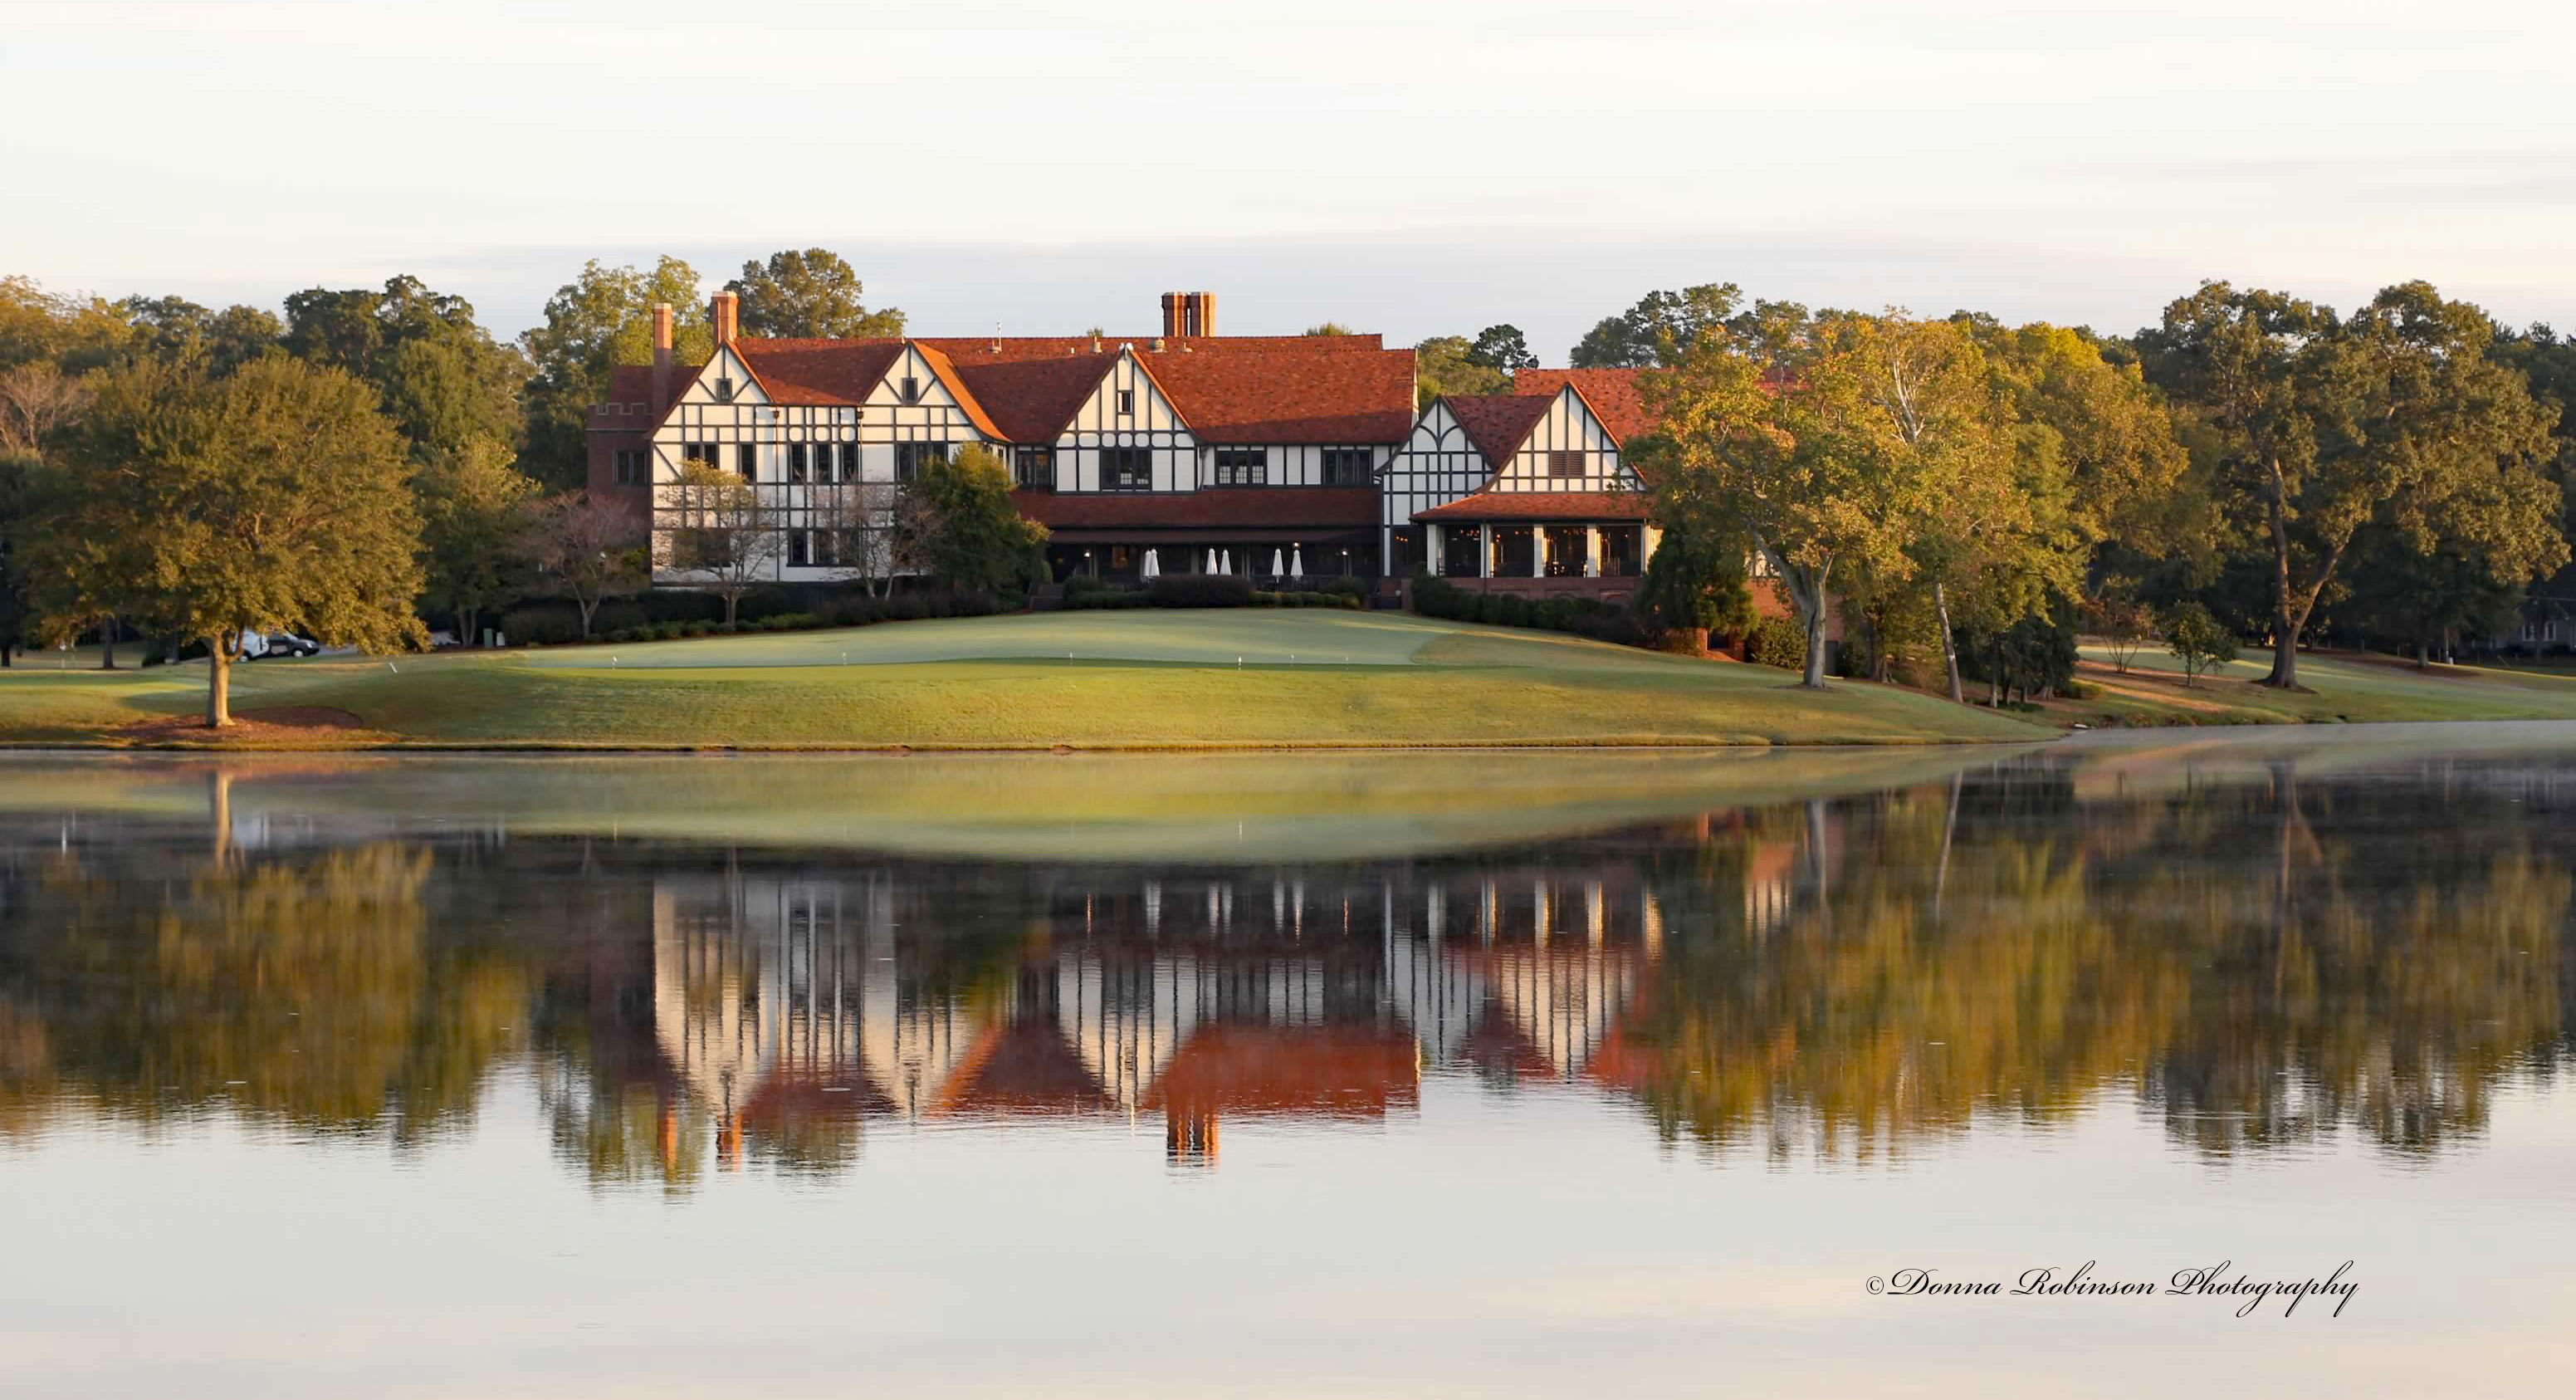
How about a shot of this beautiful East Lake Golf Club, Clubhouse. I remember taking this photo and thinking it would make a great post-card or large format photo. But as I look more closely, I could see this as an opening shot for the Tour Championship. Can’t you just hear the voice over of the announcers talking about the players and the upcoming events for the day?
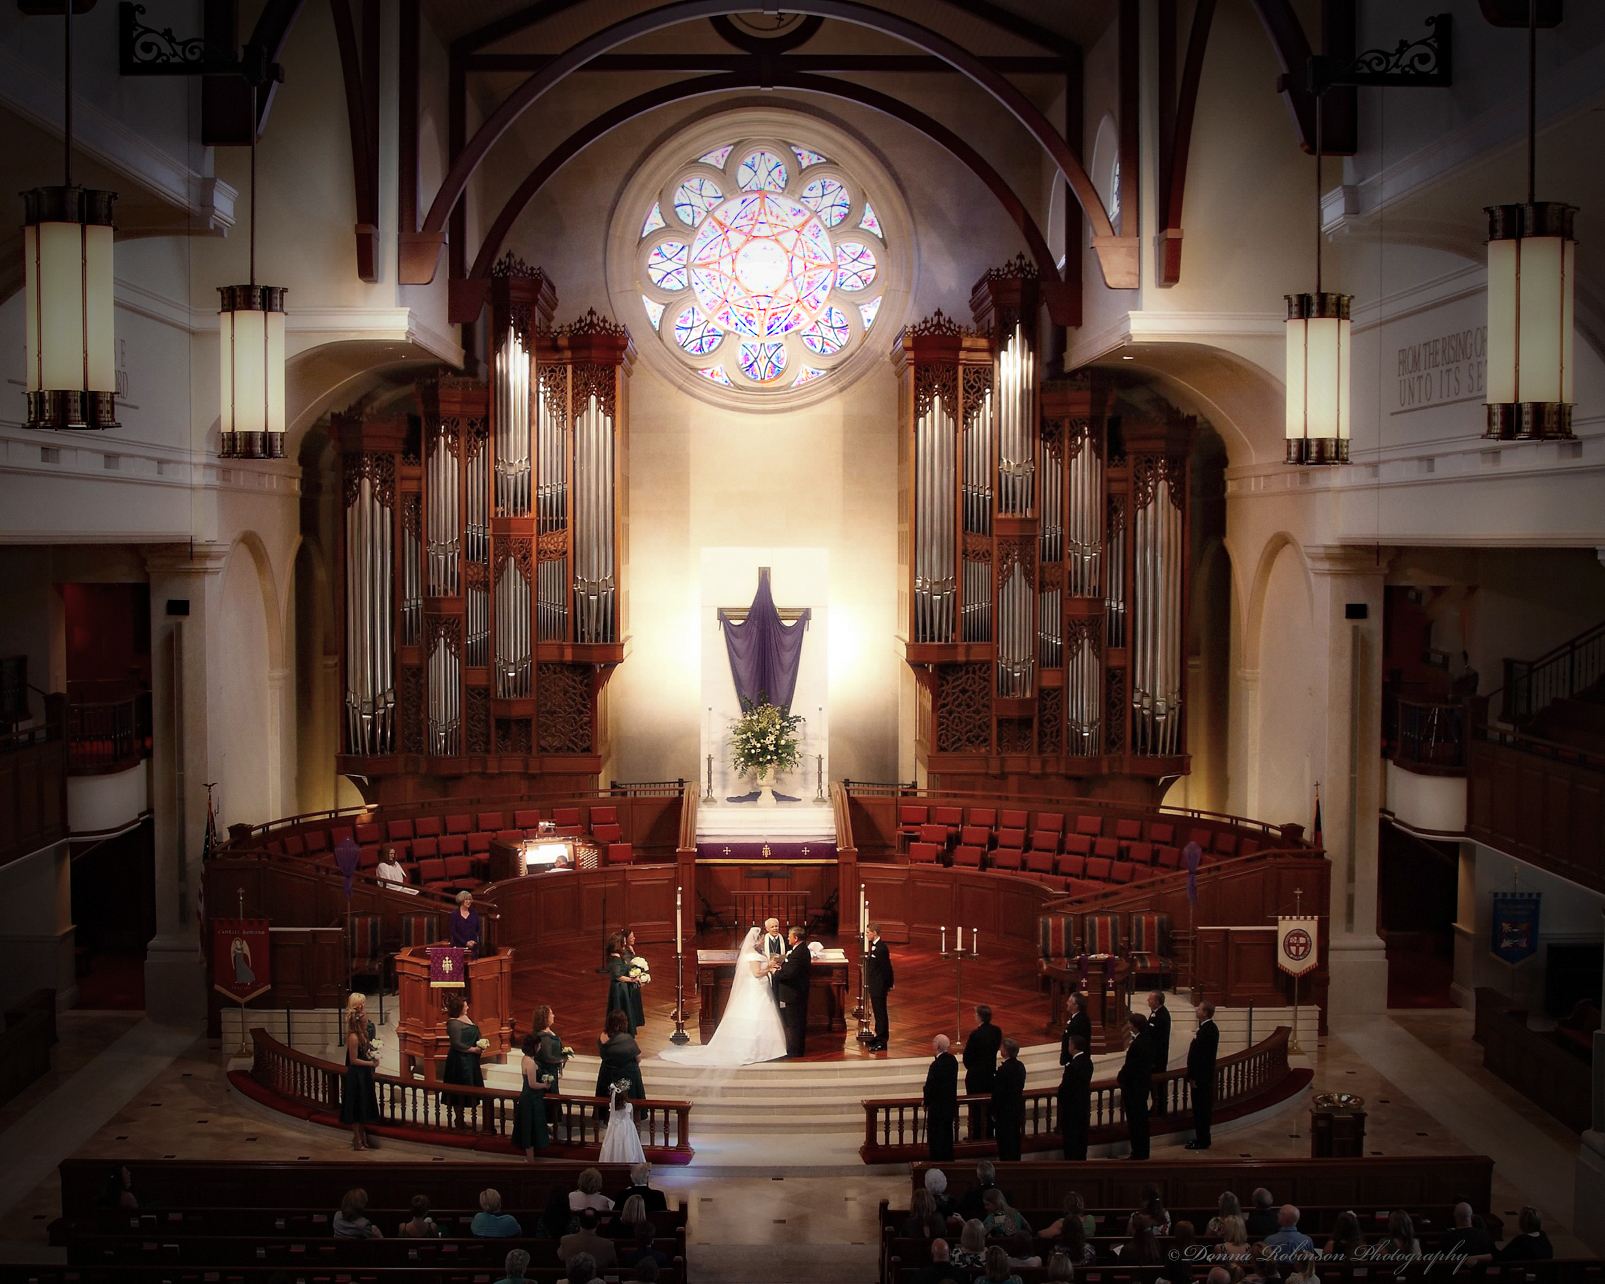
Talk about lighting, mood and the image being a snapshot of a wider situation. This wedding image has always been one of my favorite shots from this particular ceremony. I wasn’t allowed to bring my camera into the sanctuary during the actual ceremony, so my assistant and I went up into the balcony. I’m so thankful we were banned from the sanctuary because I wouldn’t have been able to get this special shot. How many movies have you seen with “cathedral style” weddings?
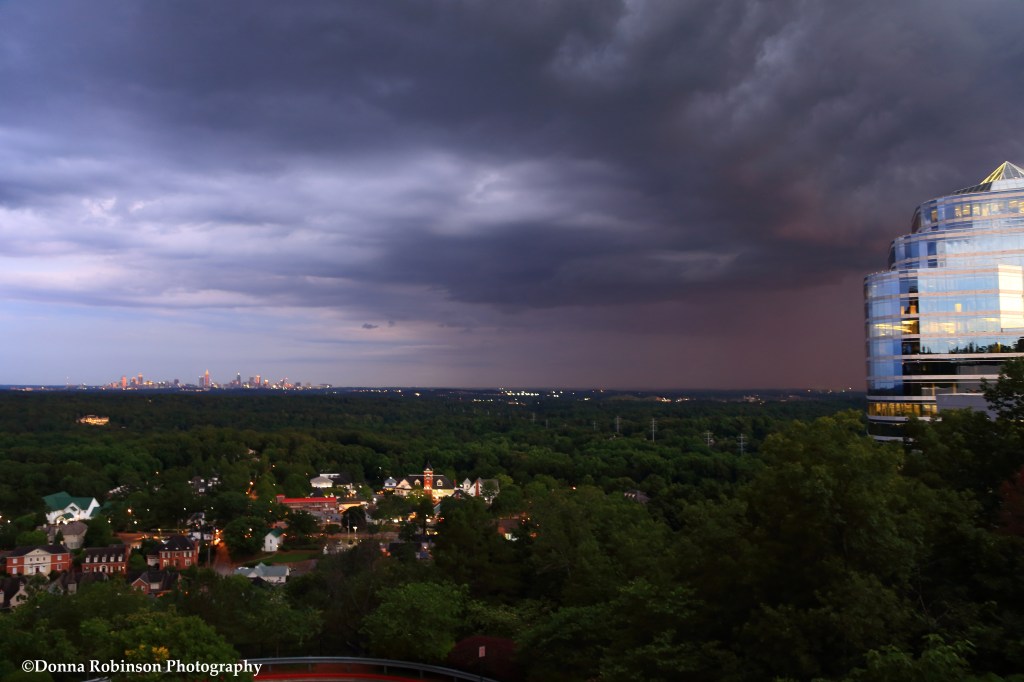
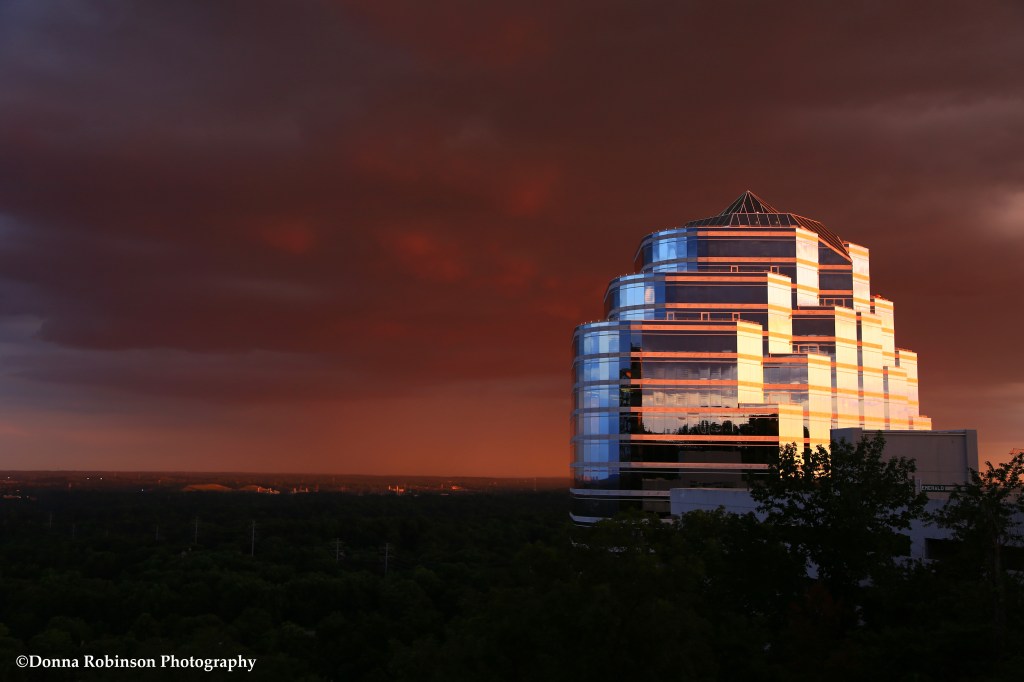
My closing few shots takes us back to downtown Atlanta. Our views of the storms that rolled through the city were amazing. Anyone of these could have easily come from a movie where a storm was integral to the storyline; lightning strikes, rolling rain clouds, showers in the distance at dawn. Each offering up its own “ominous mood.”
So, how did I do? I know one thing for sure, I will definitely be thinking about “cinematic feel” in my photos going forward.
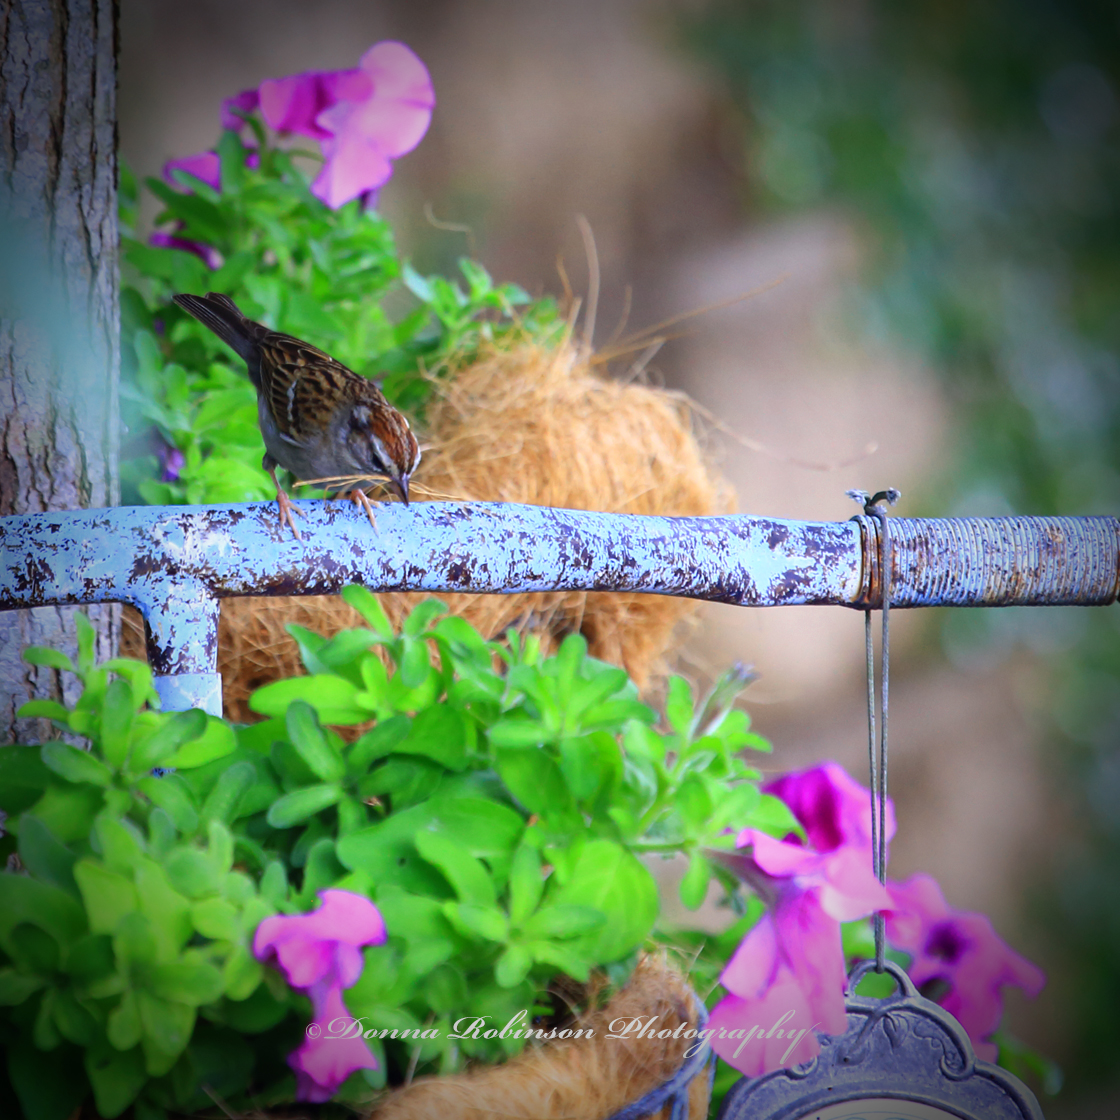
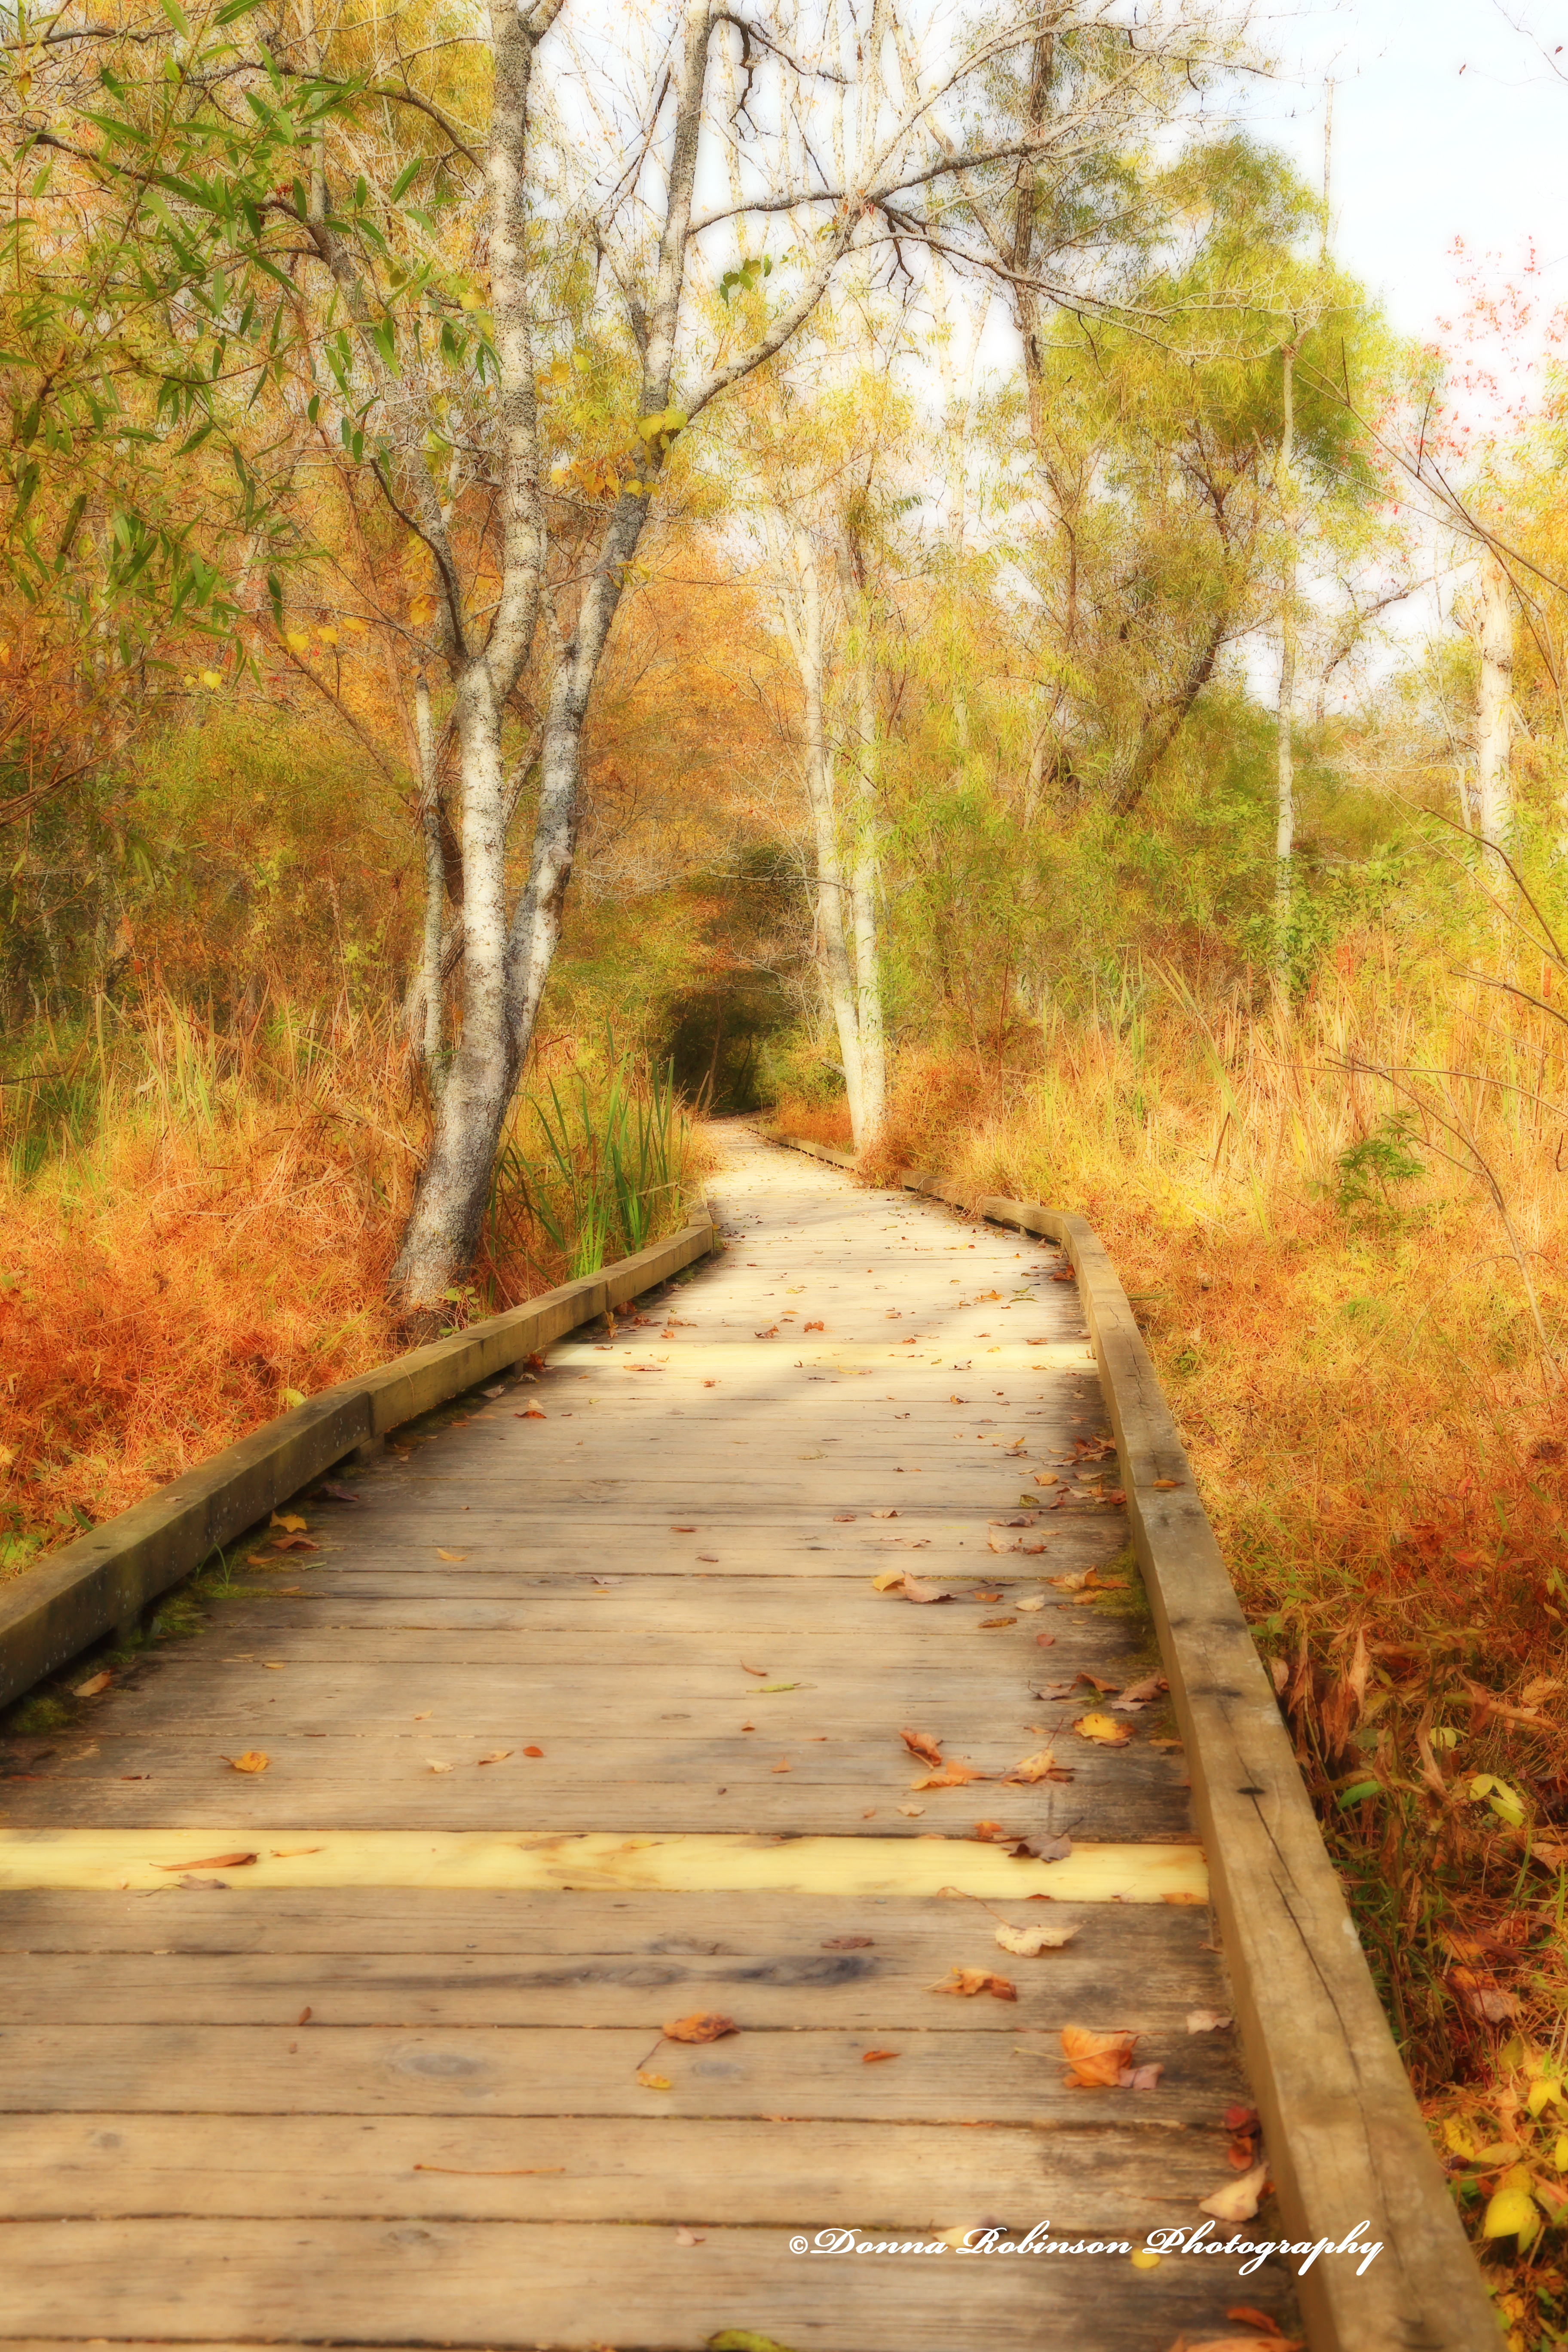
It’s a new week of the Lens Artist Challenge and John from Travels with JohnBo has us sharing our “Go to Places” for photography (you can read John’s original post here). It’s a wonderful theme and one that I didn’t have to think too much about, because really any place I have my camera becomes my “go to place.” But specifically, my “go to place” is anywhere I can be outside connecting with nature.
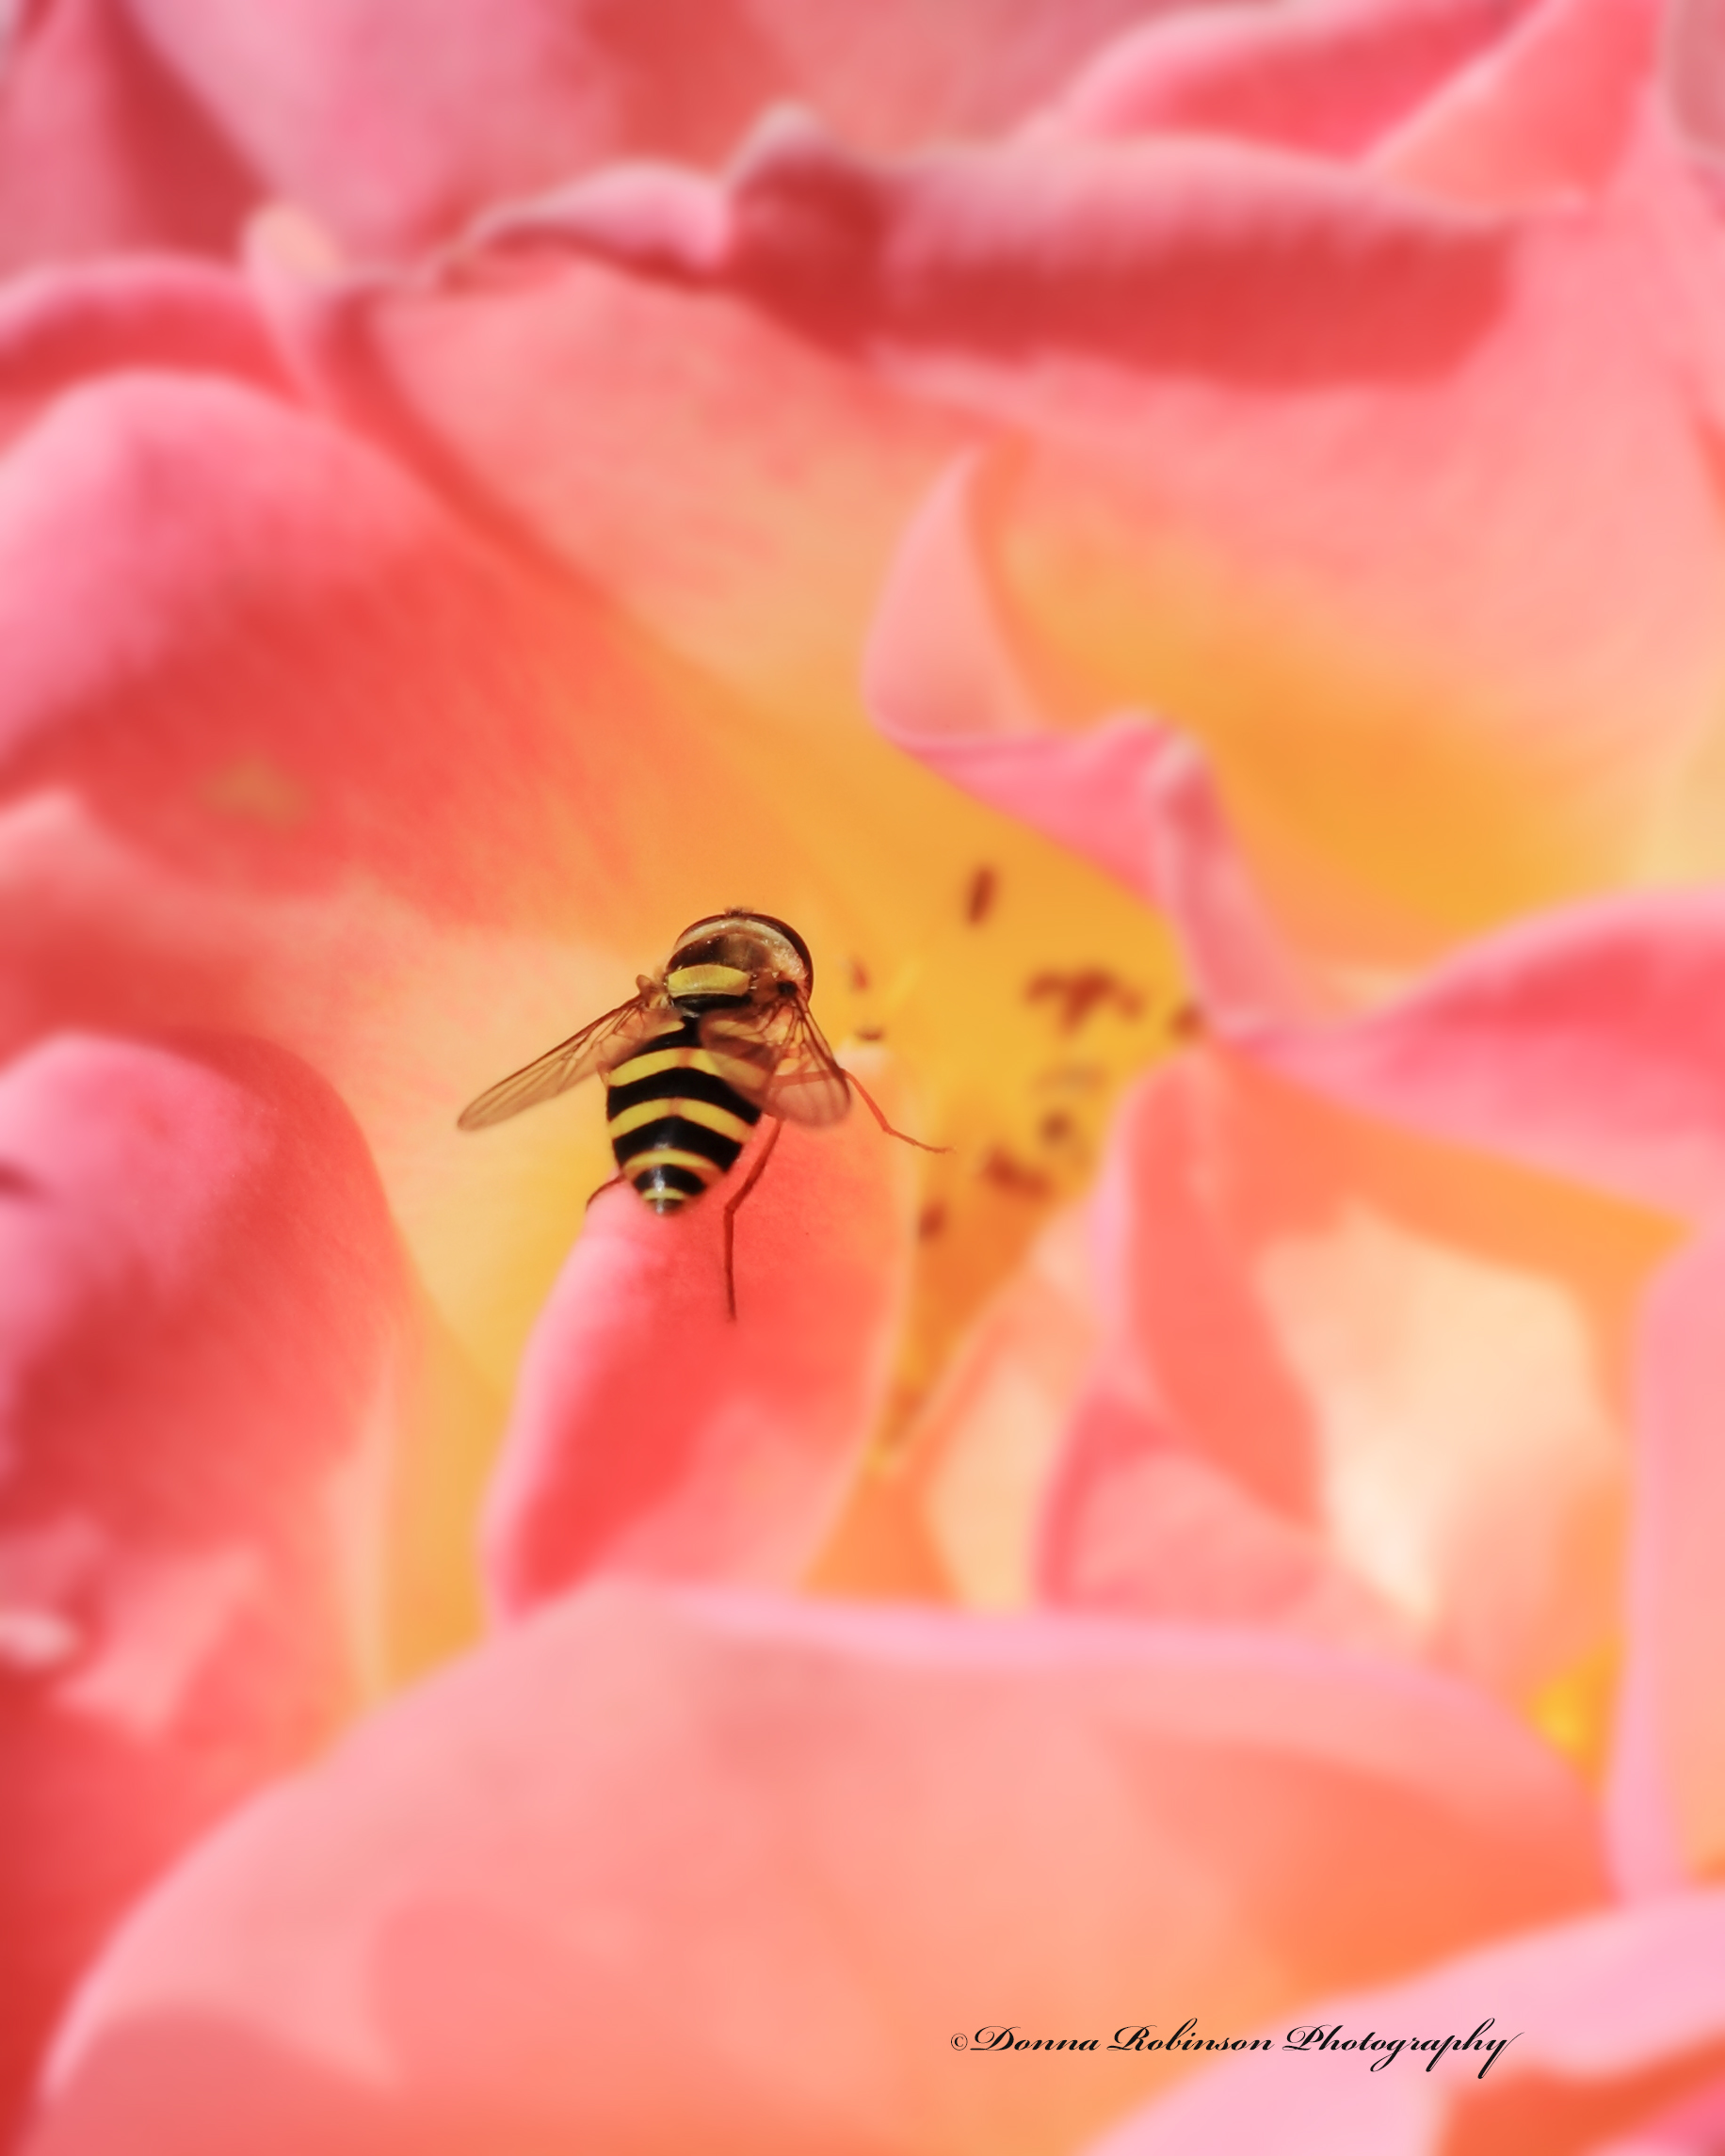
It can be in a garden enjoying the blooms and color while watching the birds and insects gathering food and nectar:
Macro Photography of a Sunflower with a BugBee Pollenating on Rododendron
It can be a walk in the park on a Fall Day enjoying the crisp air and changing colors of the leaves:
IMG 8175
Or walks along the beach taking in the salt air and ocean breezes.
So where is your “Go to Place” when you need inspiration?
Many thanks to John for this wonderful challenge. Next week, Sofia will host. Be sure to follow her here so you don’t miss her post, which will go live next Saturday at noon Eastern time.
Ritva leads this week and boy does she have us stepping out of our comfort zone, but in a fun way. In her challenge she has us exploring abstract photography and in her words “breaking the rules of realism.”
“If you obey all the rules, you miss all the fun!”
_Katherine Hepburn
There’re quite a few ways to create abstract photography whether “in camera” or through the editing process. I thought I would share with you some images I took “in camera.”
In this first image I had read about a technique placing a baggie (or plastic wrap) over the lens to give a soft, moody kind of feel. To experiment with this technique, I shot a matted 5 x 6 photo. When I added the baggie over the lens and reshot the photo it produced an even more “antique-ish” kind of feel. It’s almost like the photo was so old that it was beginning to fade away.
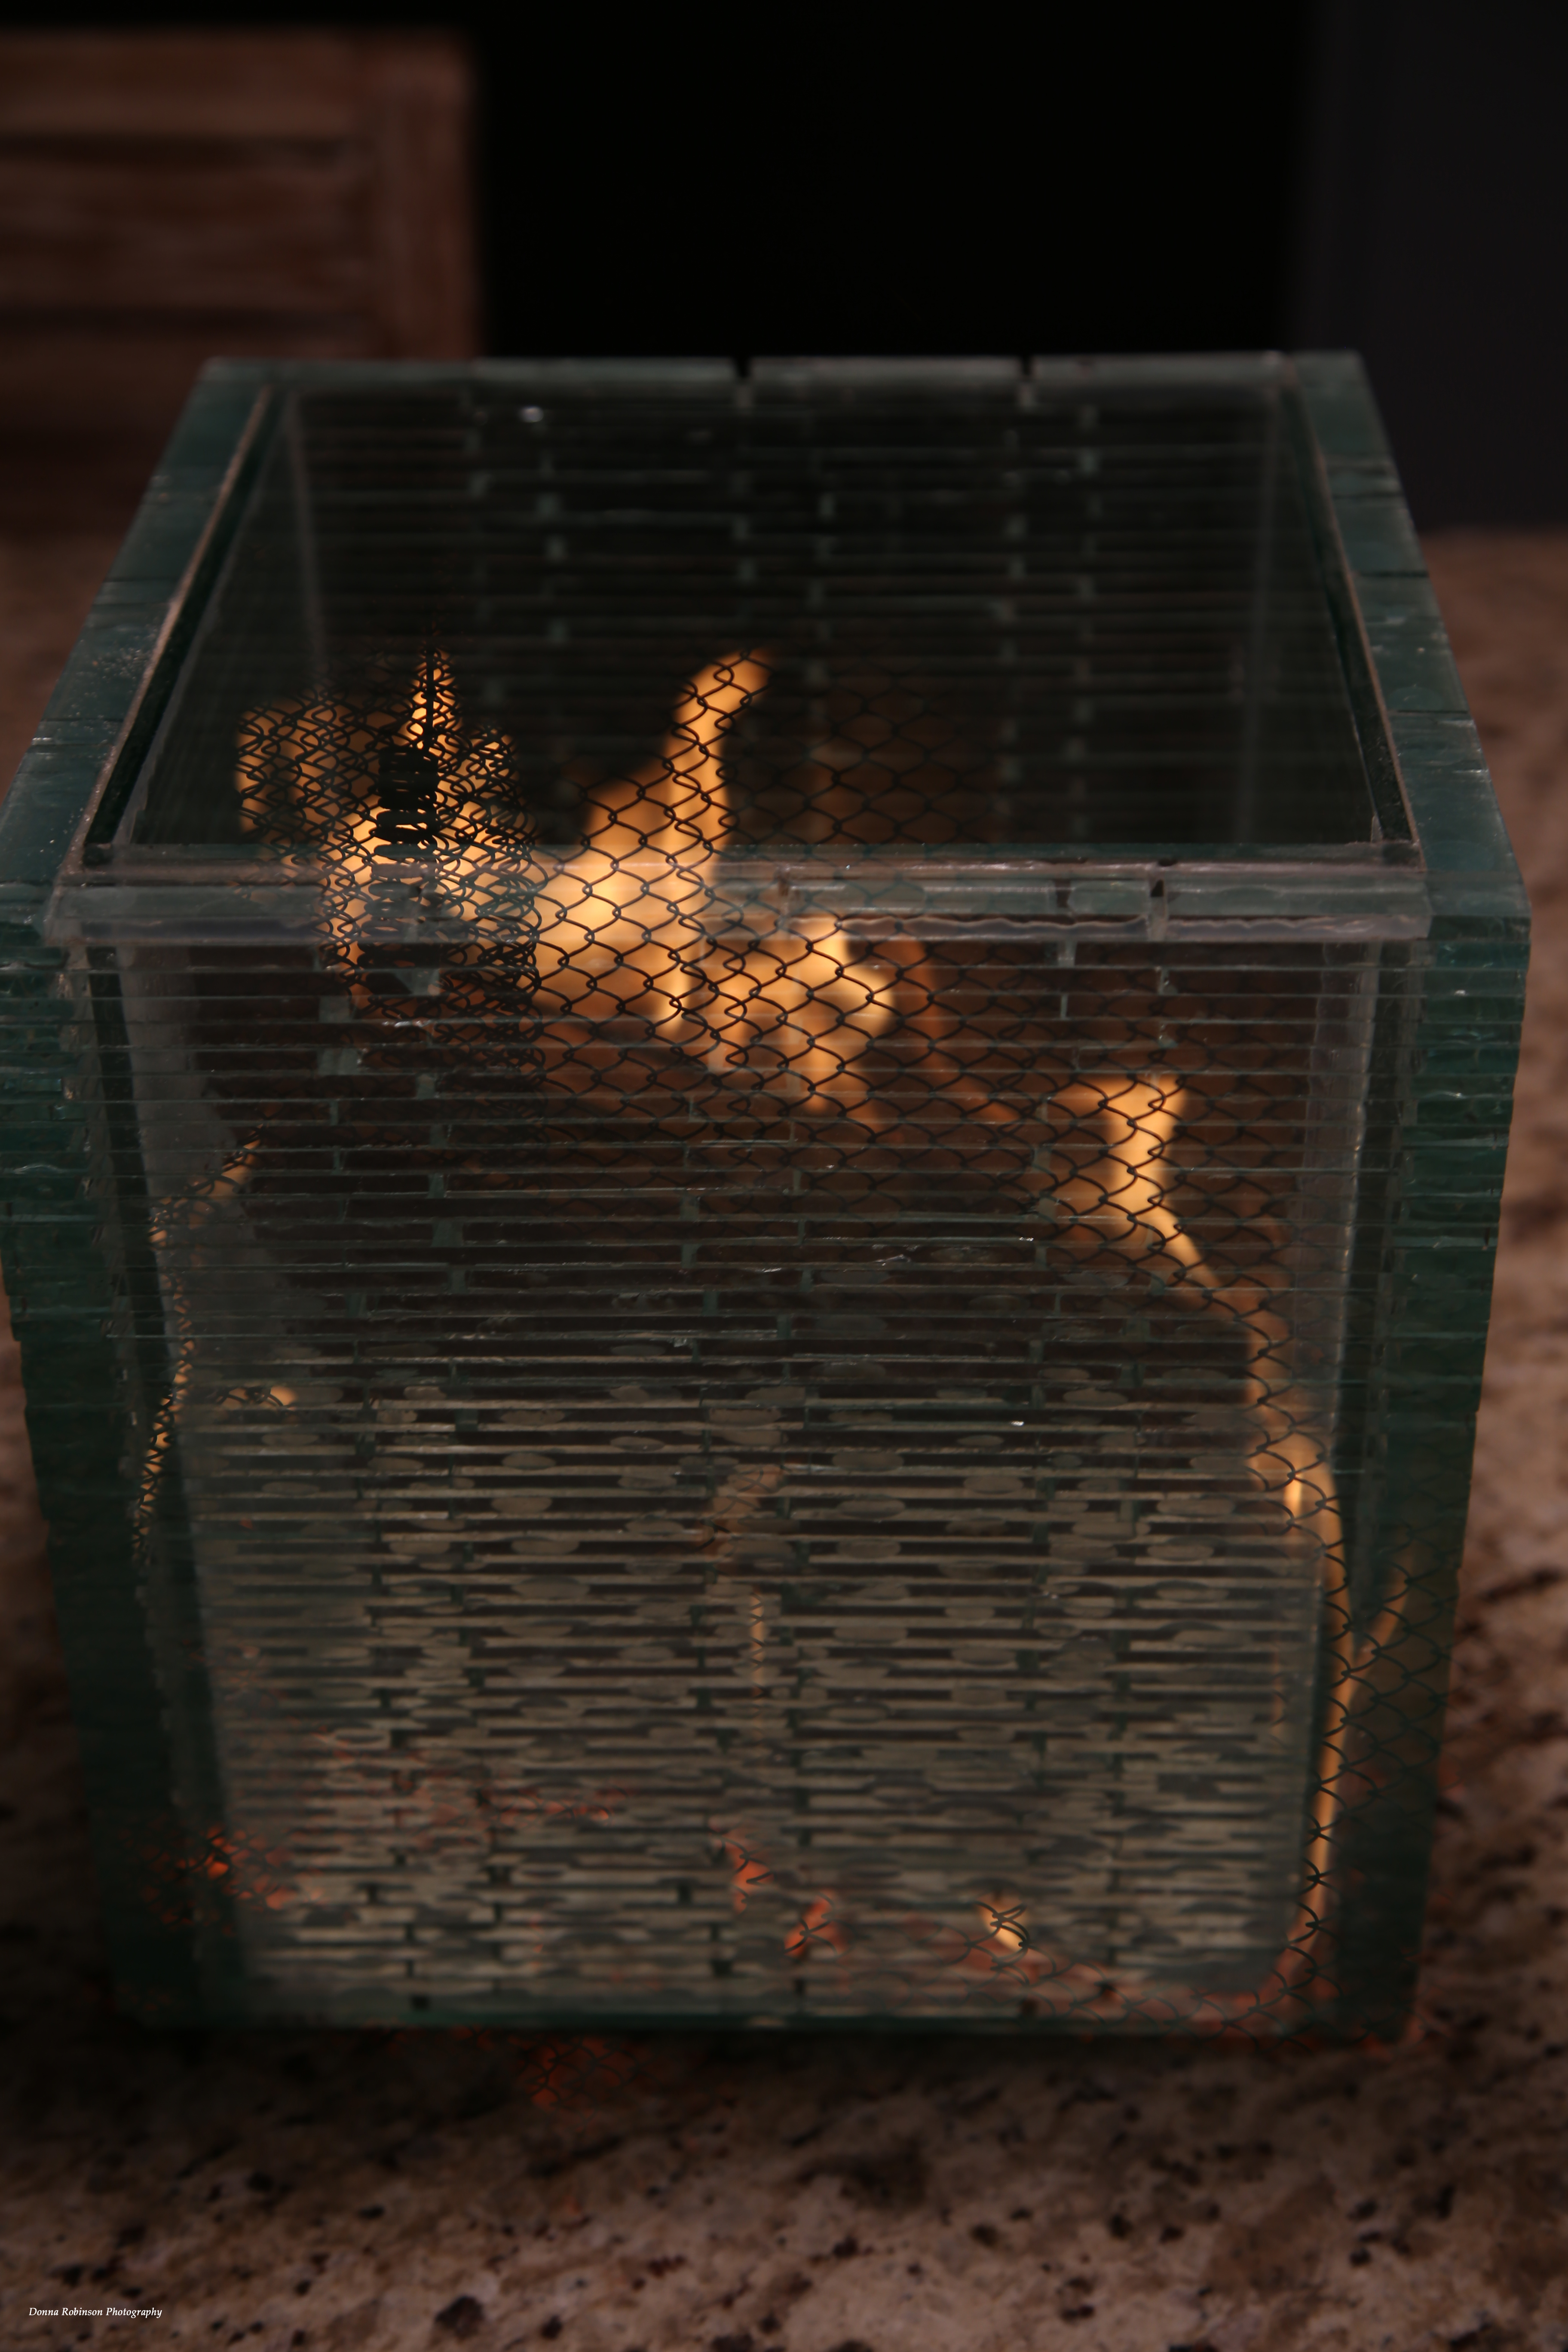
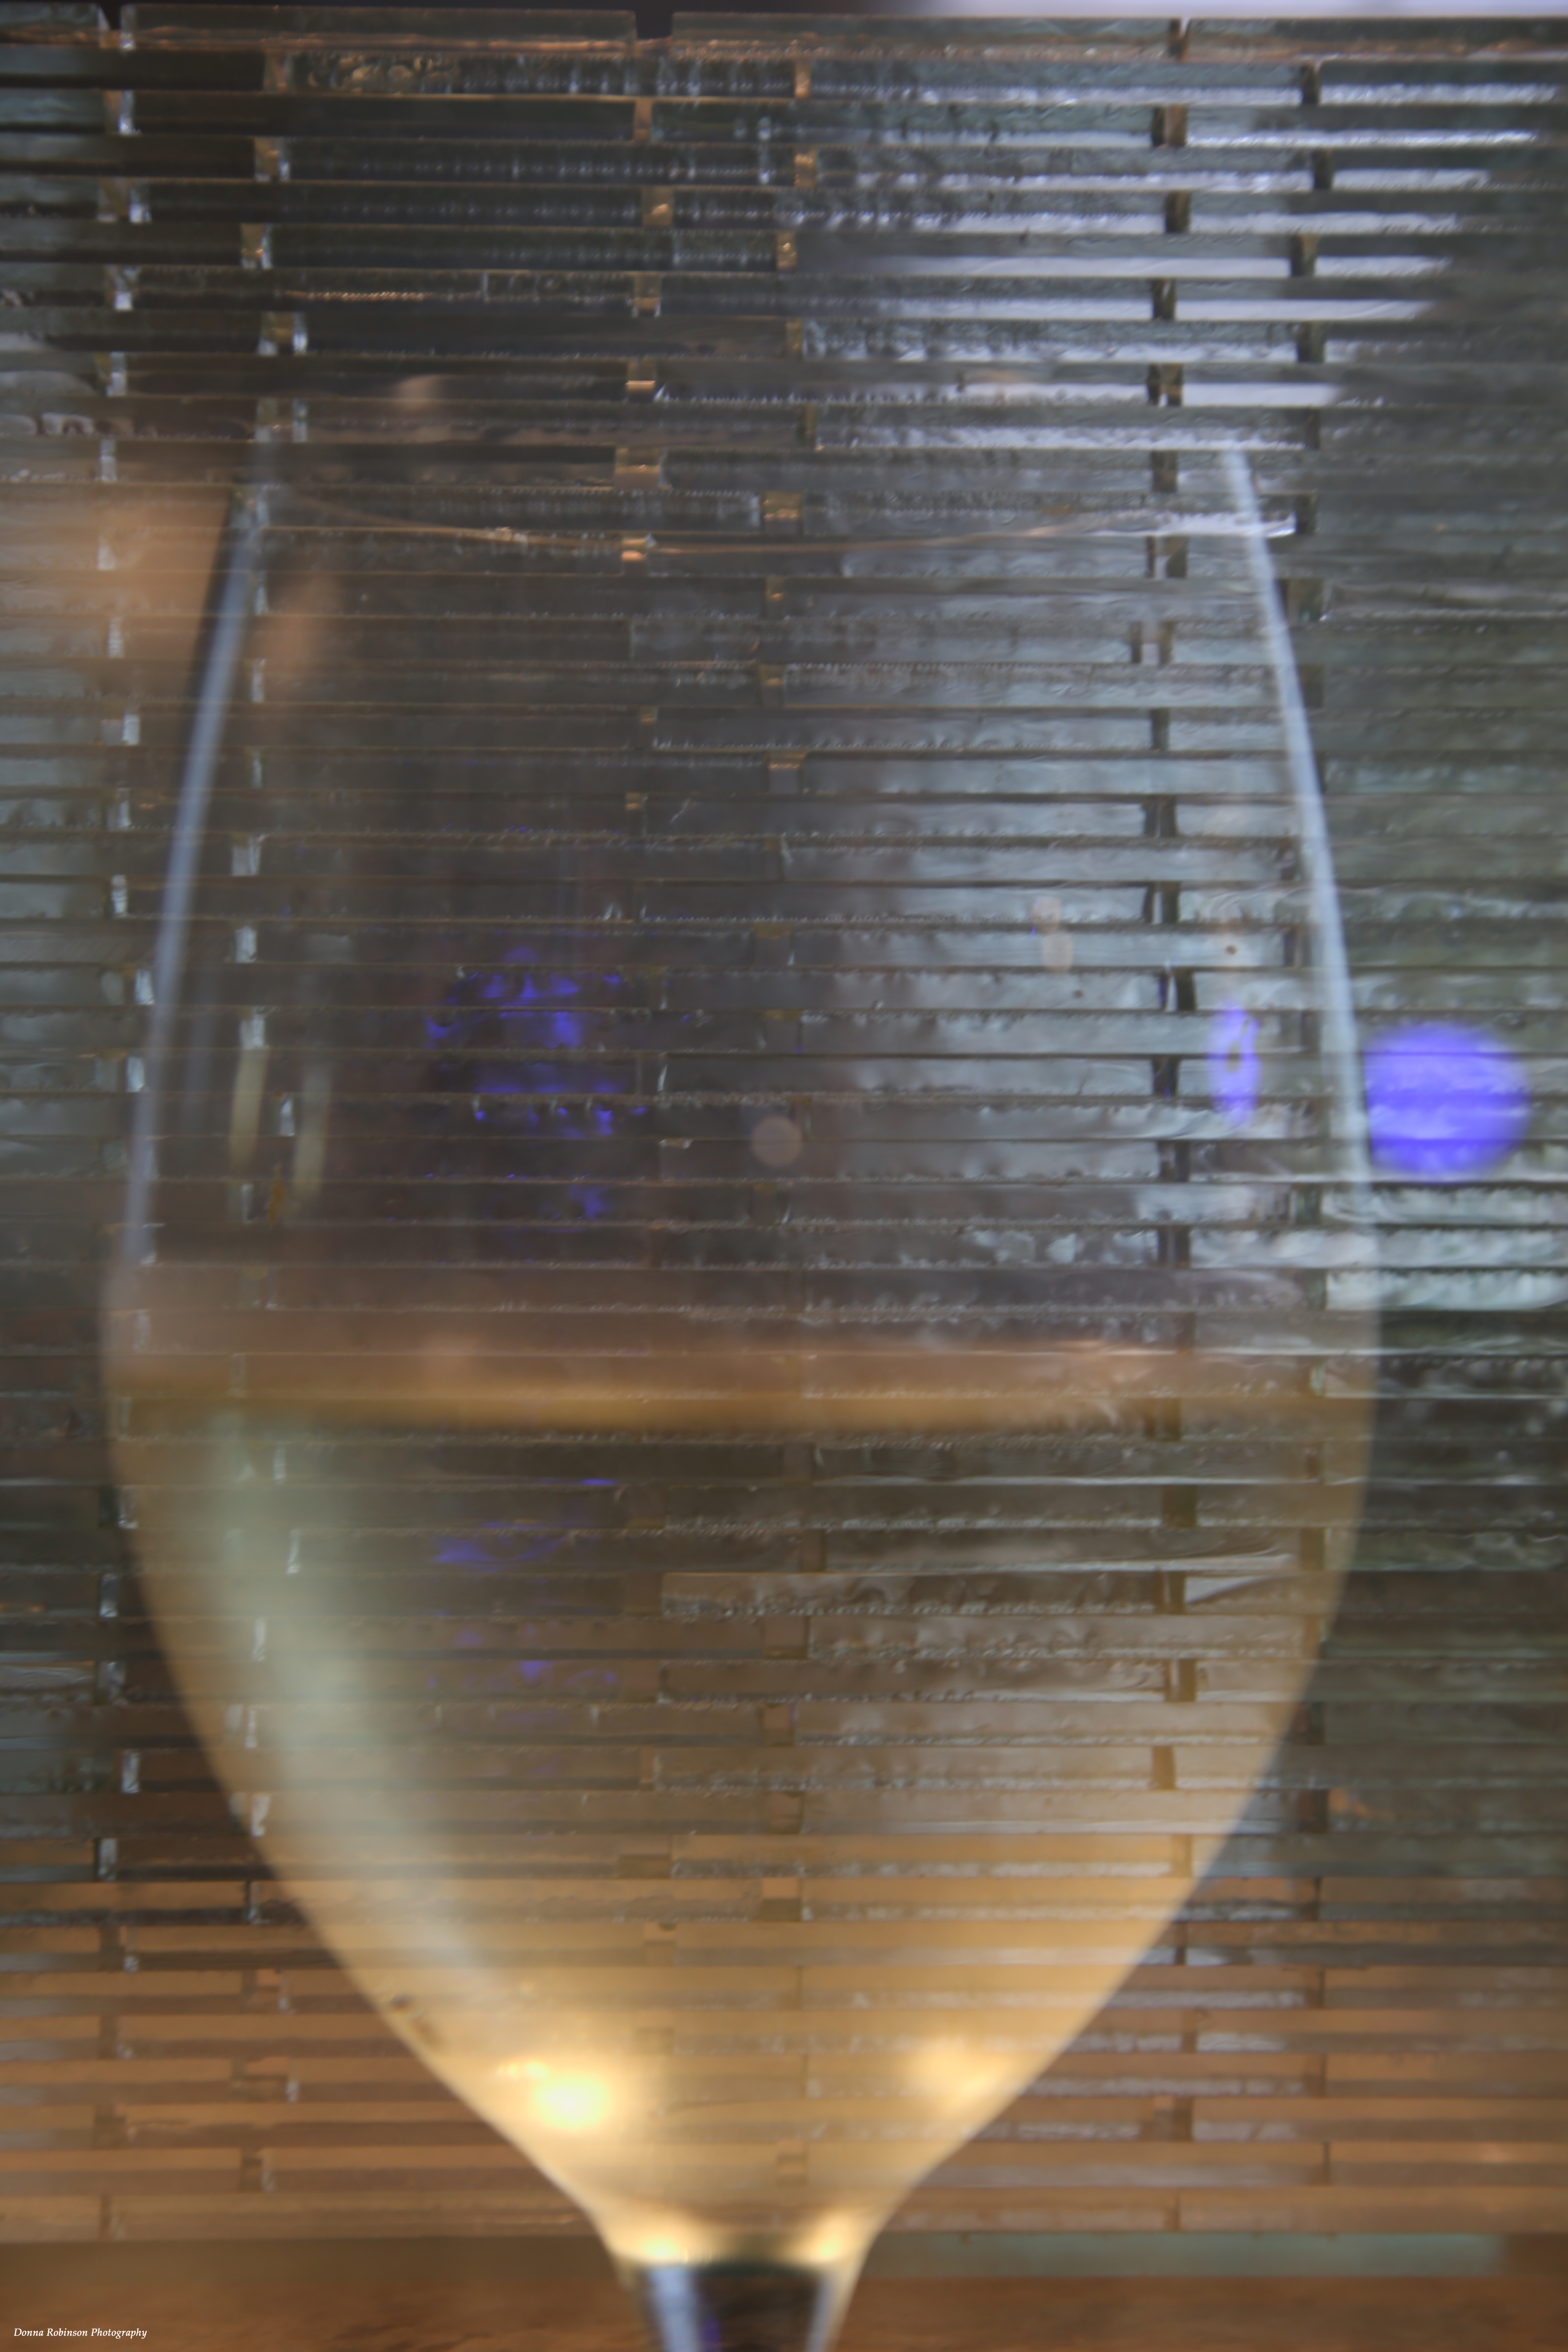
With the images below I used the “multiple exposure” setting in my Canon EOS 6D. It’s a VERY cool setting that allows you to take up to 9 different images and the camera will merge them together. I’ve only tried it with two (2) images so far.
Fire in Glass VaseYellow Daisy Floating in Bird BathChardonnay in Glass Vase
Another fun “in the camera” technique is “zooming.” A tripod or really steady hand is very helpful with this technique because as you’re using a slow shutter speed (i.e 1/5 th – 1/8th ) and as you’re taking the picture, you’re rapidly turning the lens to achieve the effect you want. Of course, you can also achieve this in Photoshop, but it’s pretty fun to challenge yourself with the camera.
Loquat BloomHavanna Cuba Acrylic PaintingBird Seed
The possibilities are limitless in creating abstract photography. It just depends on the story you’re trying to tell through your image as to what abstract technique you want to use.
Thank you Ritva for this fun and creative challenge. If you’re joining in on this challenge, be sure to link to Riva’s post in the “comments” section and also use the Lens-Artist tag.
Next week Egídio is hosting. He has some amazing photography so be sure to subscribe to his blog Through Brazilian Eyes.
This week’s Lens Artist Challenge, hosted by John, leads us down the path of examining how we edit our photos. As photographers we don’t just take a photo of what we see with our eyes, but oftentimes we take photos of what we see the end result to be. Are you with me?
I haven’t had much time behind the lens lately, so instead of going back through my library of images, I decided to get outside in our garden. I mean, what better way to share my before and after process than taking pictures in real time?!? So, here it goes.
Each of my examples were shot in RAW and first brought into the Canon Digital Professional Editing tool. There I could more accurately adjust the white balance and any other lighting/color tweaks. I’m sure I could do the same in Photoshop, but it’s what has worked for me over the years. Why fix what isn’t broke, right? I then brought all images into Photoshop to crop, make a few more minor color adjustments and apply copyright information.
Up first is one our many hydrangea shrubs. They are covered with buds this year and I’m excited to see their blooms come in. The top photo is my before shot to me it was just a little too much on the yellow green side.
In the Digital Professional editing tool, I warmed up the white balance with the temperature control and then I moved up the contrast slide a few notches and voila! The leaves are a much richer, deeper green with better definition of the veins on the leaves. Once I pulled it into Photoshop, I cropped it in to bring more focus to the cluster of buds.
Next up was our Dogwood tree. It has really given us a wonderful show of blossoms this year. I was almost a little too late in taking photos. Thankfully, I managed to get a few shots in before the next round of wind and rain blew more off the tree.
Here’s my first shot. I was using my macro lens to capture the detail of the flowers. Unfortunately, the sun was moving in and out of the clouds and I was having a hard time keeping my settings straight. Also, the wind caused a major battle in getting a sharp imagine. But, of all the images, this was the one which closely matched what I was envisioning.
In my after shot, I really like how the white balance temperature setting warmed up the darker tones of the petals and flowers. I was also able to brighten it up a little without blowing out the detail. Because I had done all the tweaking in the Digital Professional Editing tool, I only needed to crop it slightly once I brought it into Photoshop.
Last up in my garden tour is this rosebud. Once again, the sun and the wind were wreaking havoc on the shot (it’s a red rose, not a pink rose). Still using my macro lens, I wanted to get a better shot of one of the water droplets. That just didn’t work so I settled on a wider perspective of the various curves of the bloom.
Editing was a little challenging because to me the highlights were washing out the petals. But then I found an edit button “Linear” just under the “Contrast,” “Highlights,” and “Shadows” buttons. And just like that the entire image transformed into a beautiful red rosebud. Plus, the water droplet stands out!
But the highlight was still distracting to me. So, I went into the RGB tab and tweaked each individual color. Much better, but now it’s a little too dark.
One last little tweak and here’s the final image.
I hope you enjoyed my little tour of our garden and how I process my photos. It was nice to get outside and back behind the lens. Thank you, John for this week’s challenge.
Next week, Donna of Wind Kisses will host the challenge. You can also find more information here if you want to join the fun.
This week Anne has us focusing on “filling the frame.” Why? As Anne reminds us “when you fill the frame with your subject, you eliminate various background distractions. The viewer’s eyes have nowhere to wander. Their attention is where you want it.” She provides many wonderful examples of “filling the frame” so be sure to read her post here.
I use this technique many, many times in my photography. My archives are full of examples, and it was hard to pick a few, but here it goes.
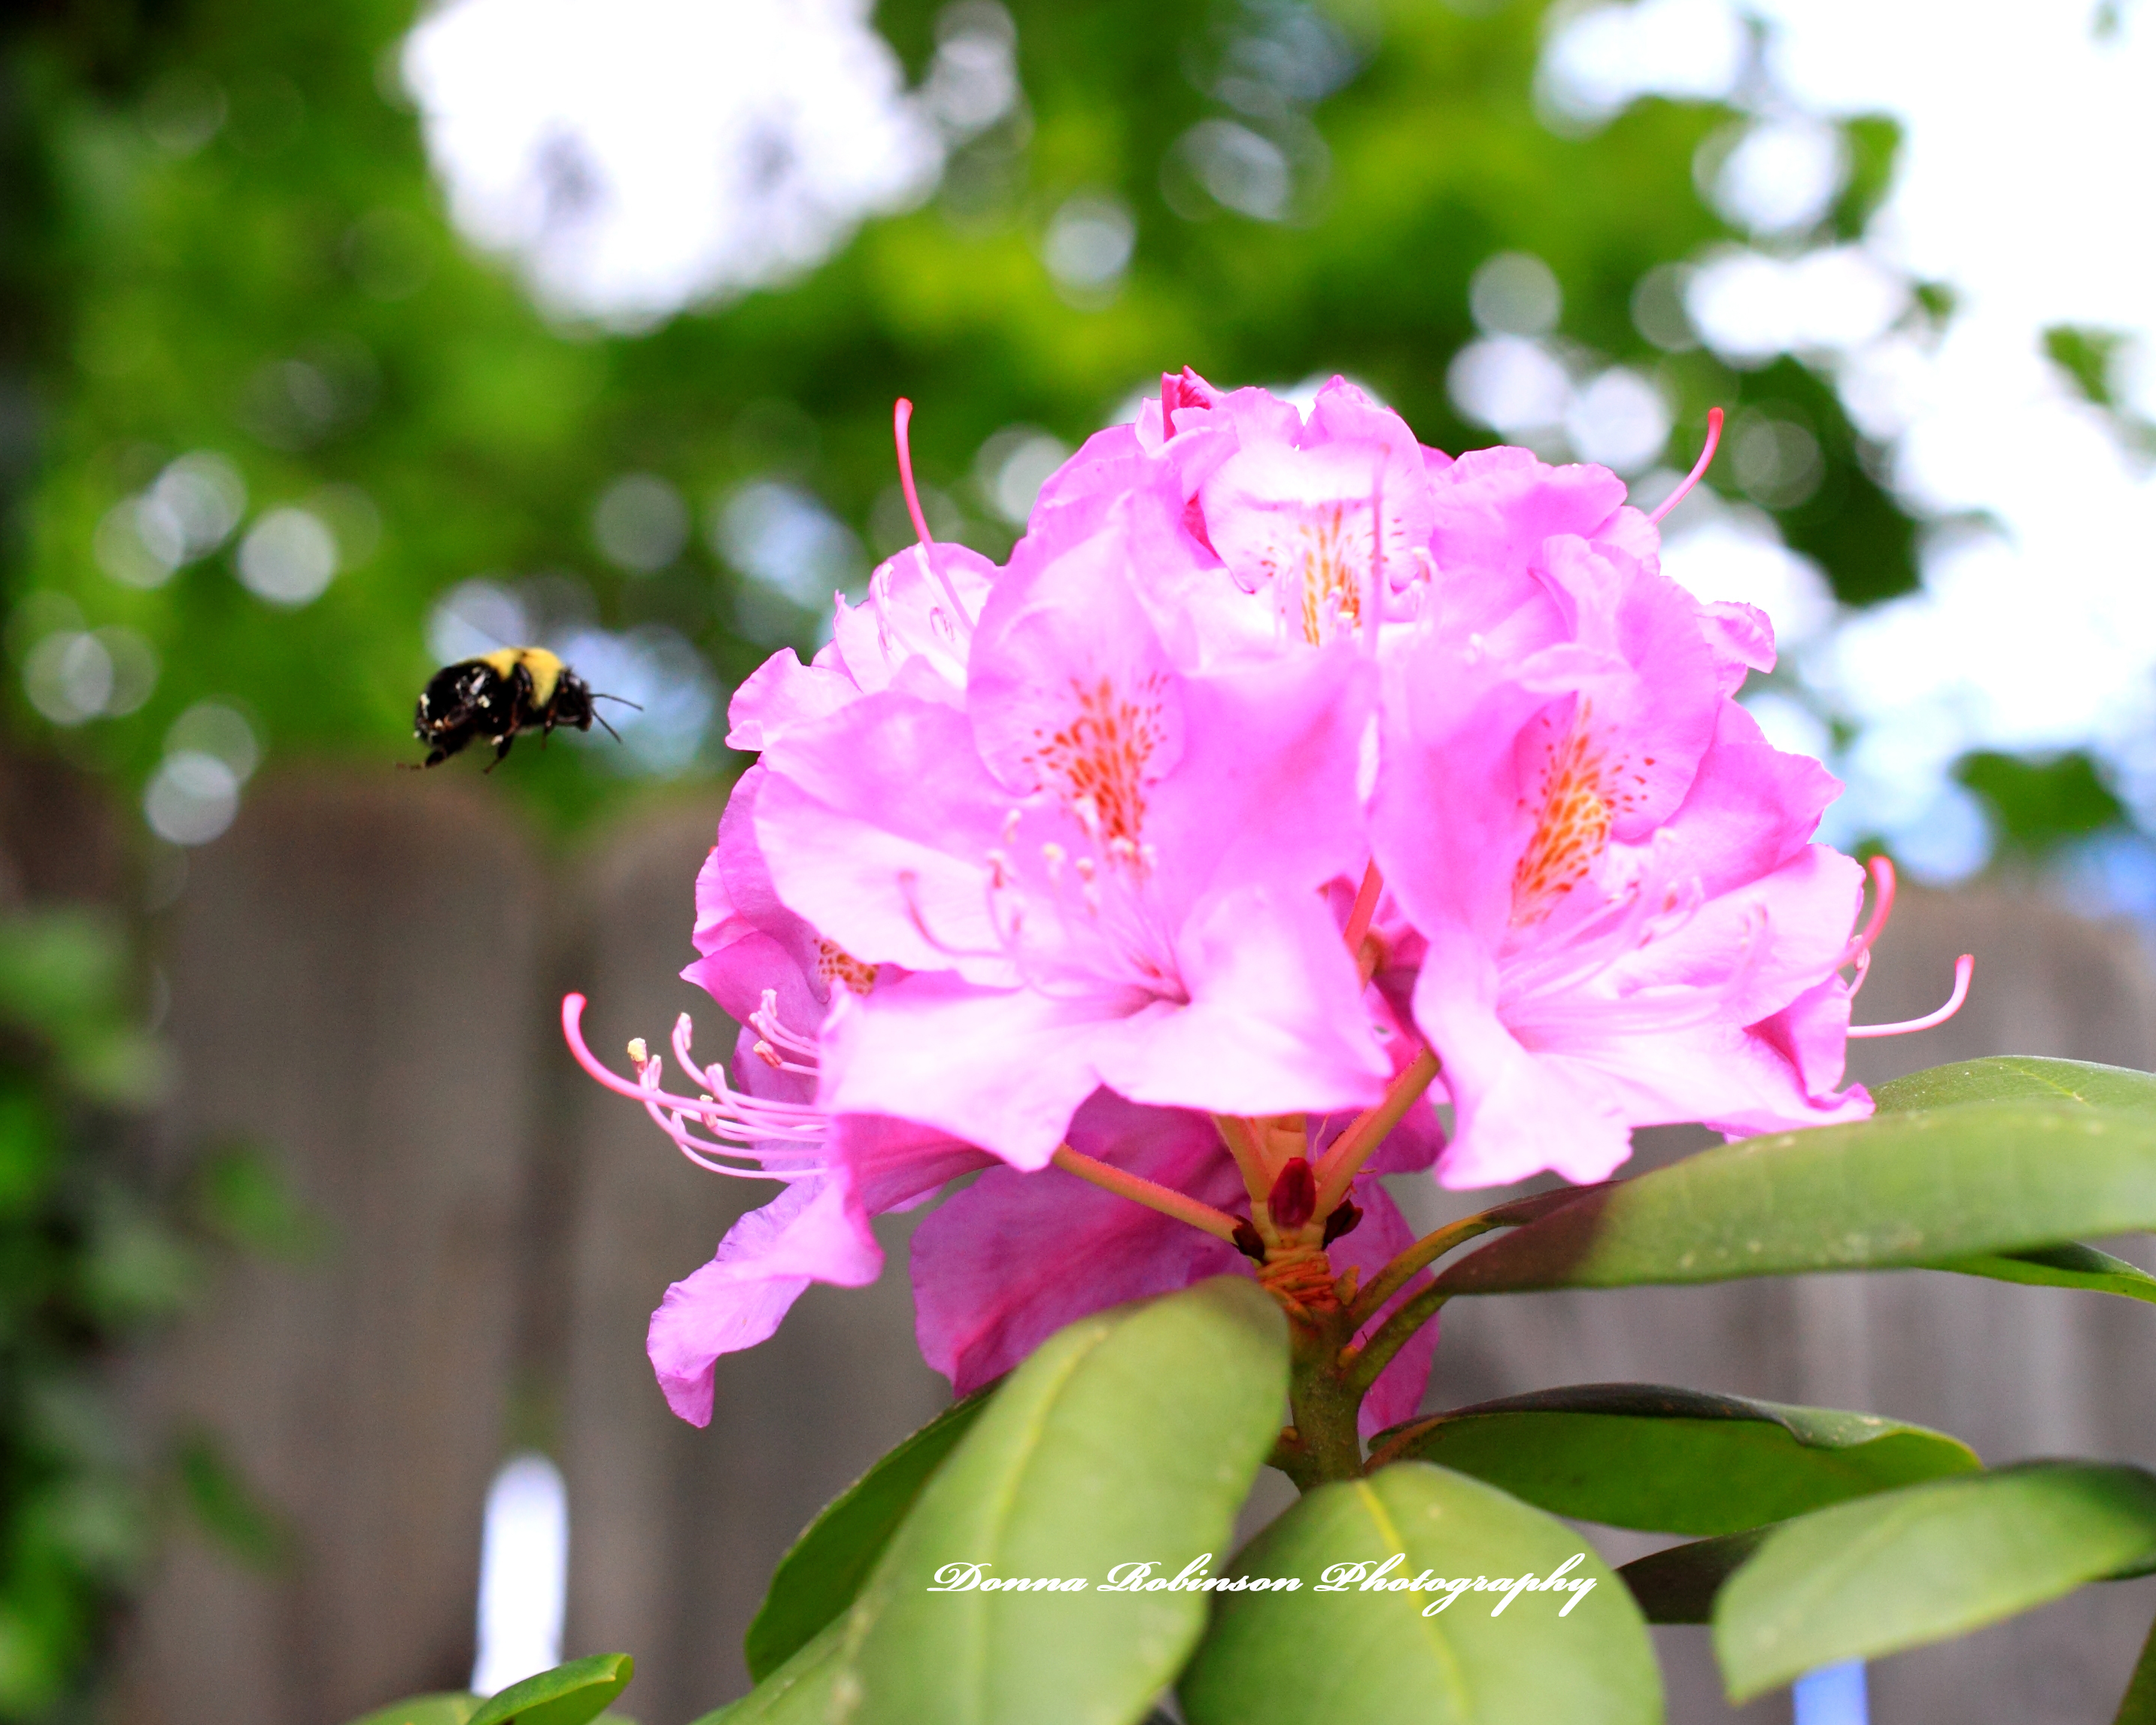
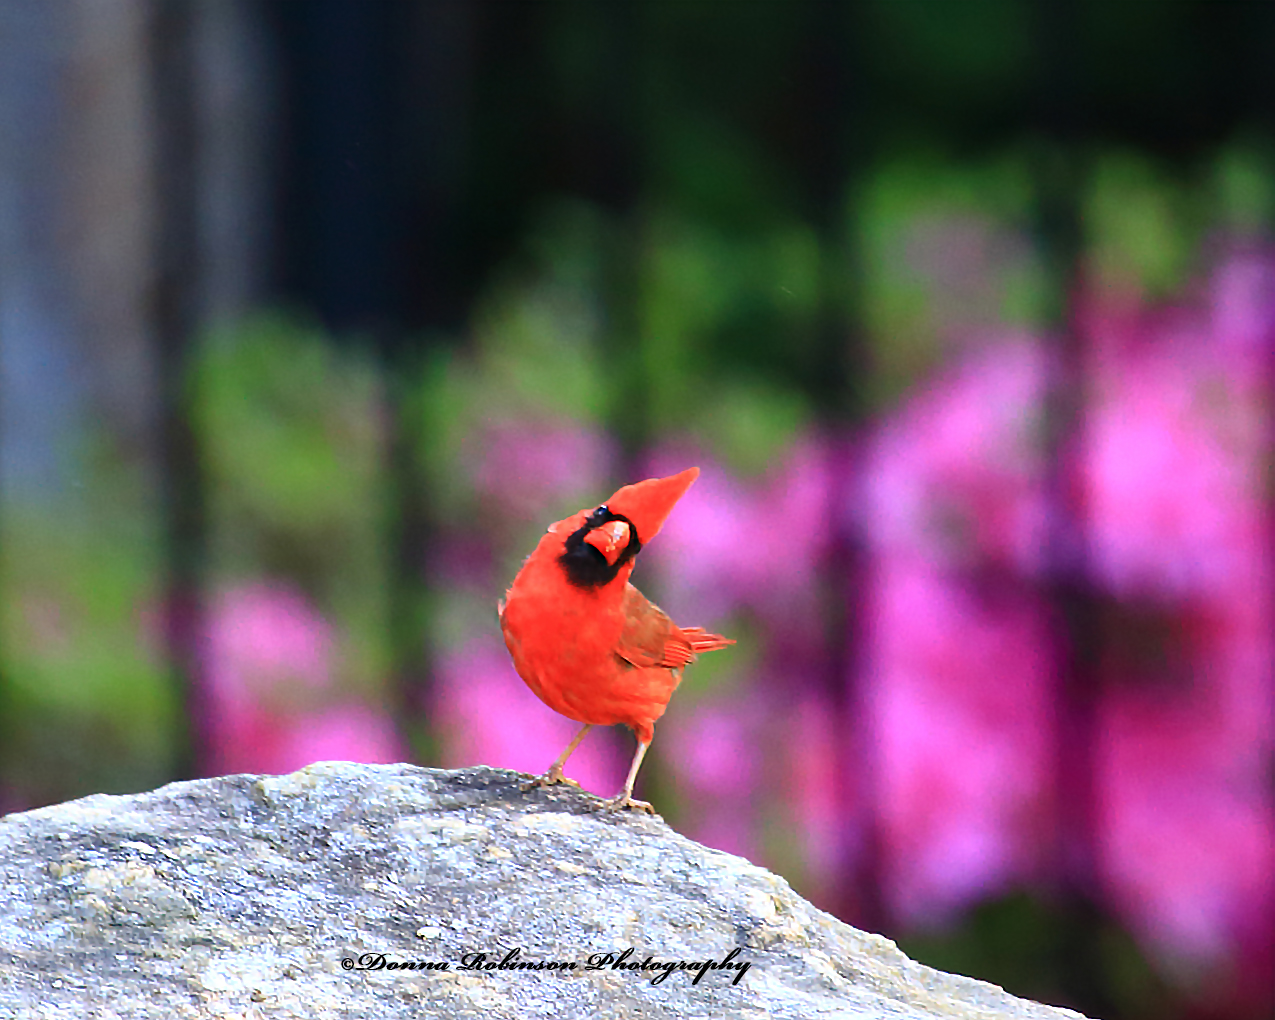
Oftentimes, I’m intentional with “filling the frame,” especially when it comes to wildlife and nature photography. In the photos below, I included portions of the background to better highlight the subject. This may go against the thought of removing distractions, but as Anne reminds us photography is subjective.
Bee Pollenating on Rododendron
“When you realize you want to spend the rest of your life with somebody, you want the rest of your life to start as soon as possible.” ~When Harry Met Sally
Filling the frame can also come in handy when shooting weddings. It’s a perfect way to capture the little details from the day.
In this photo, I purposely pulled together the elements in order to capture the memory of the invitation, shoes, earrings and bouquet. The invitation may get tucked away in a scrapbook, her shoes will probably never be worn again, and the flowers will fade away, but the photo gives her one single lasting memory of all that went into planning her wedding.
When I photograph weddings or other portraits I will start with the full subject and crop the images in editing to fill the frame with the appropriate details. I’m always looking for the “picture within the picture.”
Take the photo on the left I love the sweet moment of the groom taking the bride’s hand as she overlooks the Blue Ridge Mountain Range. But what was even more special was when I cropped in on their hands. You capture the feeling of the groom’s strong hand delicately holding his bride’s hand.
The next photo was a special prayer moment between the bride and bridesmaids. I was blessed to be able to photograph my niece’s wedding and just before the ceremony began, she and her bridesmaids circled up for a prayer. It was a sweet moment, and I couldn’t resist taking a photo of them all holding hands.
In this example, there are two (2) “pictures in a picture.” In one photo, I cropped her wedding dress. Don’t you just love the detail of the delicate applique and the laced up back with satin bow? It’s something the viewer would have noticed if I hadn’t cropped the photo.
In the other photo, I cropped in on the bride’s right hand holding her matron of honor’s hand. Her matron of honor was her sister. Can’t you just “feel” the love and pride the bride’s sister has for her?
“Why am I using a new putter? Because the old one didn’t float so well.”
~Craig Stadler, Professional Golfer
I’ll end with one last example of “filling the frame” from my days of shooting golf tournaments. This was a fun one of all the golf carts lined up waiting for the tournament to start. Fore!!!!!
Thank you, Anne for inviting us to explore “filling the frame.” It was and fun and interesting way of exploring how I use this technique with my photos.
Be sure to join us next week when James of Jazzibee will guest host and present our next challenge. Be sure to look for his post.
If you would like to participate weekly in our Lens-Artists Challenge, click here for more info.
Well, it’s been quite a while since I’ve joined a Lens Artist Challenge. It’s not because of a lack of trying as I have three (3) posts still sitting in draft form. Call it a creative drought or, whatever. Maybe they’ll eventually come out of draft form. So, if you’re reading today’s post, then yay me….the drought may be over! 😊
Back to this week’s challenge where Ritva invites us to share whatever is inspirational about our kitchen. You can read up on her challenge here.
Fortunately, I’ve dabbled a little (for fun) with food photography and even wrote a few posts, too. So, this was a good challenge to hit the re-start button with.
First up, if you’re familiar with Southern Cooking, you’ll recognize the cast iron pan with its golden, sizzling fried chicken. Cooking fried chicken is my husband’s specialty. It’s a skill that doesn’t come easy (that’s why he makes it and not me) but somehow through osmosis, he learned how to make the best fried chicken from watching his mother. You can read all about his fried chicken in my post, Peggy’s Fried Chicken.
Next up, our good friends are Foodies through and through. There isn’t anything they won’t try and fortunate for us, we’re usually the guinea pigs for new dishes. I featured the dish below “Cuban Chicken” in a blog a few years back.
Oh, and then there was that time they made “Paella in a pan.”
The place setting below holds a special childhood memory. “Desert Rose” was the everyday pattern my parents used when we were children. No one seems to remember what happened to the original dishes, but one year my sister found a set on-line and ordered them. We decided to use the set for our Thanksgiving dinner that year. It was a very special day because it marked the 40th anniversary of our mother’s passing. You can read more about the dishes and the special memories in “Giving Thanks over Desert Rose”.
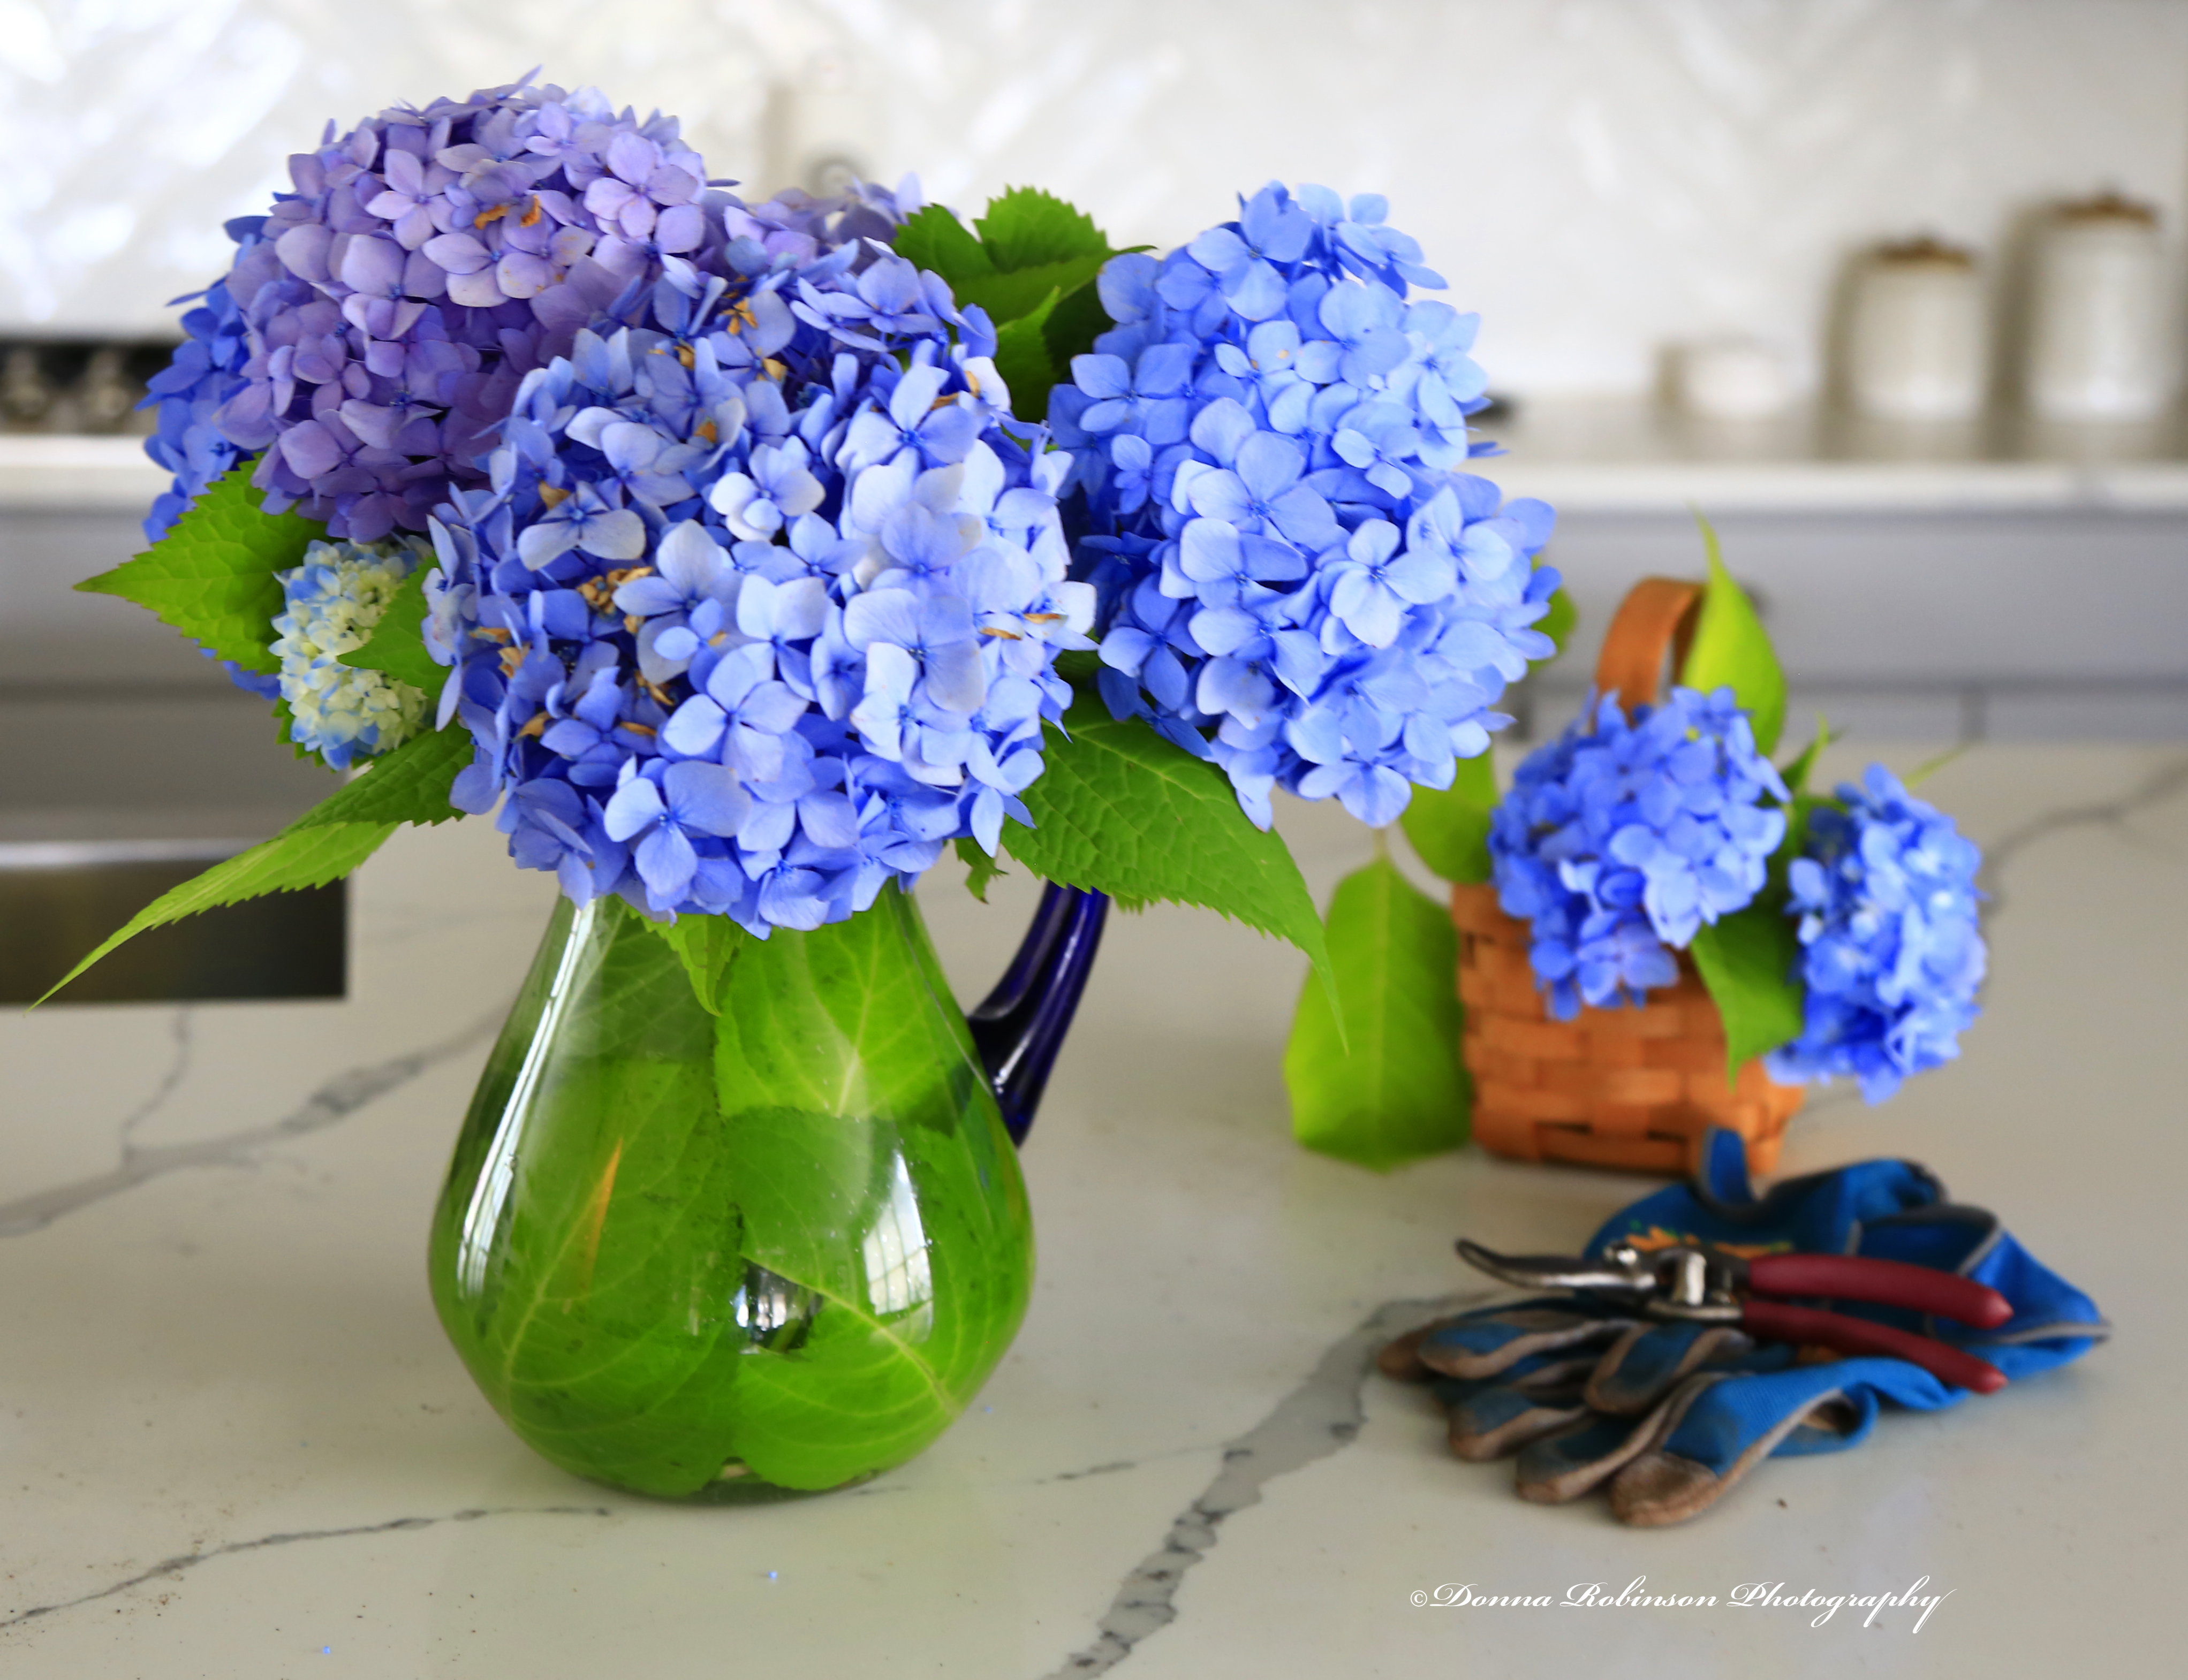
One summer a few years back our hydrangeas were in full bloom. I mean, we had A LOT of blooms! So, I decided to repurpose a kitchen pitcher into a flower vase. I took it a little further and decided to stage a few other elements into the photo.
In this week’s challenge Ritva also asks us to share our favorite cup. I don’t really have a “favorite” cup, so I thought I would take a photo of the cup/saucer setting from my parent’s china pattern. It doesn’t get used very often anymore (well, never), so I thought I would give it a chance to be seen. 😉
Thank you, Ritva for inviting us to find inspiration in the kitchen. What a fun opportunity for me to take a trip down memory lane and revisit some fun posts and photos.
Be sure to join us next week when Philo of Philosophy Through Photography invites us to post our thoughts and images of simplicity photography.
“The future belongs to those who believe in the beauty of their dreams.”
~Elenor Roosevelt
I’ve been a little busy, lately with a couple of portrait sessions and I haven’t had the chance to join in on any of the recent Lens Artist Challenges. But this week, Patti challenges us to explore what professional photographers call “working the shot” (you can read more about her challenge, here). And since you’re always “working the shot” with portrait photography, I thought I would share with you some images from a recent High School Senior Session.
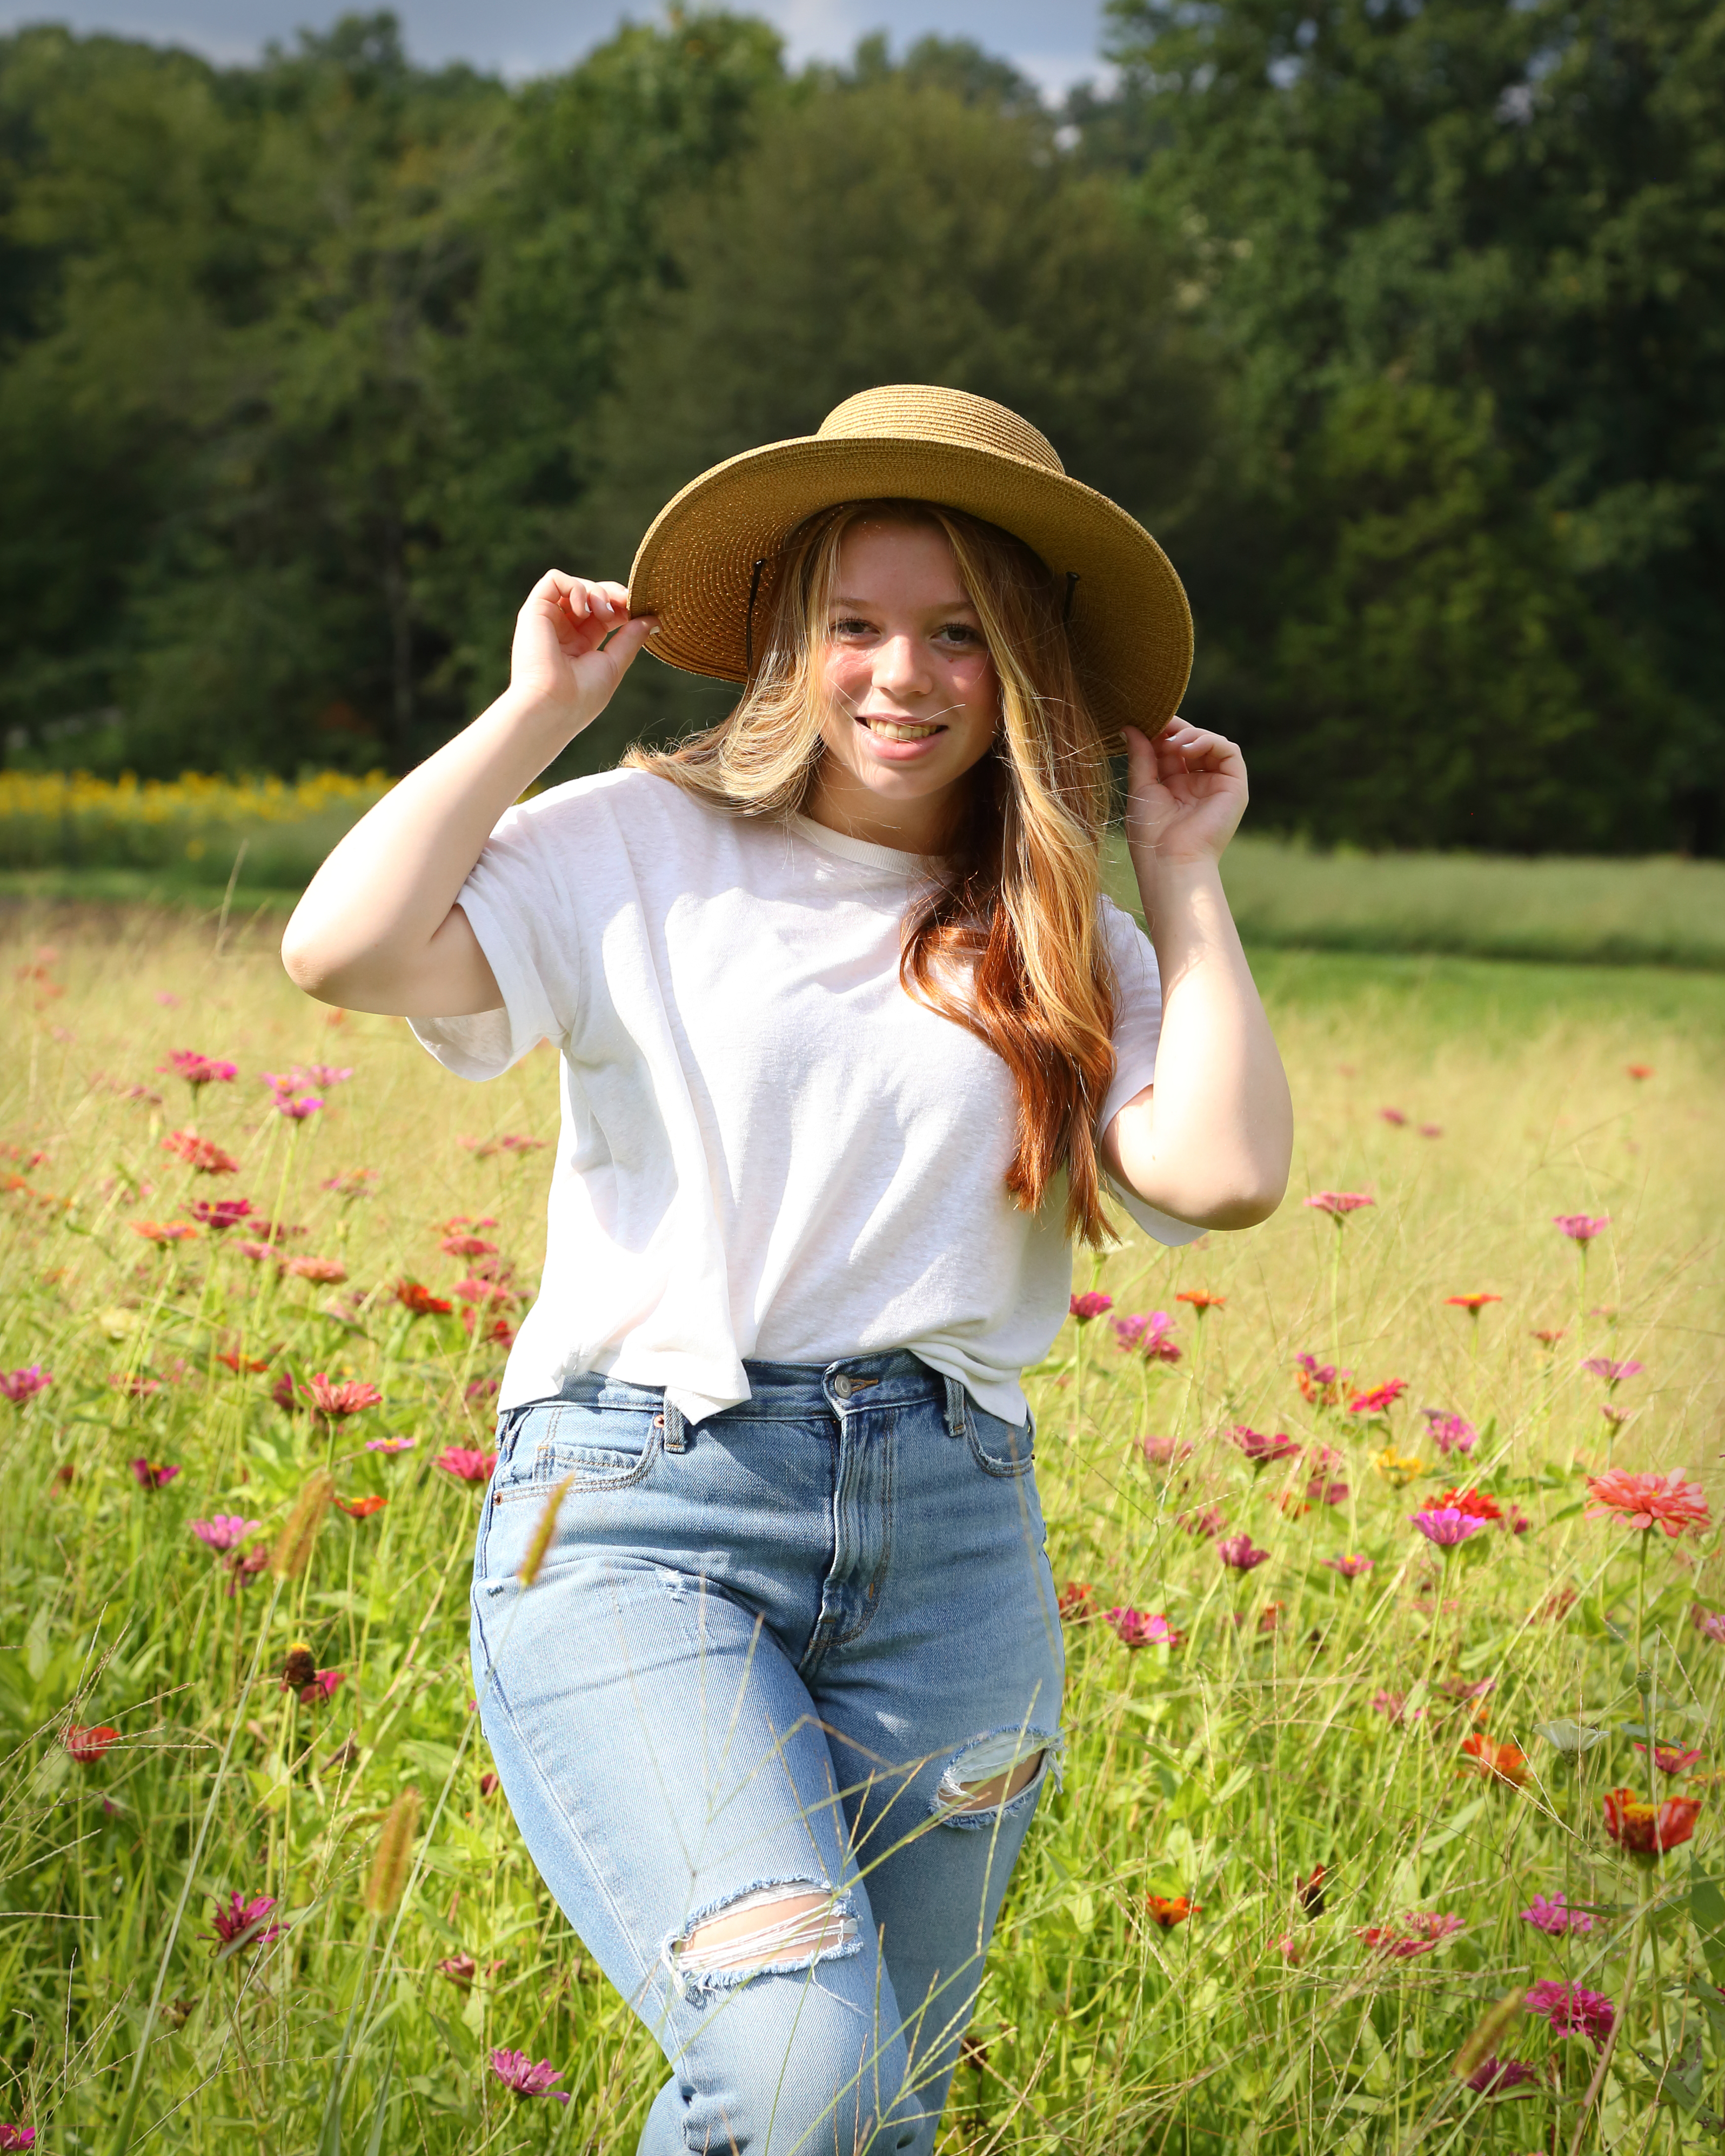
Just outside of Atlanta there is a beautiful family farm called Prospect Farms. It’s truly a photographer’s paradise with several locations to shoot photos. We were scheduled to shoot in their Zenia fields, but because they had several openings that morning, we were able to wander around to some other locations on the property.
We started at 10a.m. and had one hour to shoot. Given what I thought was a short time frame I was a little nervous we wouldn’t be able get all the photos she wanted. But 600 images (yes, 600) later we ended up with more than we could have ever hoped for. Throw in a mix of sunshine and passing clouds it truly was the perfect day for a photo shoot!
“Be bold enough to use your voice, brave enough to listen to your heart and strong enough to live the life you’ve always imagined.”
~unknown
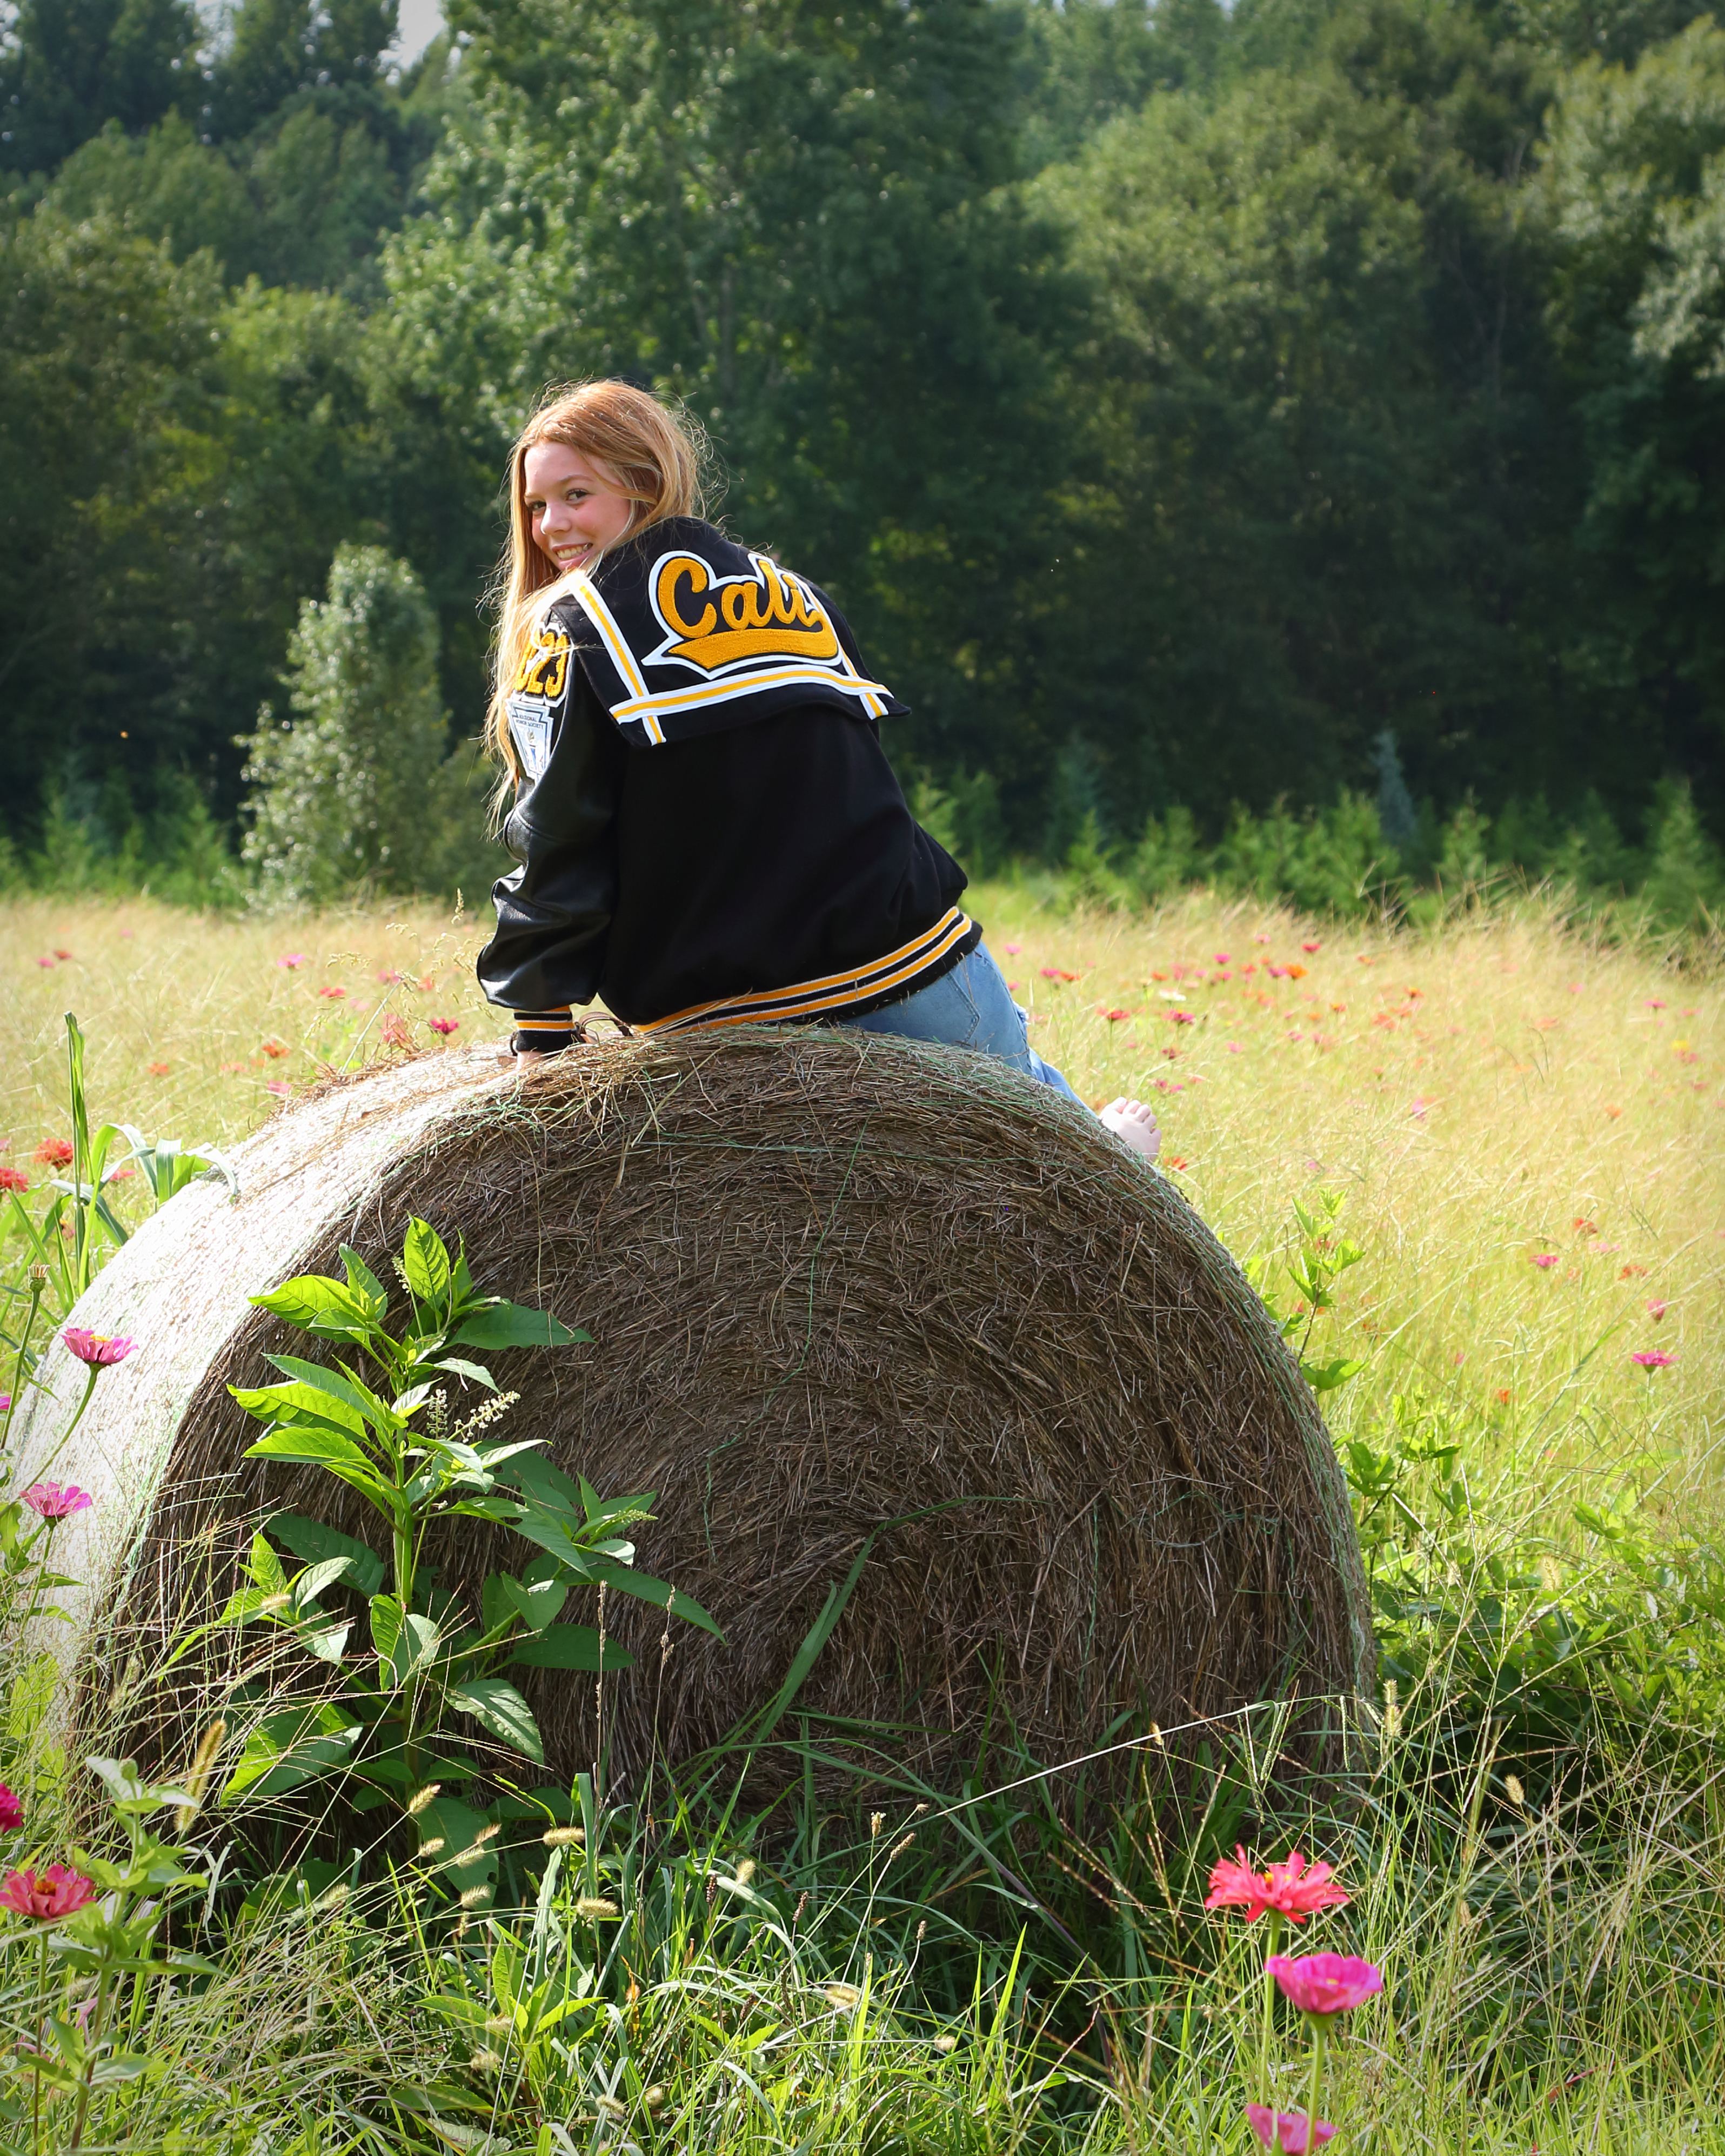
First up, the Zenia field. Cali was so prepared for this photo shoot, making my job easy! She really let her personality shine through that day.
“Take pride in how far you’ve come and have faith in how far you can go.”
~unknown
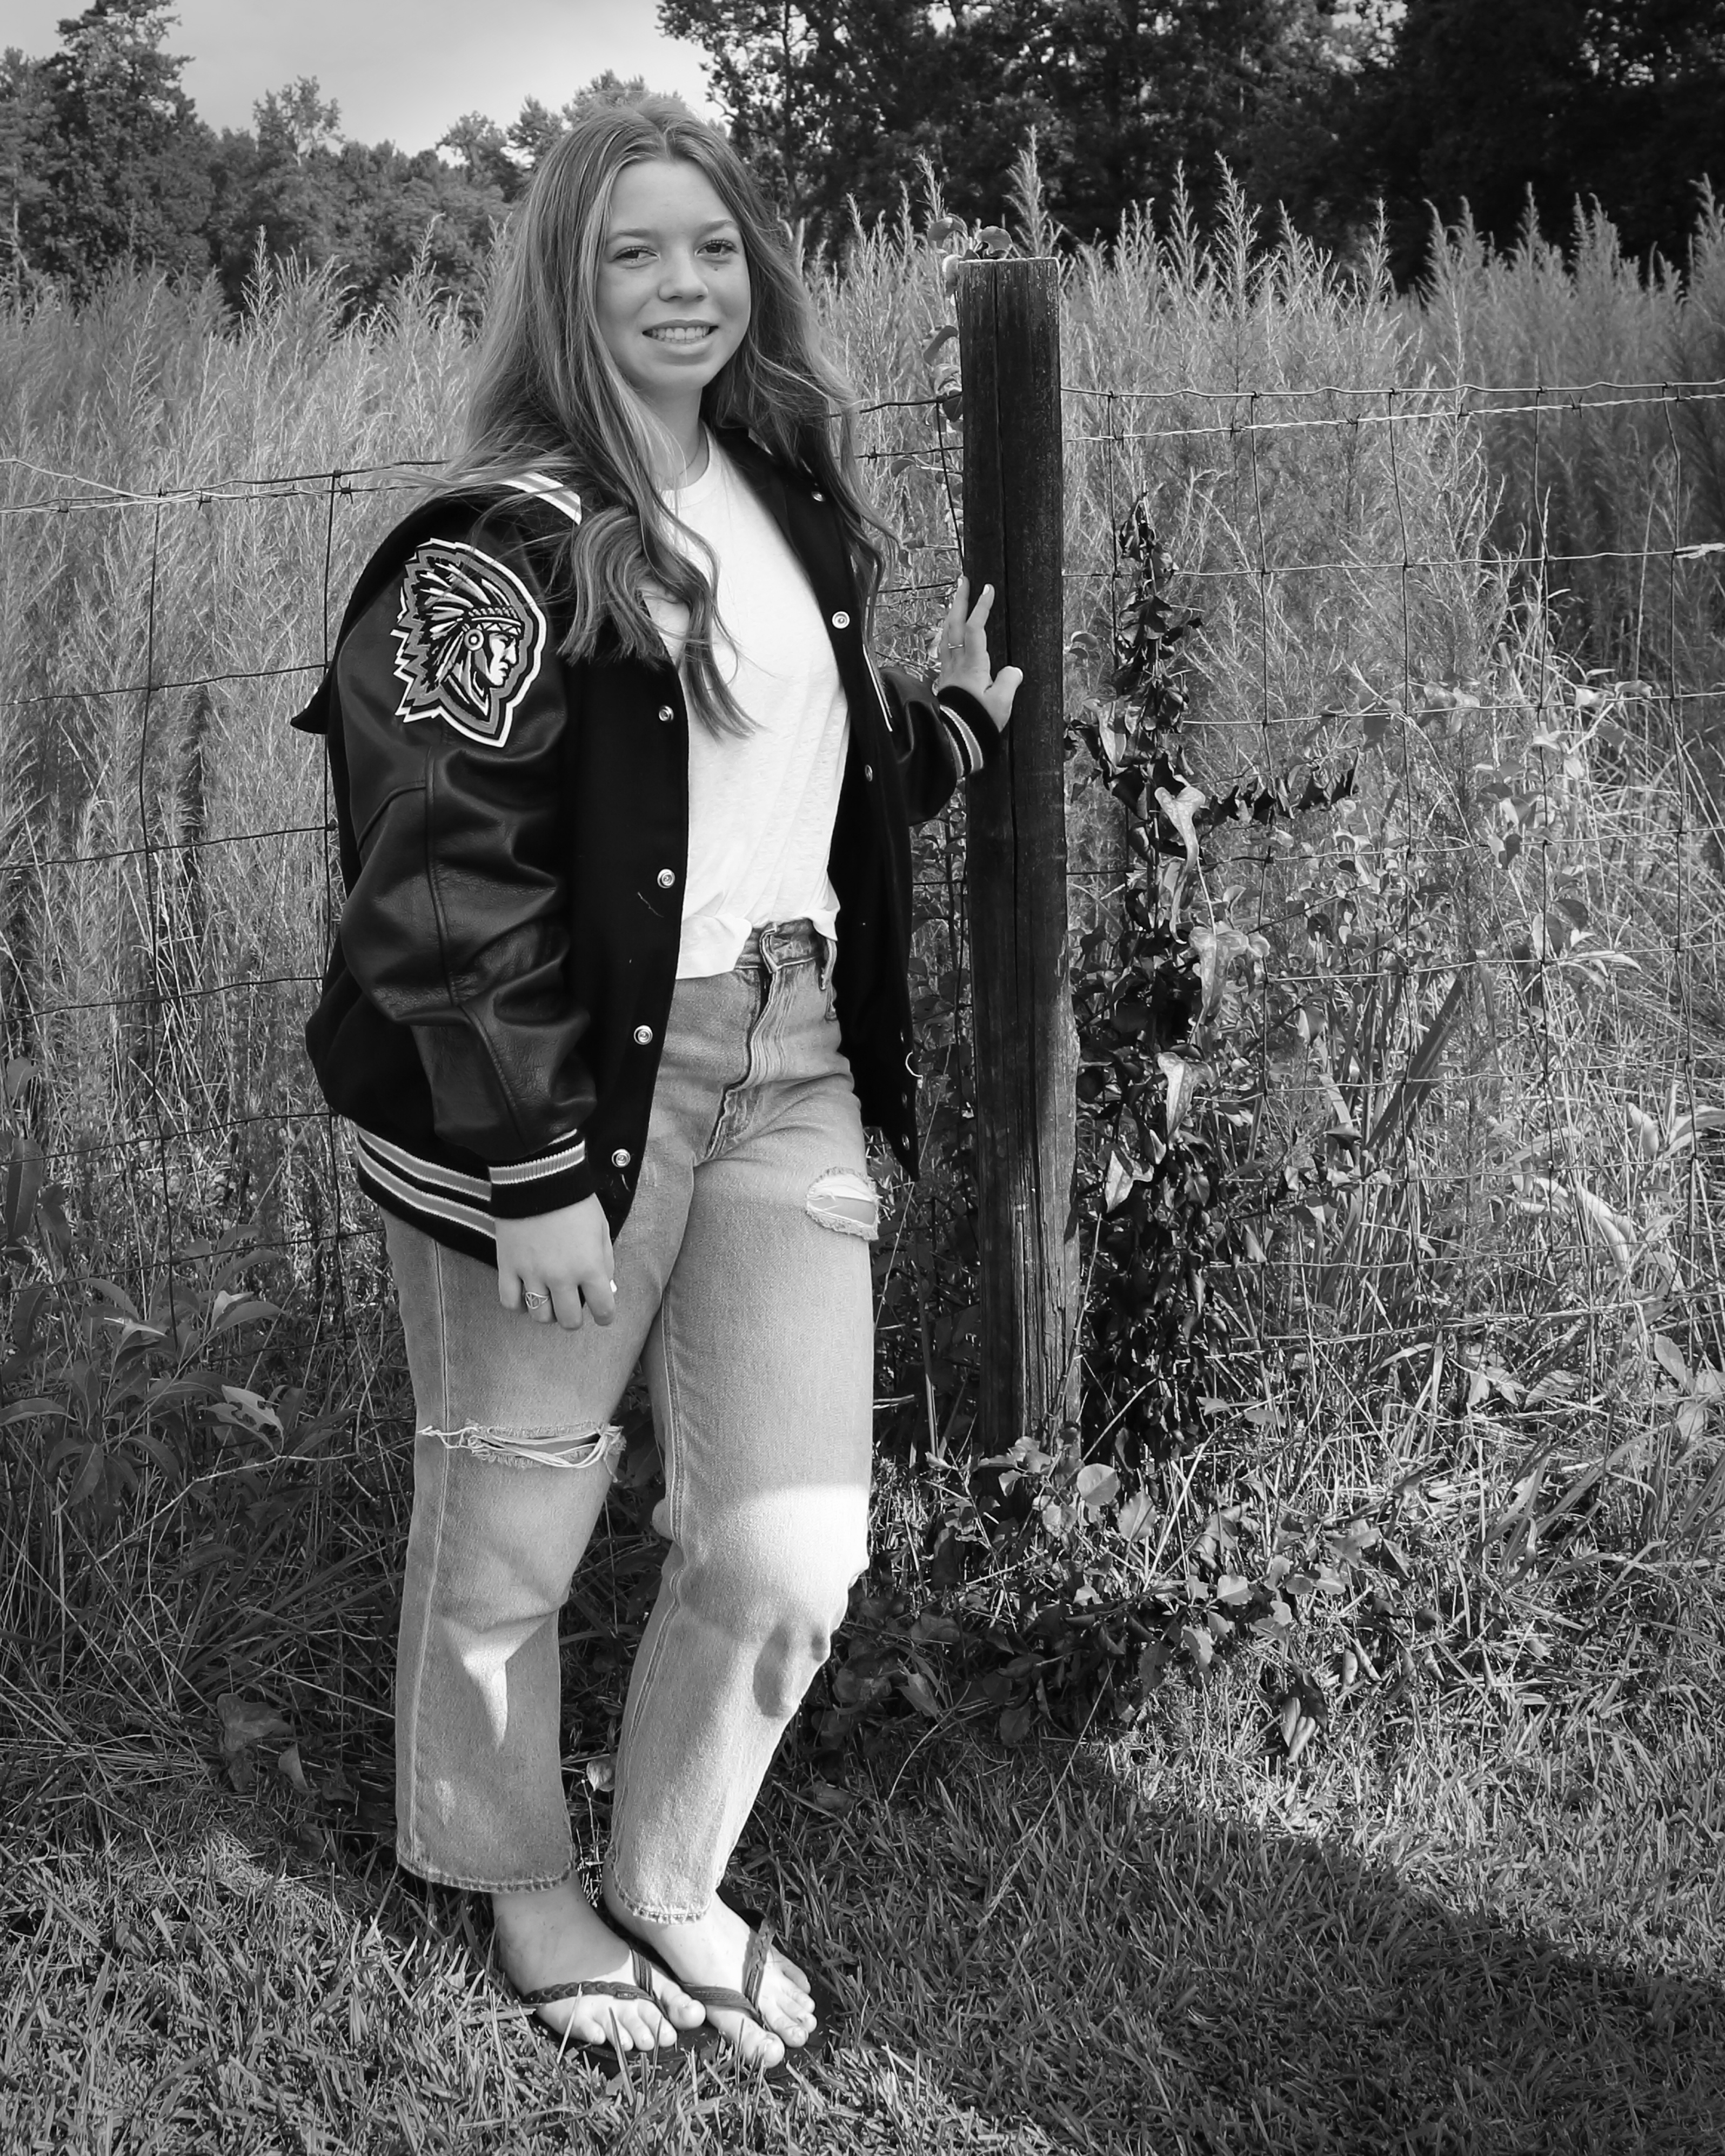
Next, the hayfield and fencepost. These were fun to shoot! There was so much texture, lighting and color to work with in both shooting and in final edits.
“Believe in yourself and you will be unstoppable.”
~unknown
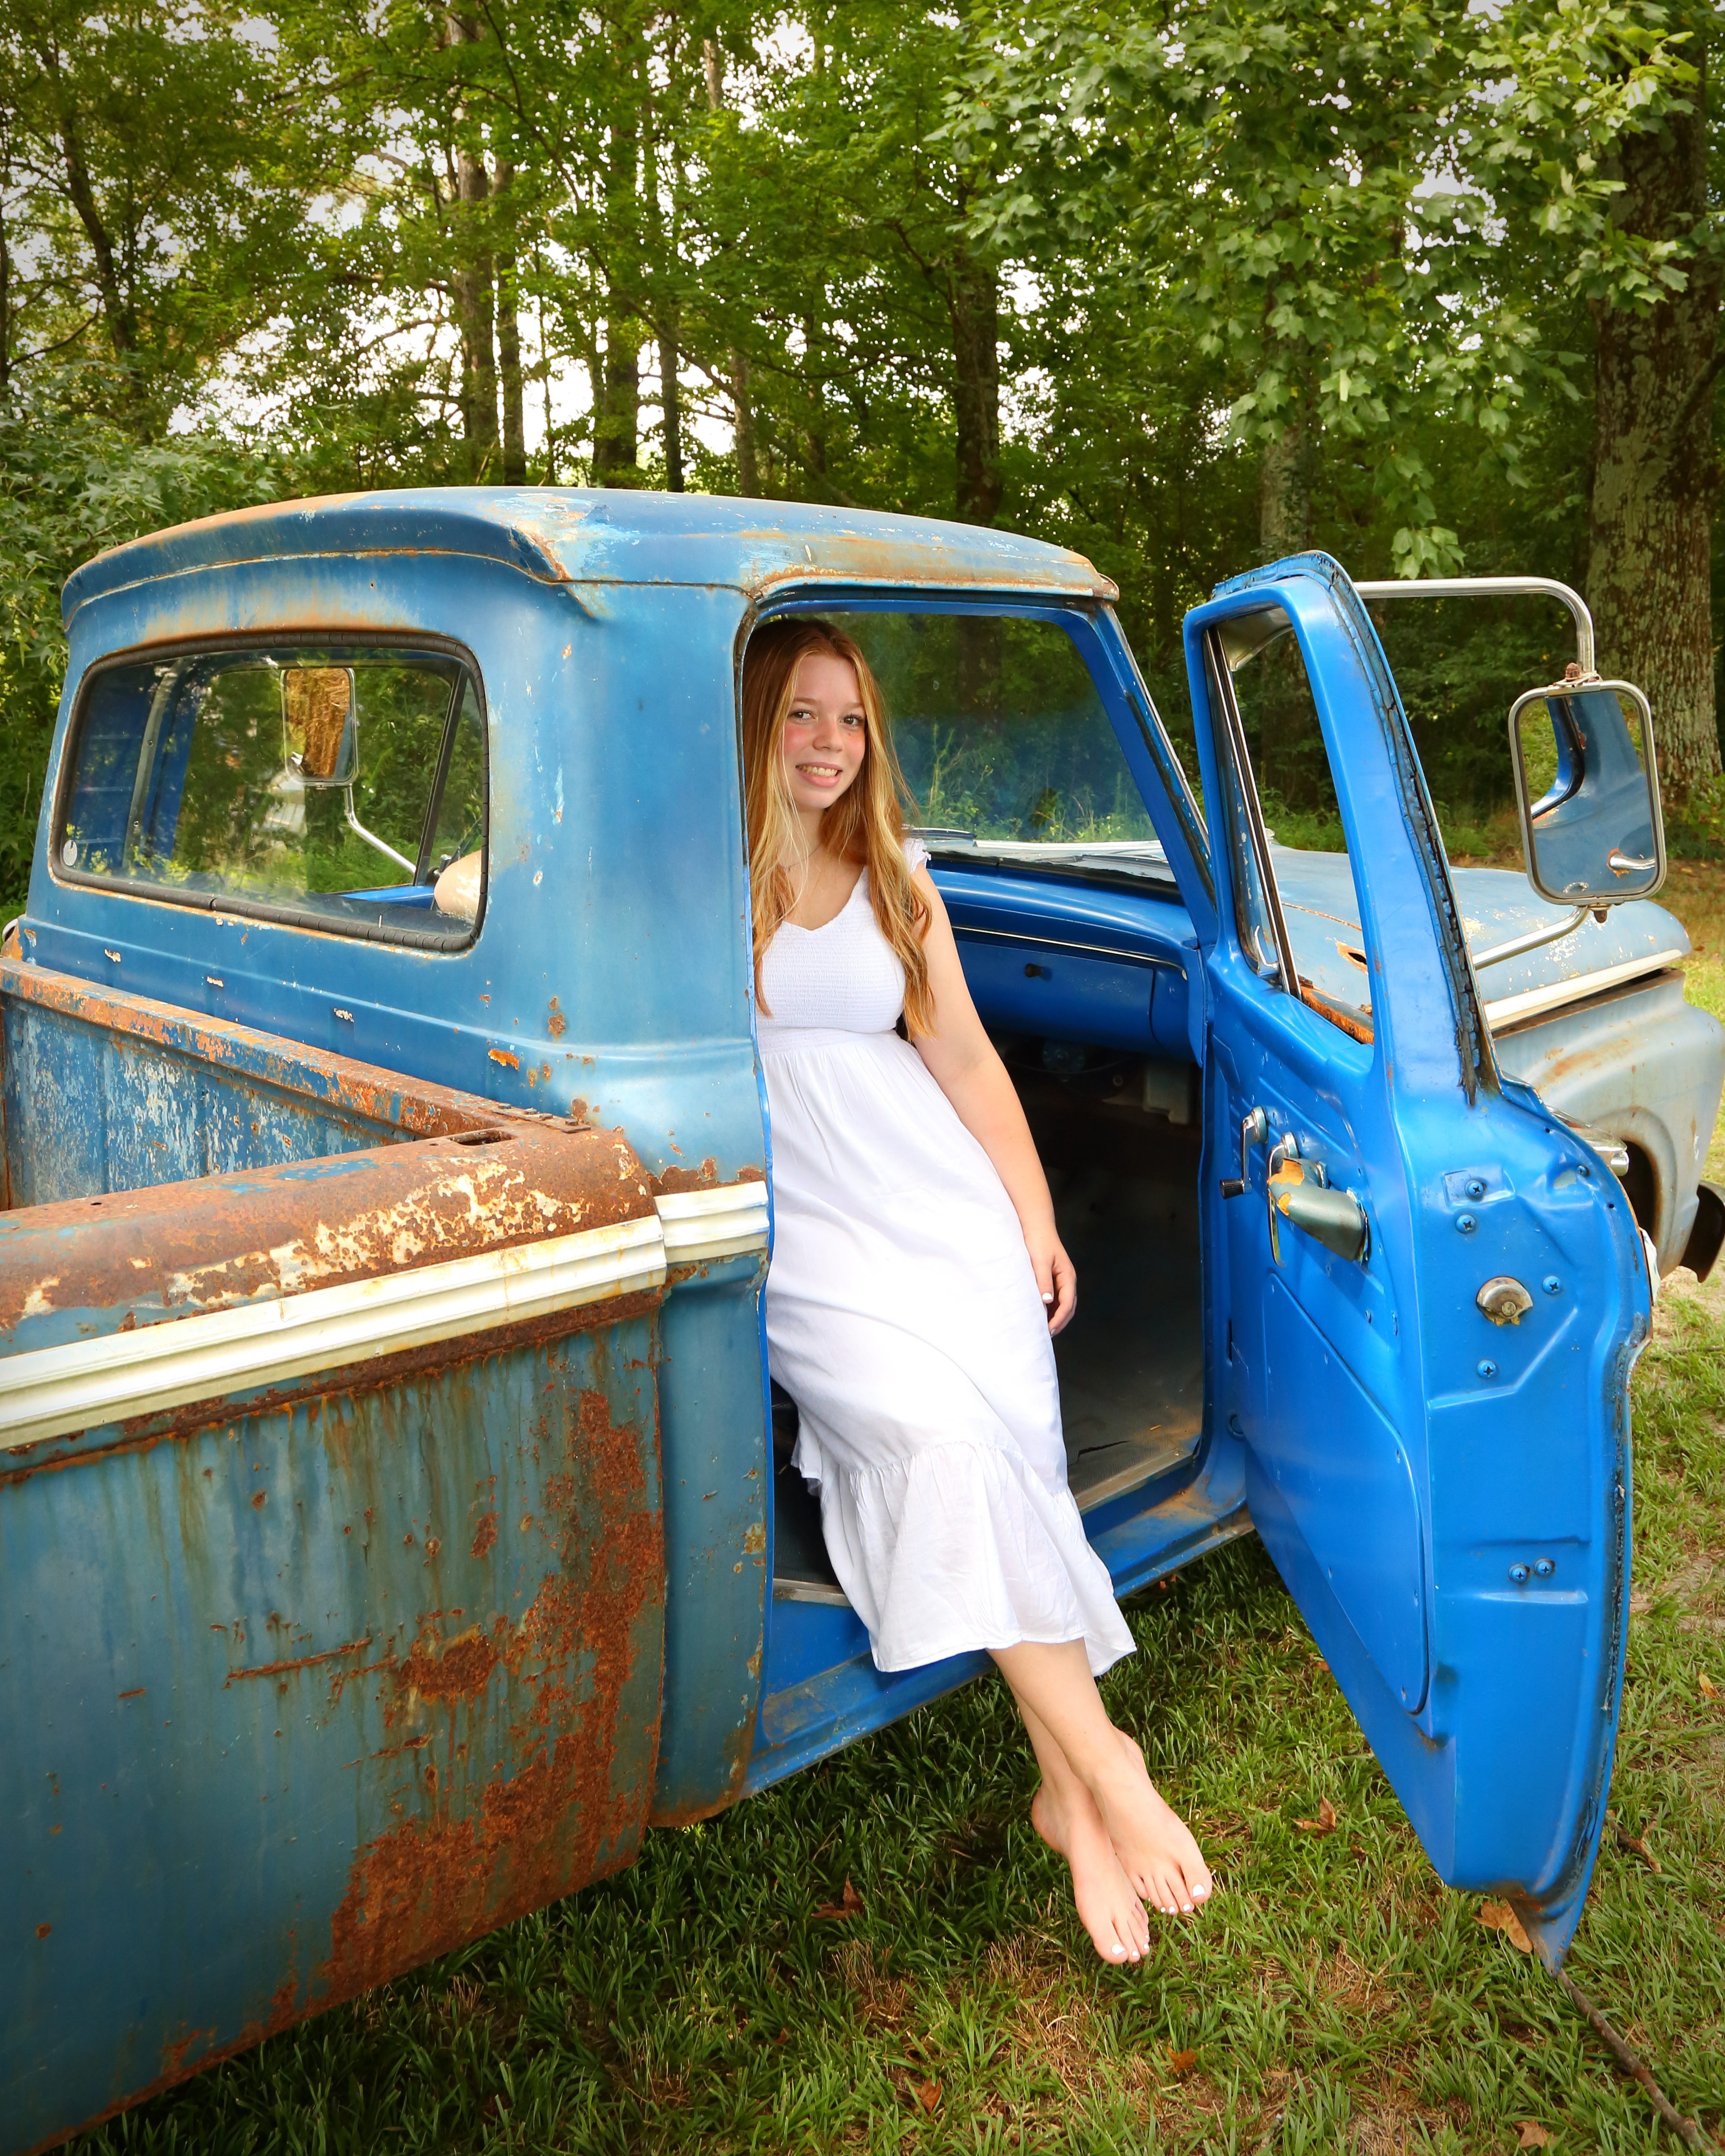
And my favorite location was this old, blue truck. What photographer can’t resist taking photos of an old, rusted out truck, right?!?!
There were a few other locations we shot, but since the challenge was “one subject three ways” my twist “was one subject in three locations.” You can view some of my other favorites from that day over on my gallery page
Thank you, Patti for this week’s challenge. I enjoyed sharing a glimpse into my other side of photography.
Next week Ann-Christine will host, so be sure to visit her site, Leya, to see what she has in store (weekly challenges post every Saturday at 12 noon EST).
“Life is a journey, not a destination….You are the artist, paint what you will.”
For our challenge this week, John fromJourneys with Johnbo encourages us to share images that focus on our journeys, possibly the modes of transportation which took us there. Or to even share images of places we discovered while on our journey.
I think my love for travel started when I was a child. I couldn’t tell you when exactly it started. But if I had to guess it was the trip, we took out west when I was about six (6) years old. It was so exciting because this was my first plane ride. And from what I remember we saw a LOT of the country – everything from The Hoover Dam to The Grand Canyon; San Diego to Disney Land, and lastly to San Franciso. I remember it being so much fun I cried (literally) when we had to come home.
“A photograph is a return ticket to moments already gone.”
Trip out west – Stop at the Grand Canyon Dad’s missing because he was the one taking all the photos (I’m the one in red pants).
Yes, I’ve been very fortunate throughout my life to travel to many places here in the U.S. and to other parts of the world. And I’ve pretty much been on all forms of transportation, too: planes, trains, automobiles, sailboats, cruise ships, helicopters and yes, even The Goodyear Blimp!
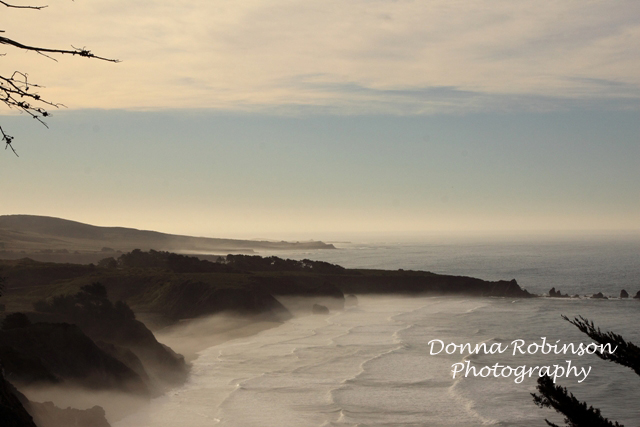
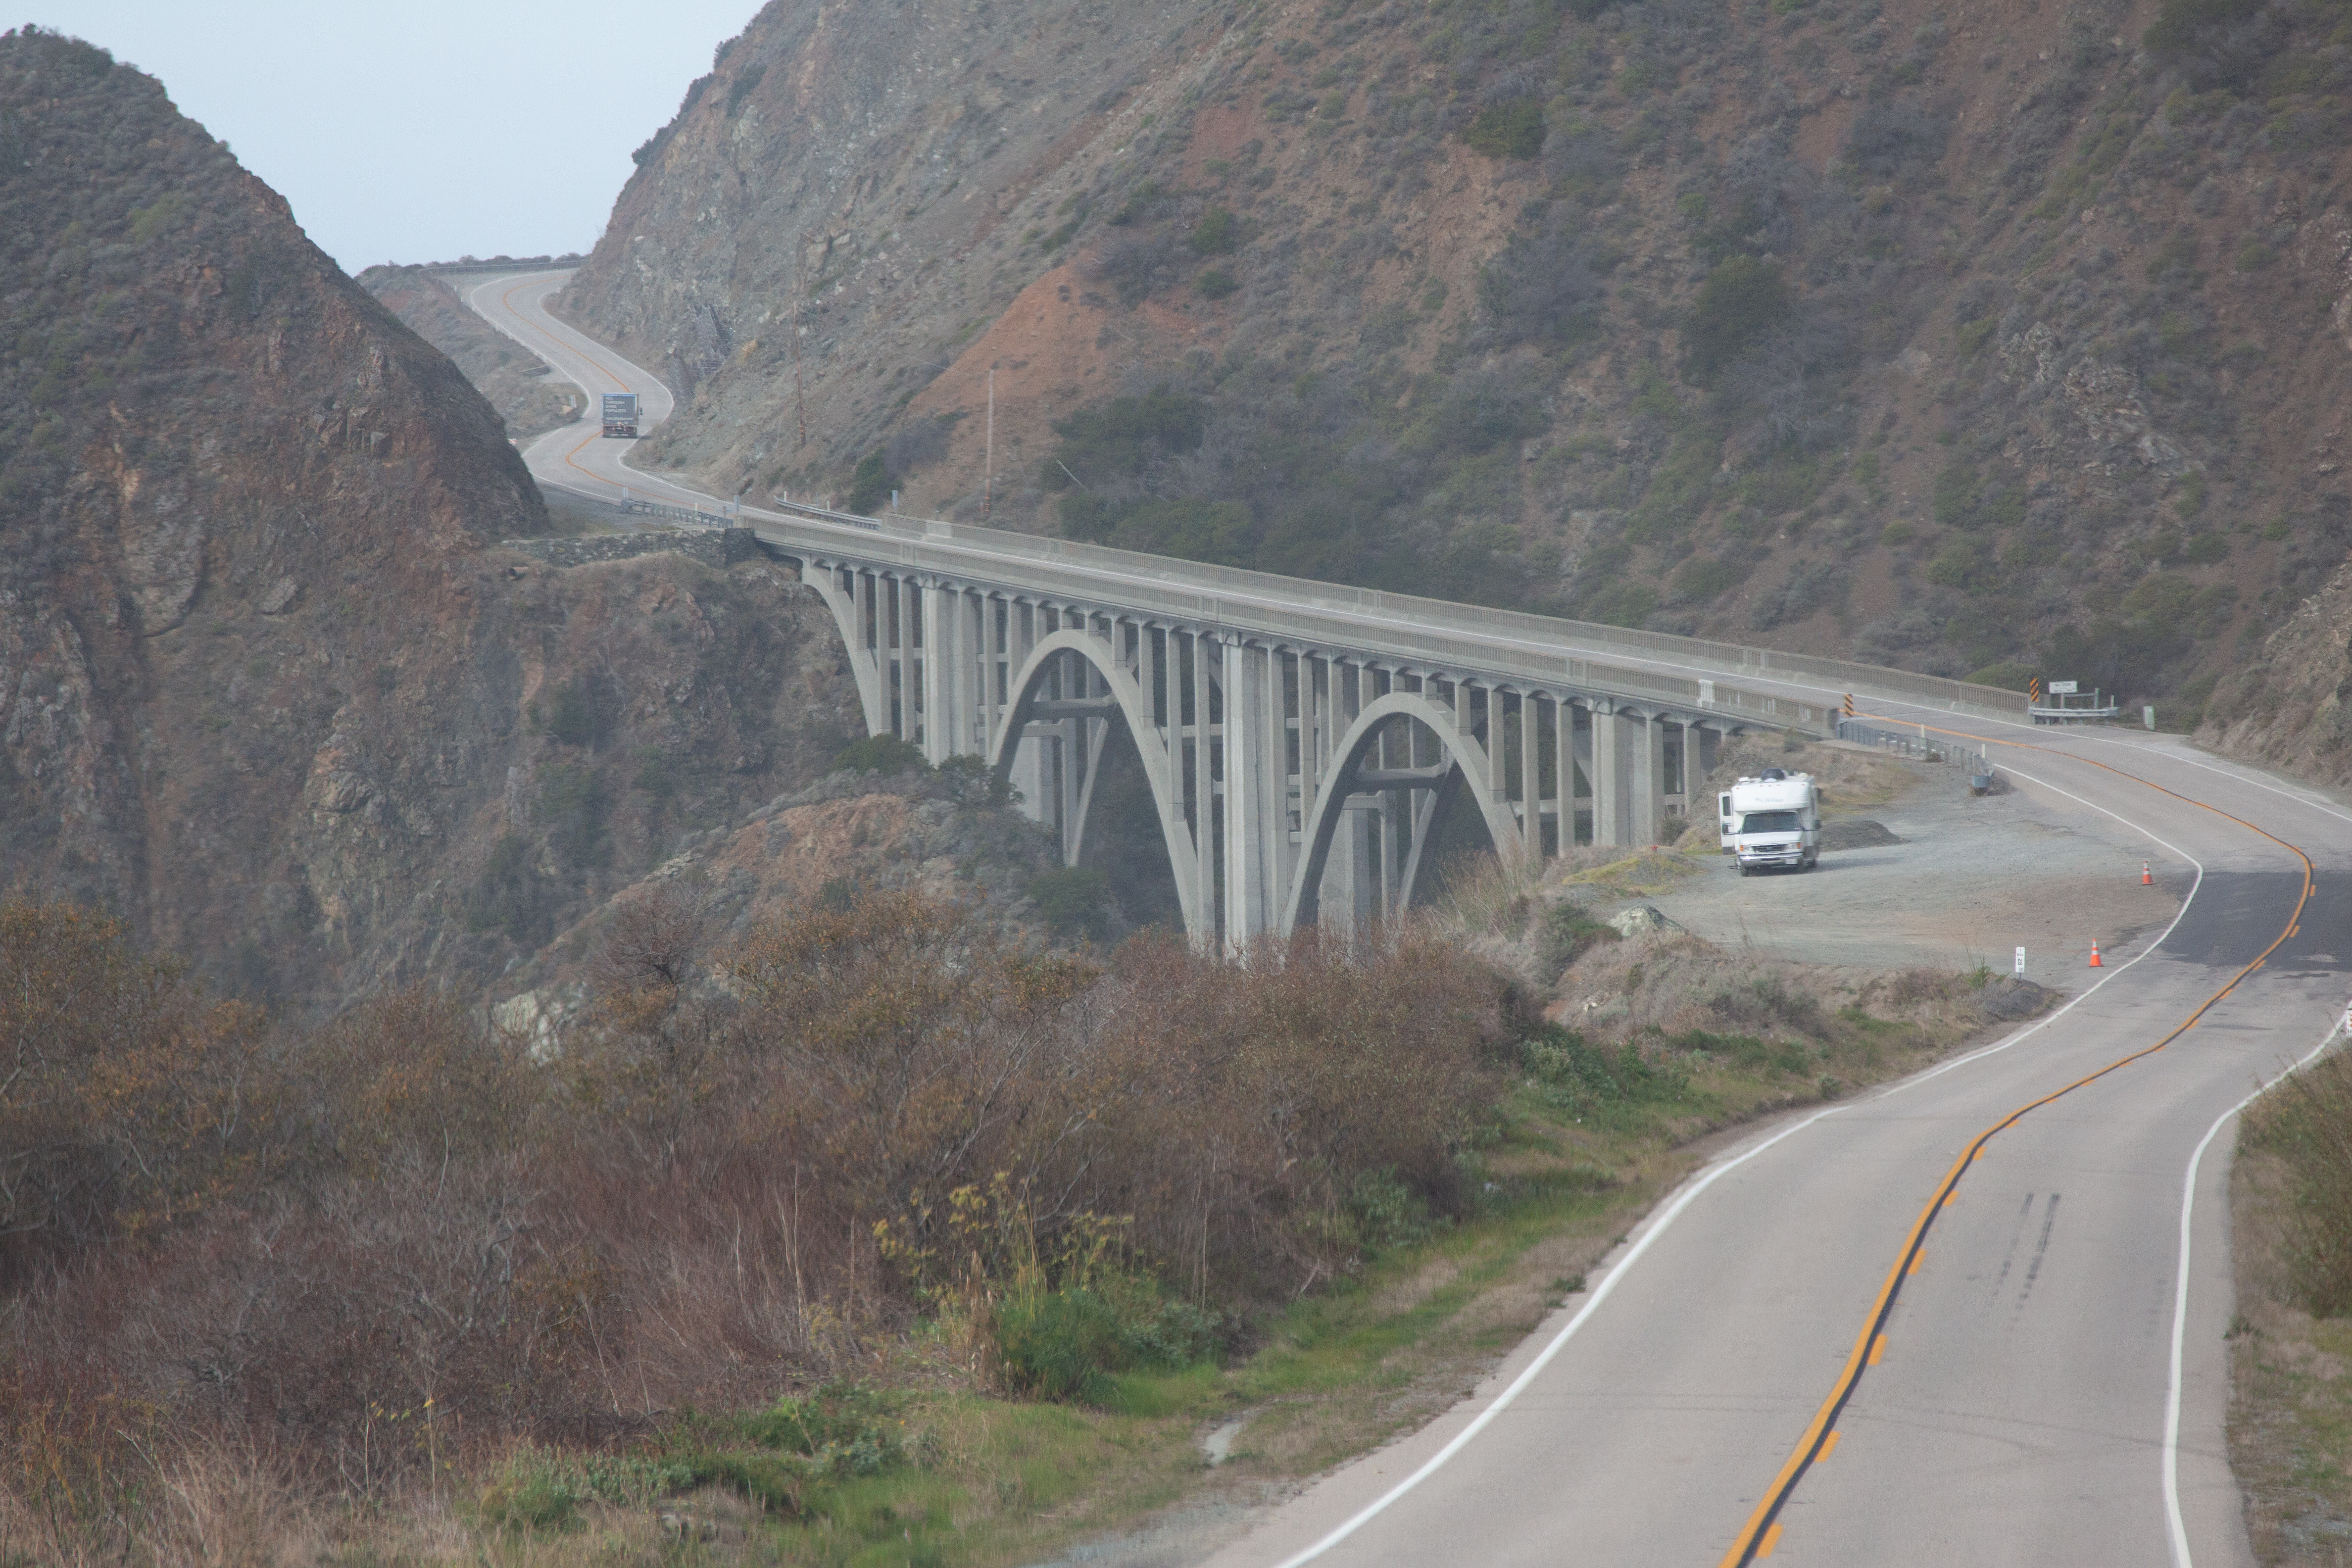
But one of my most memorable adventures was another trip out west which Michael and I took Christmas of 2011. We couldn’t decide where we wanted to go, so we narrowed it down to three (3) places. We wrote the names on pieces of paper, folded them up and dropped them into a bowl. I don’t remember which one of us drew the winner, but we landed on a road trip up the Pacific Coast Highway.
Our motto for the trip was “No map, no plans, no place to be.” It’s a line from Toby Keith’s song “South of You.” The only parts of the trip planned were our airline and rental car reservations. And so, on Christmas Day we headed to the airport and boarded a plane to San Diego, CA
Once we landed and picked up our sporty Mustang convertible for the trip, we headed to our first stop just outside of San Diego (Carlsbad, CA) for a quick visit with our nephew and his family.
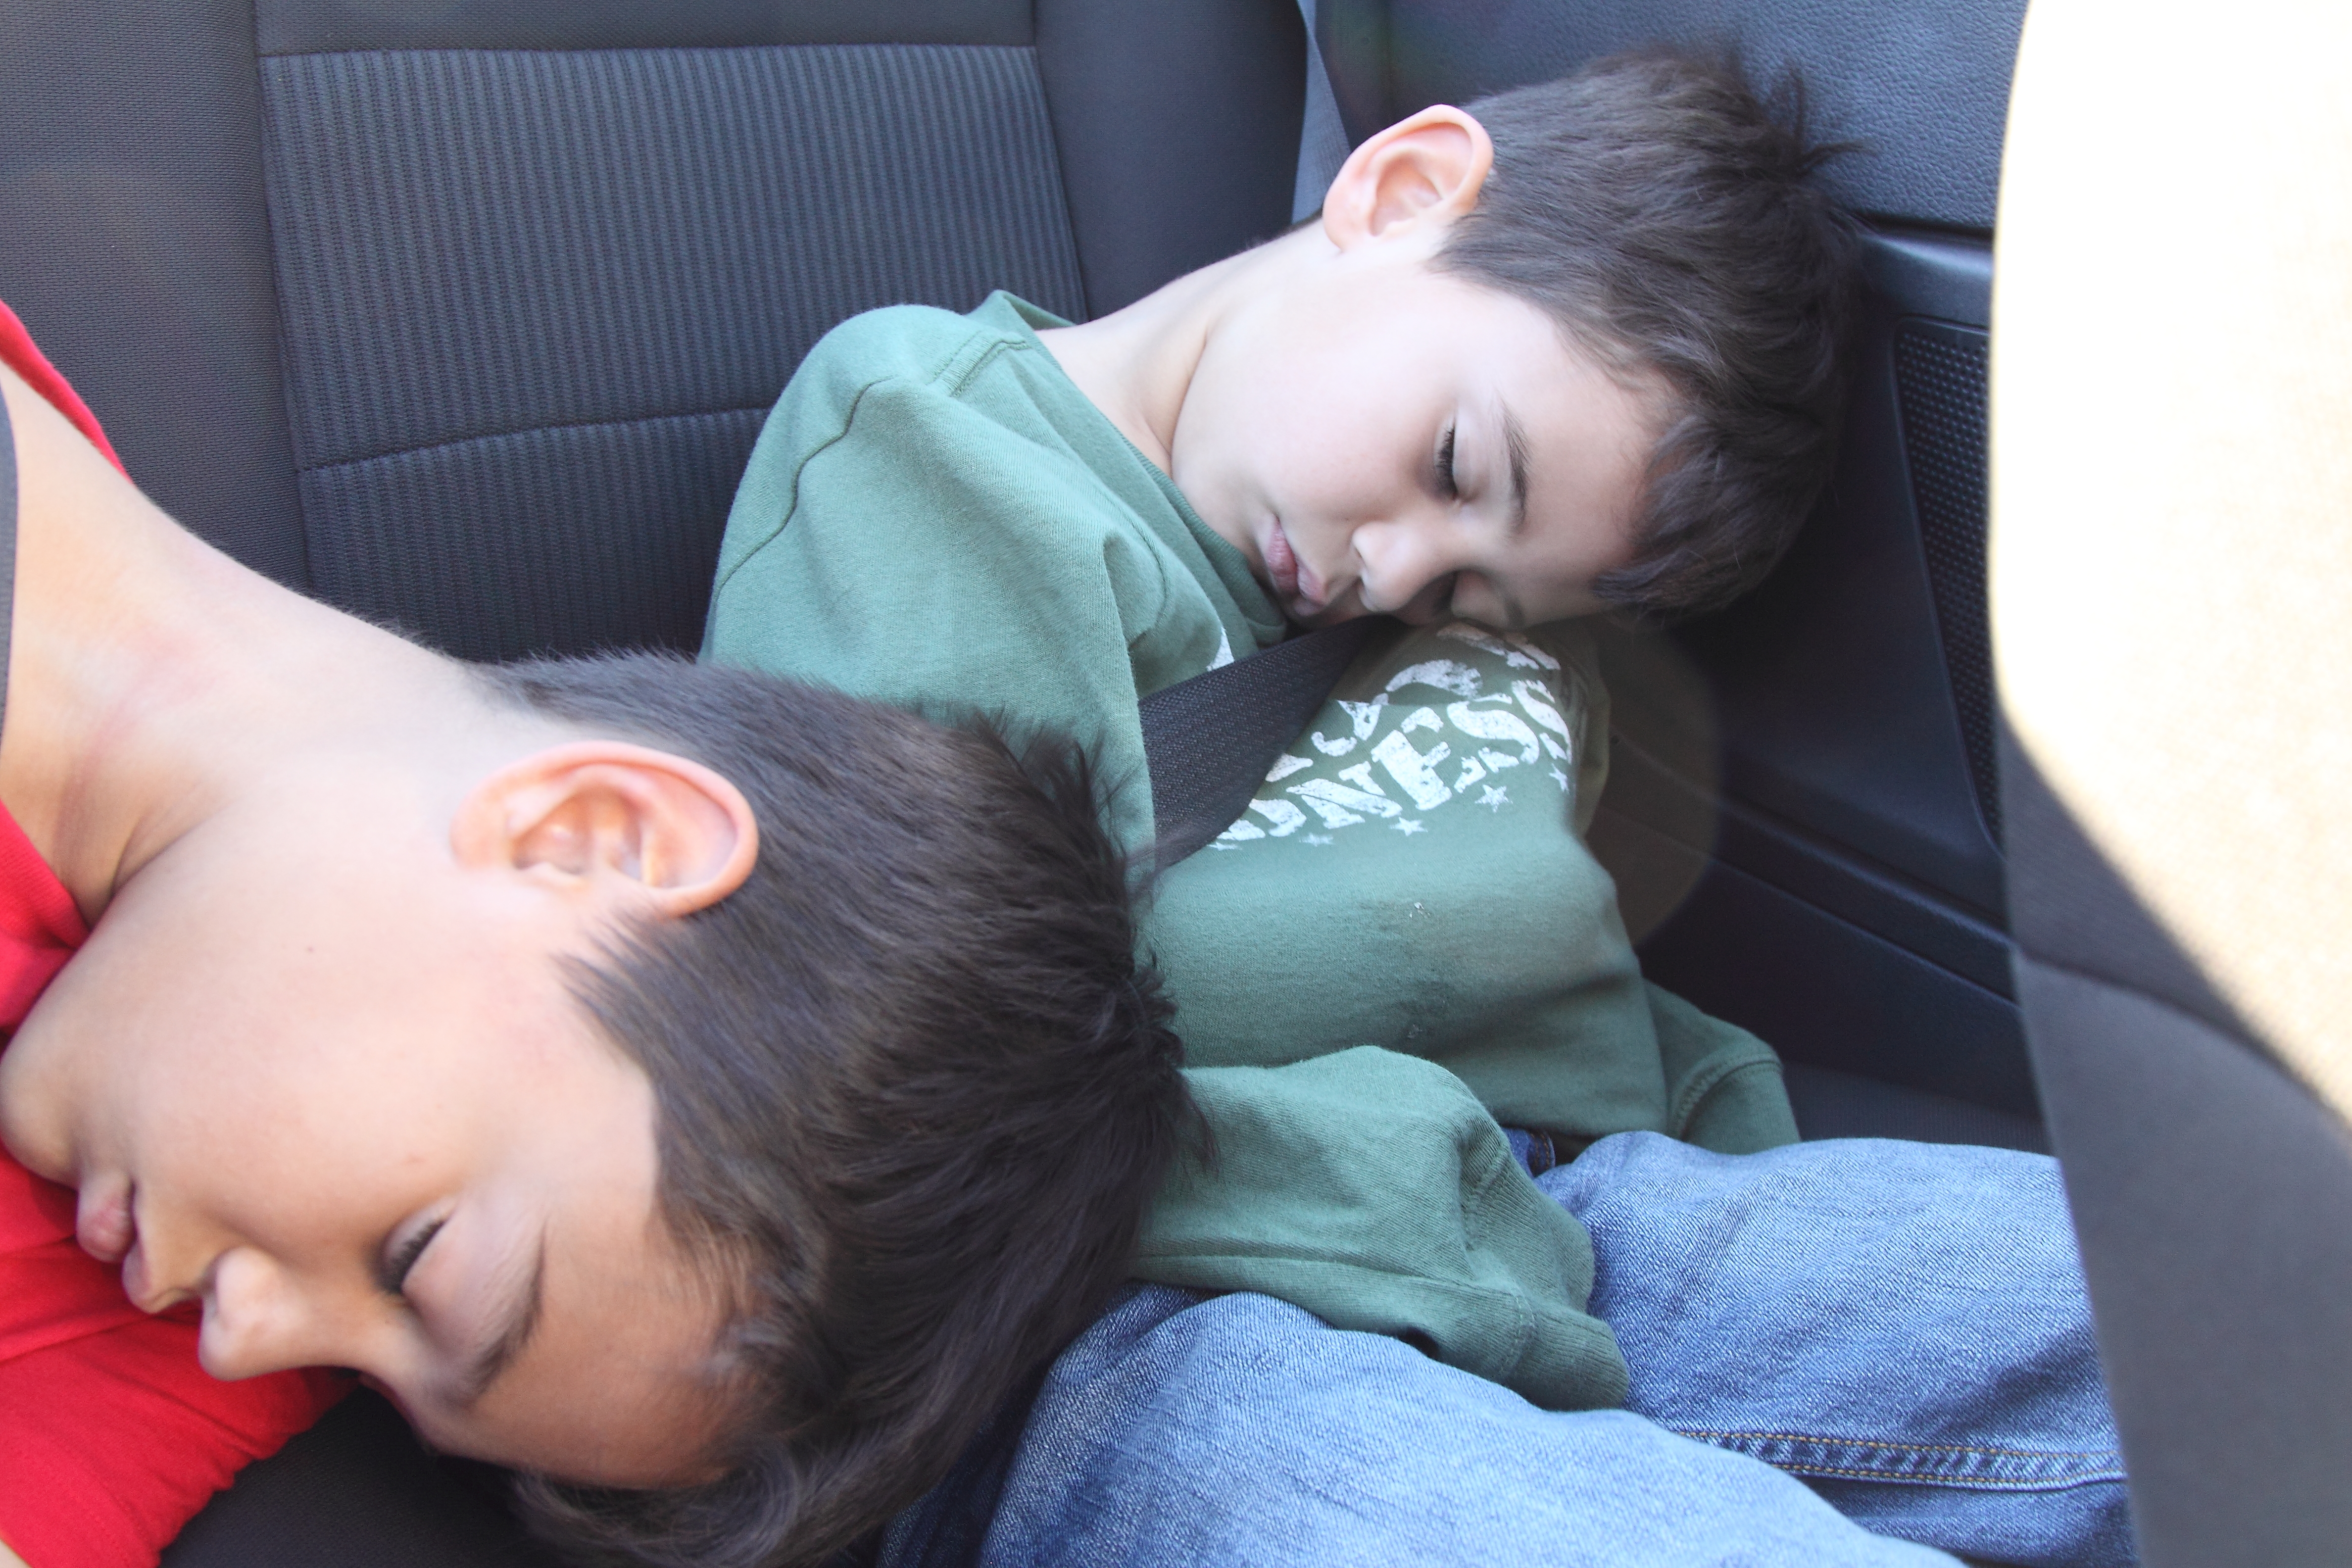
Our activities for the day included lunch, a walk on the pier, and a visit to Mission San Louis Rey de Francia – Oceanside, CA. You can tell the boys were quite warn out from our day’s outing and scooting around in the convertible!
Mission San Louis Rey de Francia – Oceanside, CA
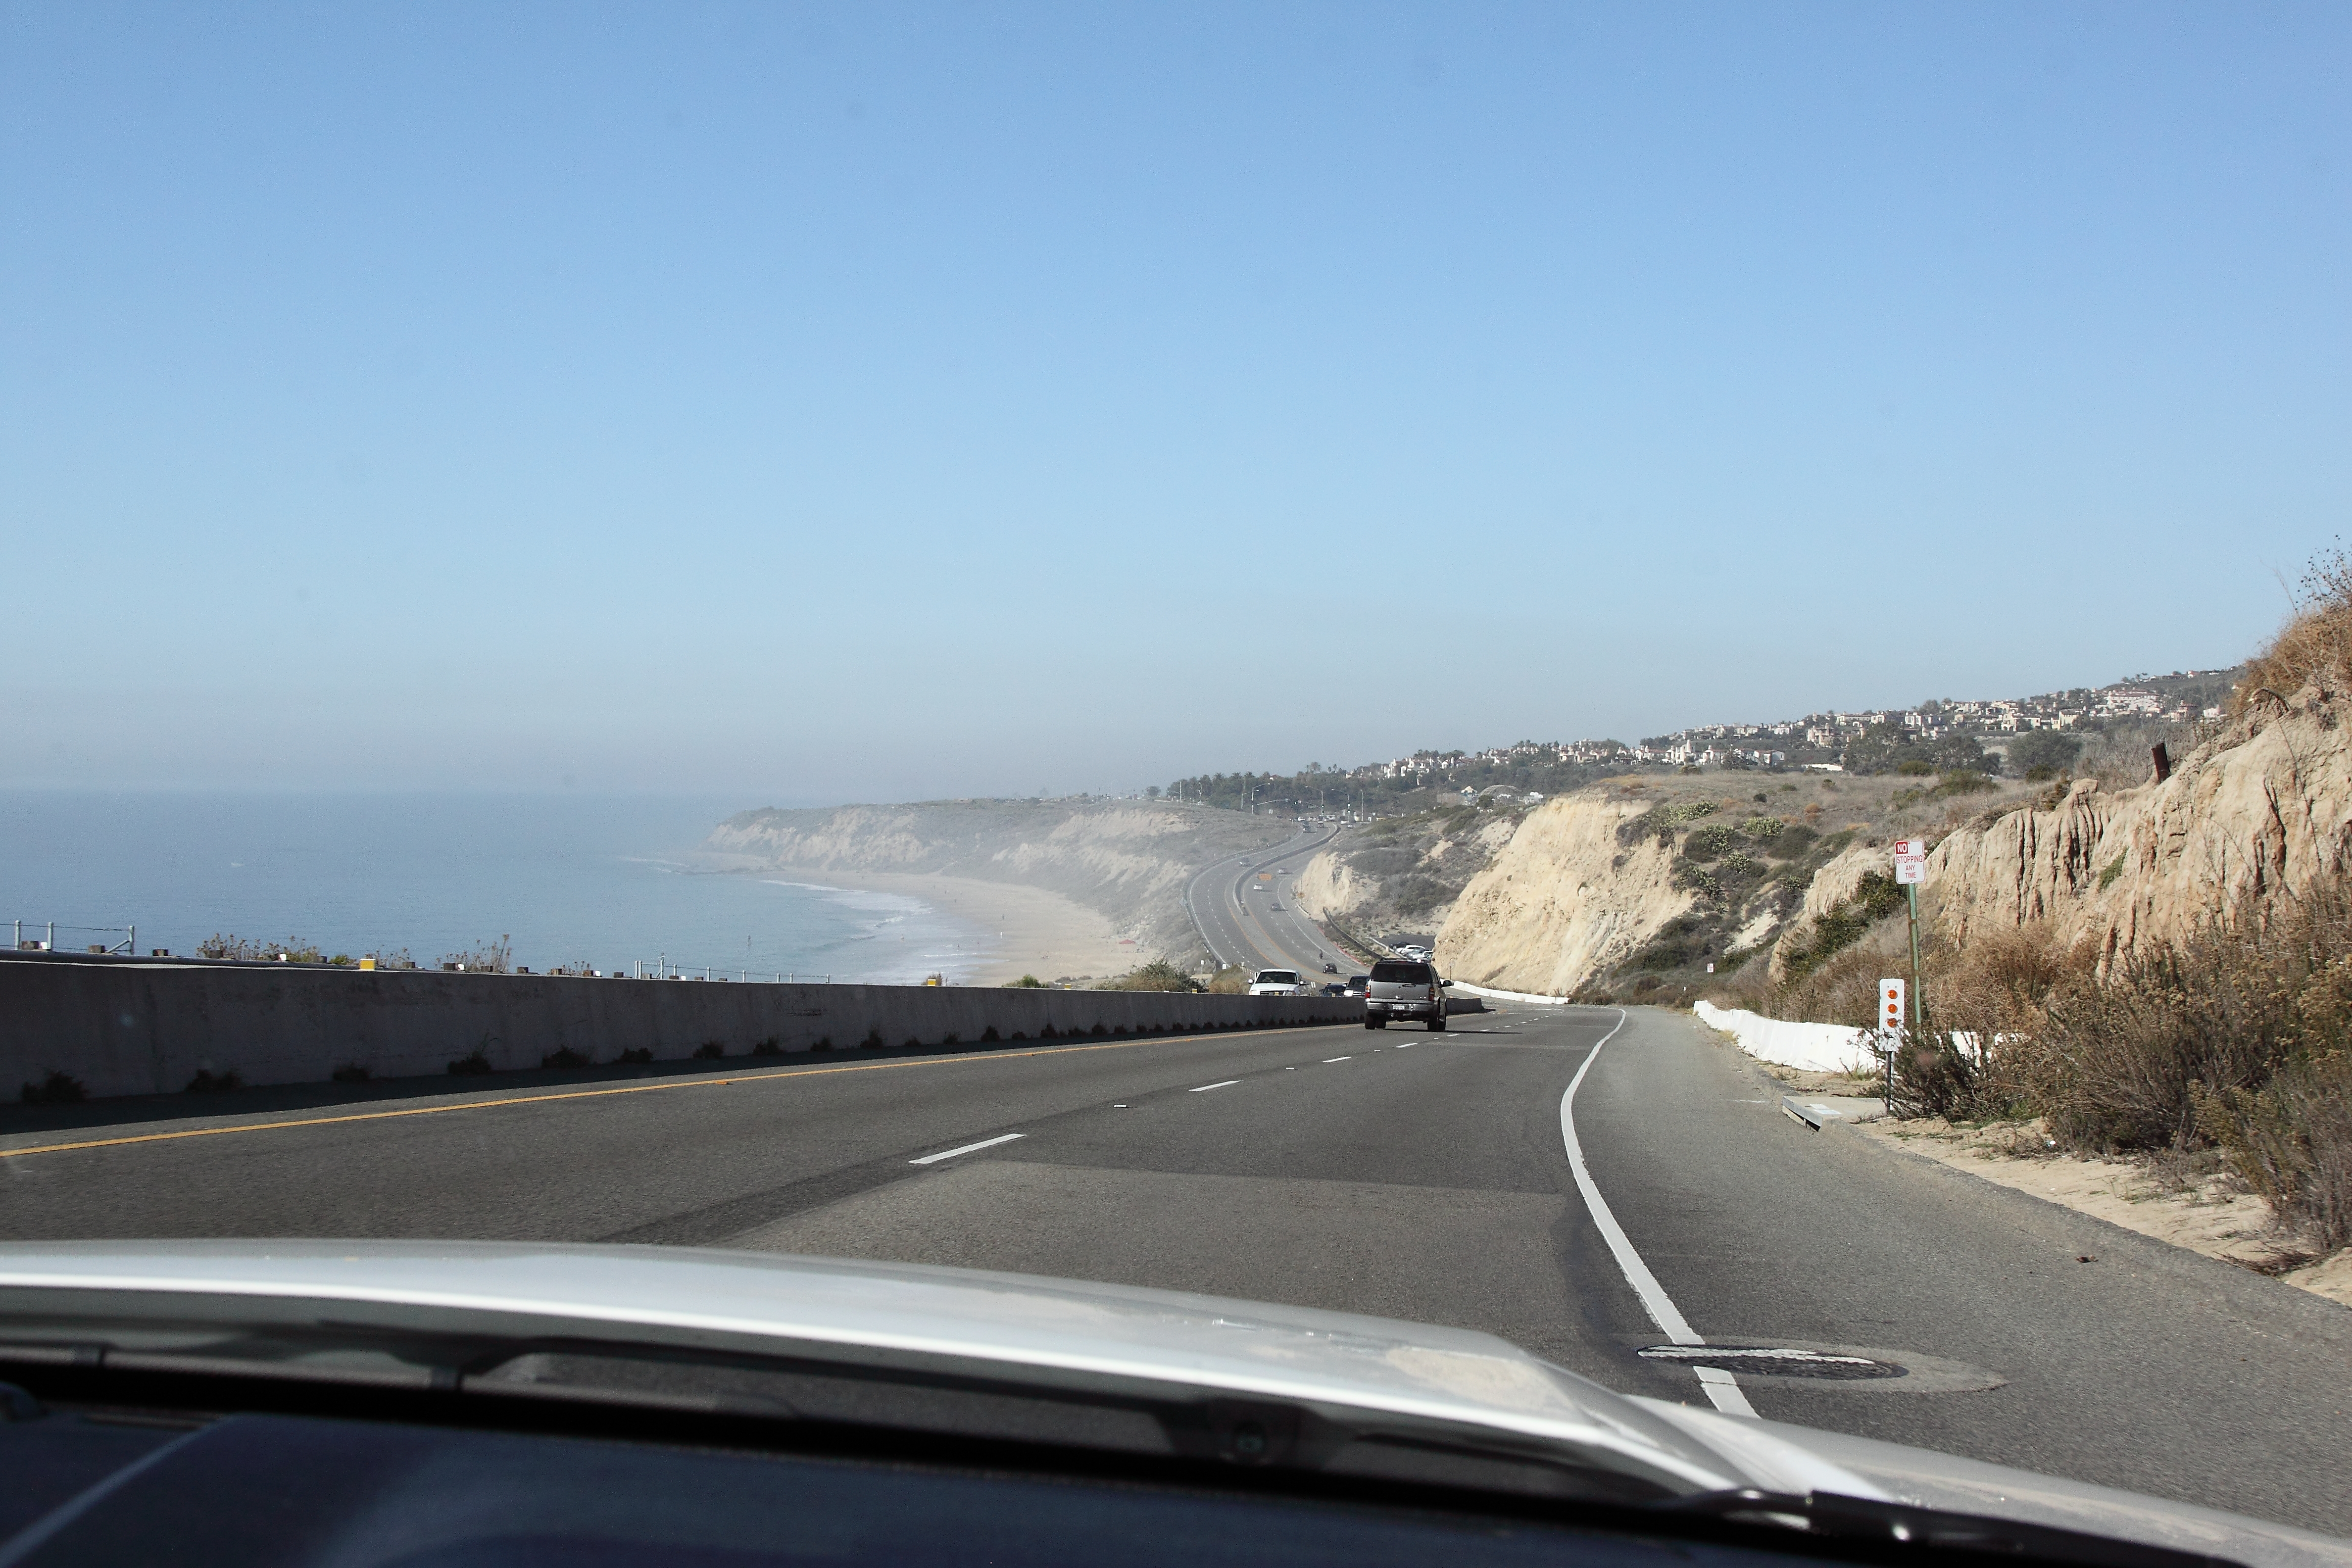
The real adventure of “no map, no plans, no place to be” started when we left San Diego. Our first stop that day was lunch in Laguna Beach. It’s definitely the artist colony it’s known for.
We didn’t stop much that day because we were too busy enjoying the coastline scenery. But, by the time we reached Los Angeles and navigated our way through the traffic, we decided to call it quits for the day.
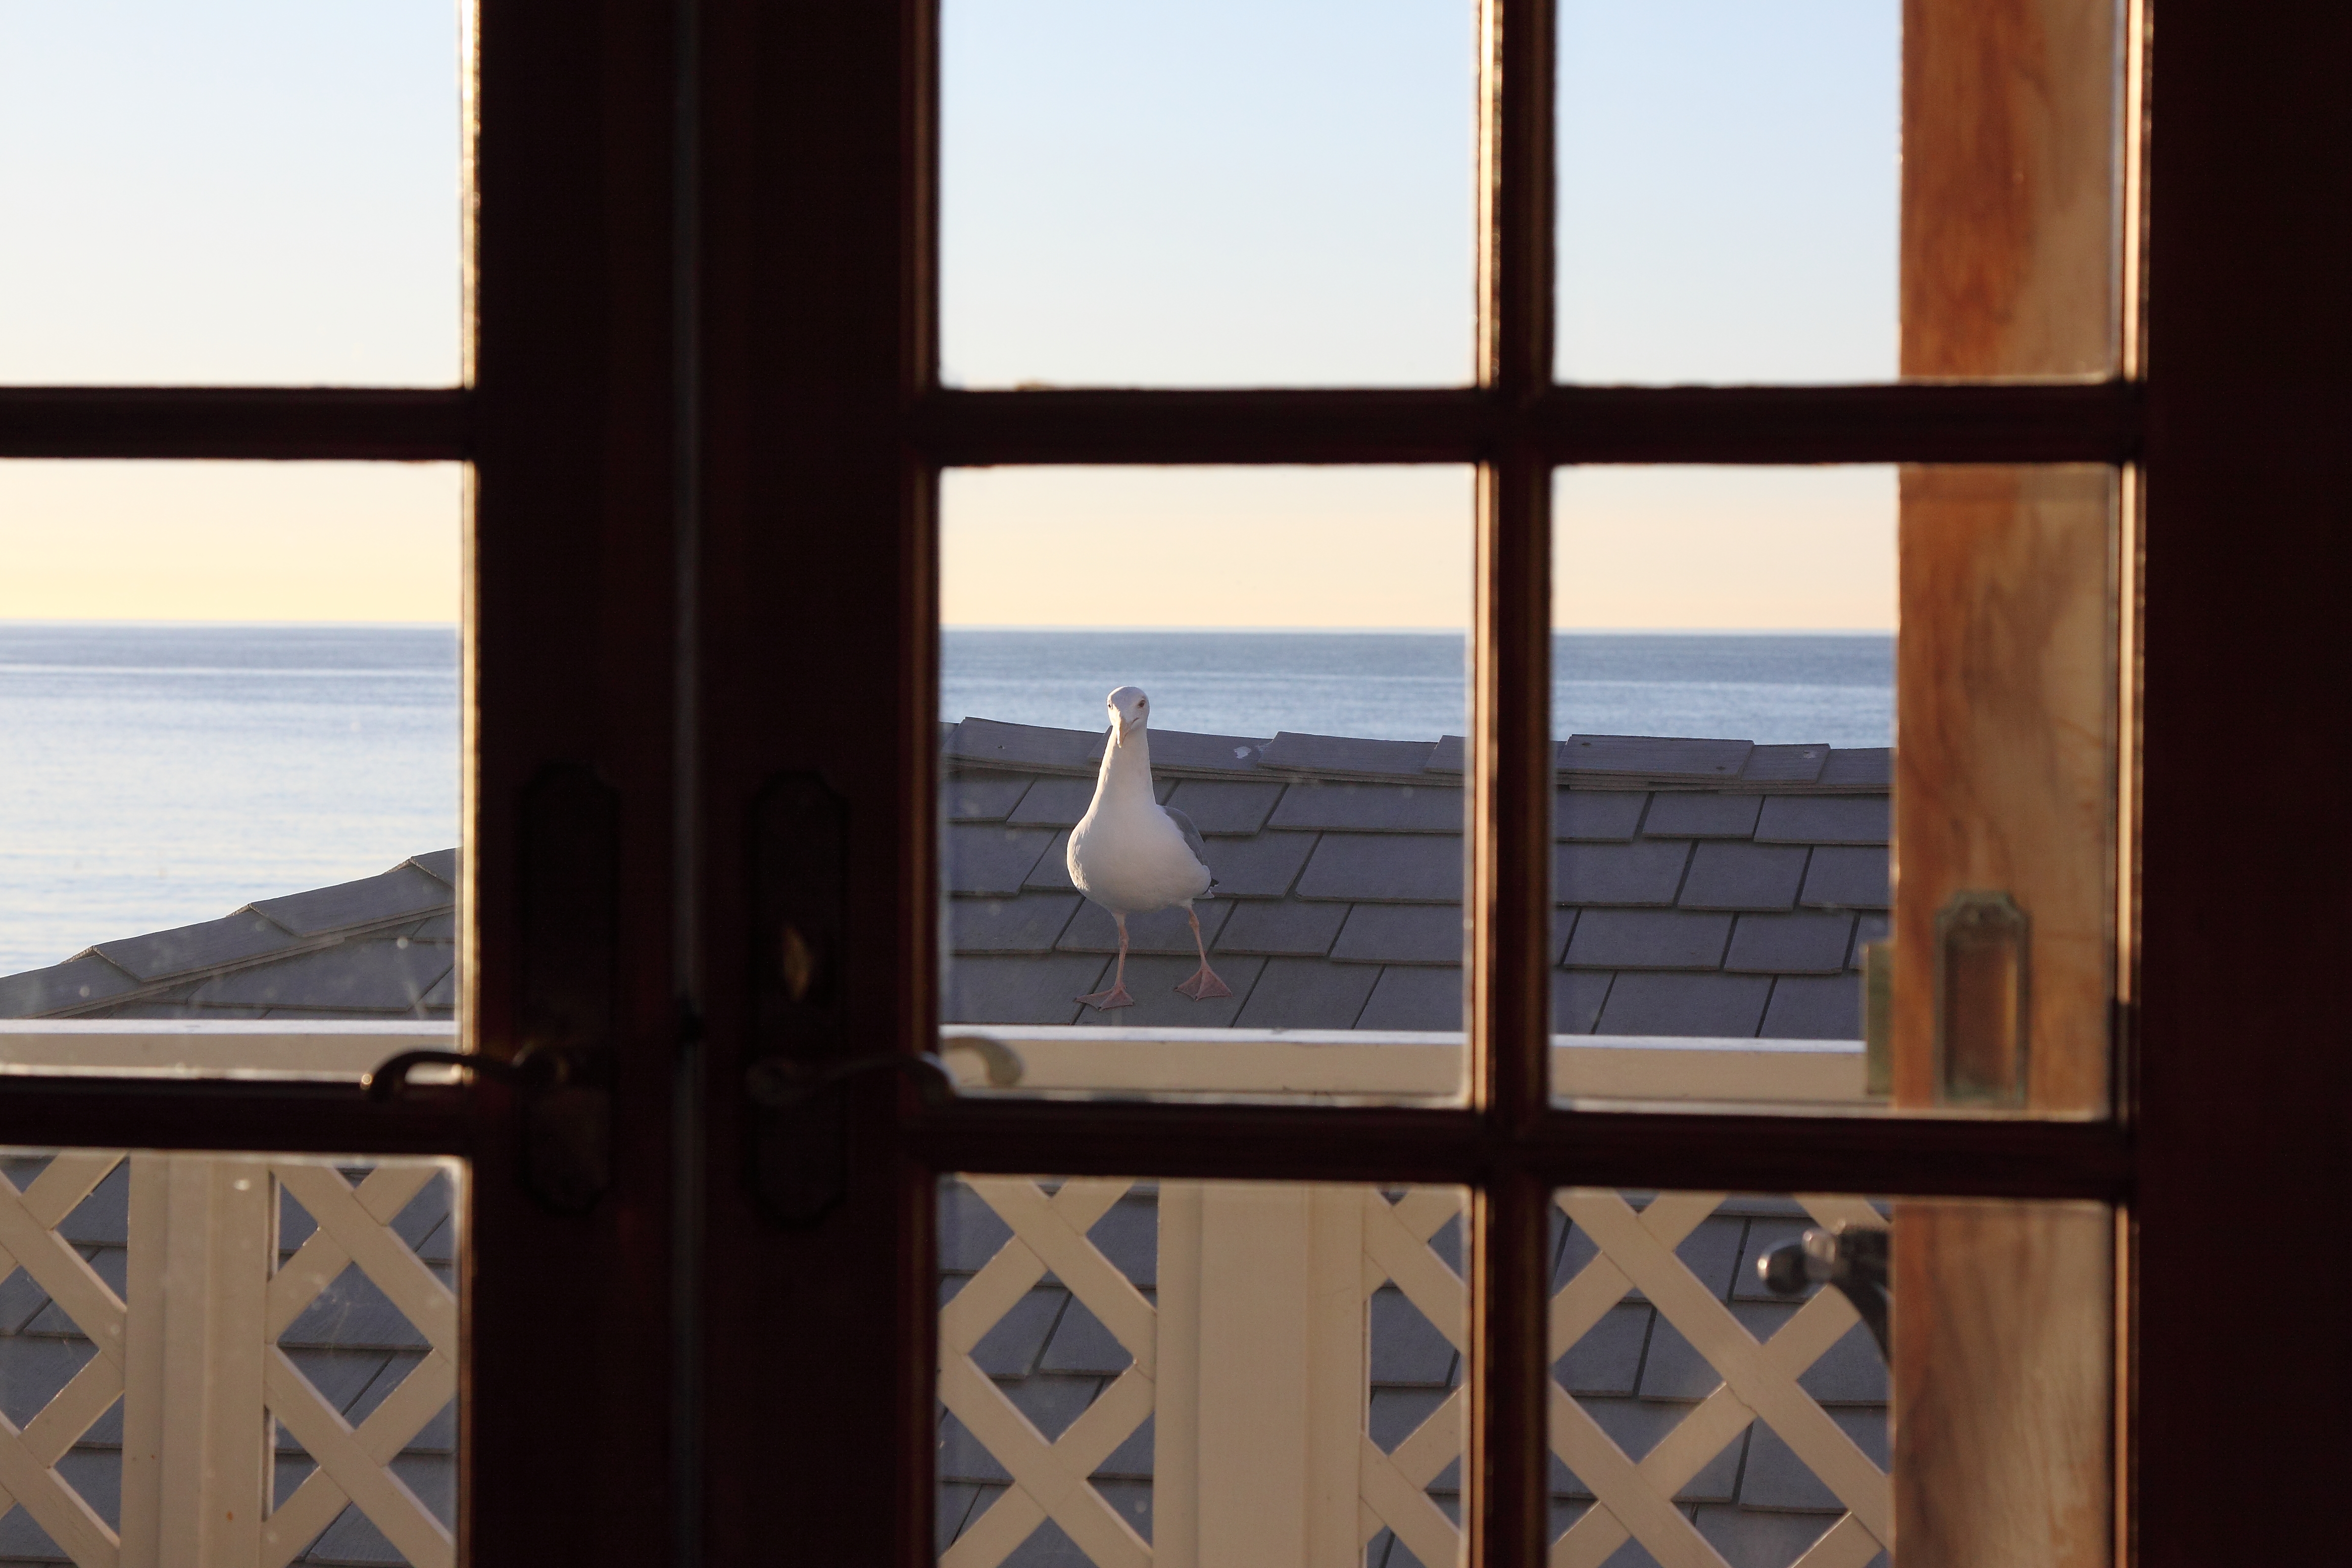
We pulled into Malibu, just in time to grab a place for the night. And, since we didn’t have any reservations, we had no idea what we were in for when it came to hotels. We were lucky enough though, to find a wonderful little inn on the ocean and were greeted the next morning by a cute seagull at our balcony door (which was at the foot of our bed).
Good Morning!Malibu Beach
Day 3 – More driving, but we didn’t care, the scenery was amazing. We stopped for the night at Moonstone Beach in Cambria. THIS was the downfall of “no reservations.” We ended up in a dive of a motel. It was one of those places where you wouldn’t dare take your shoes off, let alone get under the covers! But it was a small price to pay for a beautiful sunset.
After that fateful night when we were ready to stop for the day, we would go to the nearest restaurant/bar and ask the locals for their recommendations……they never failed us.
Sunset at Moonstone Beach in Cambria
“Due to the Interstate Highway System, it is now possible to travel across country from coast to coast without seeing anything.”
~Charles Kuralt
This is one of Michael’s favorite quotes and it’s so true. We may not have been driving coast to coast, but the quote is still appropriate for our south to north journey on the PCH. Afterall, if we had chosen to take the interstate look at all we would have missed.
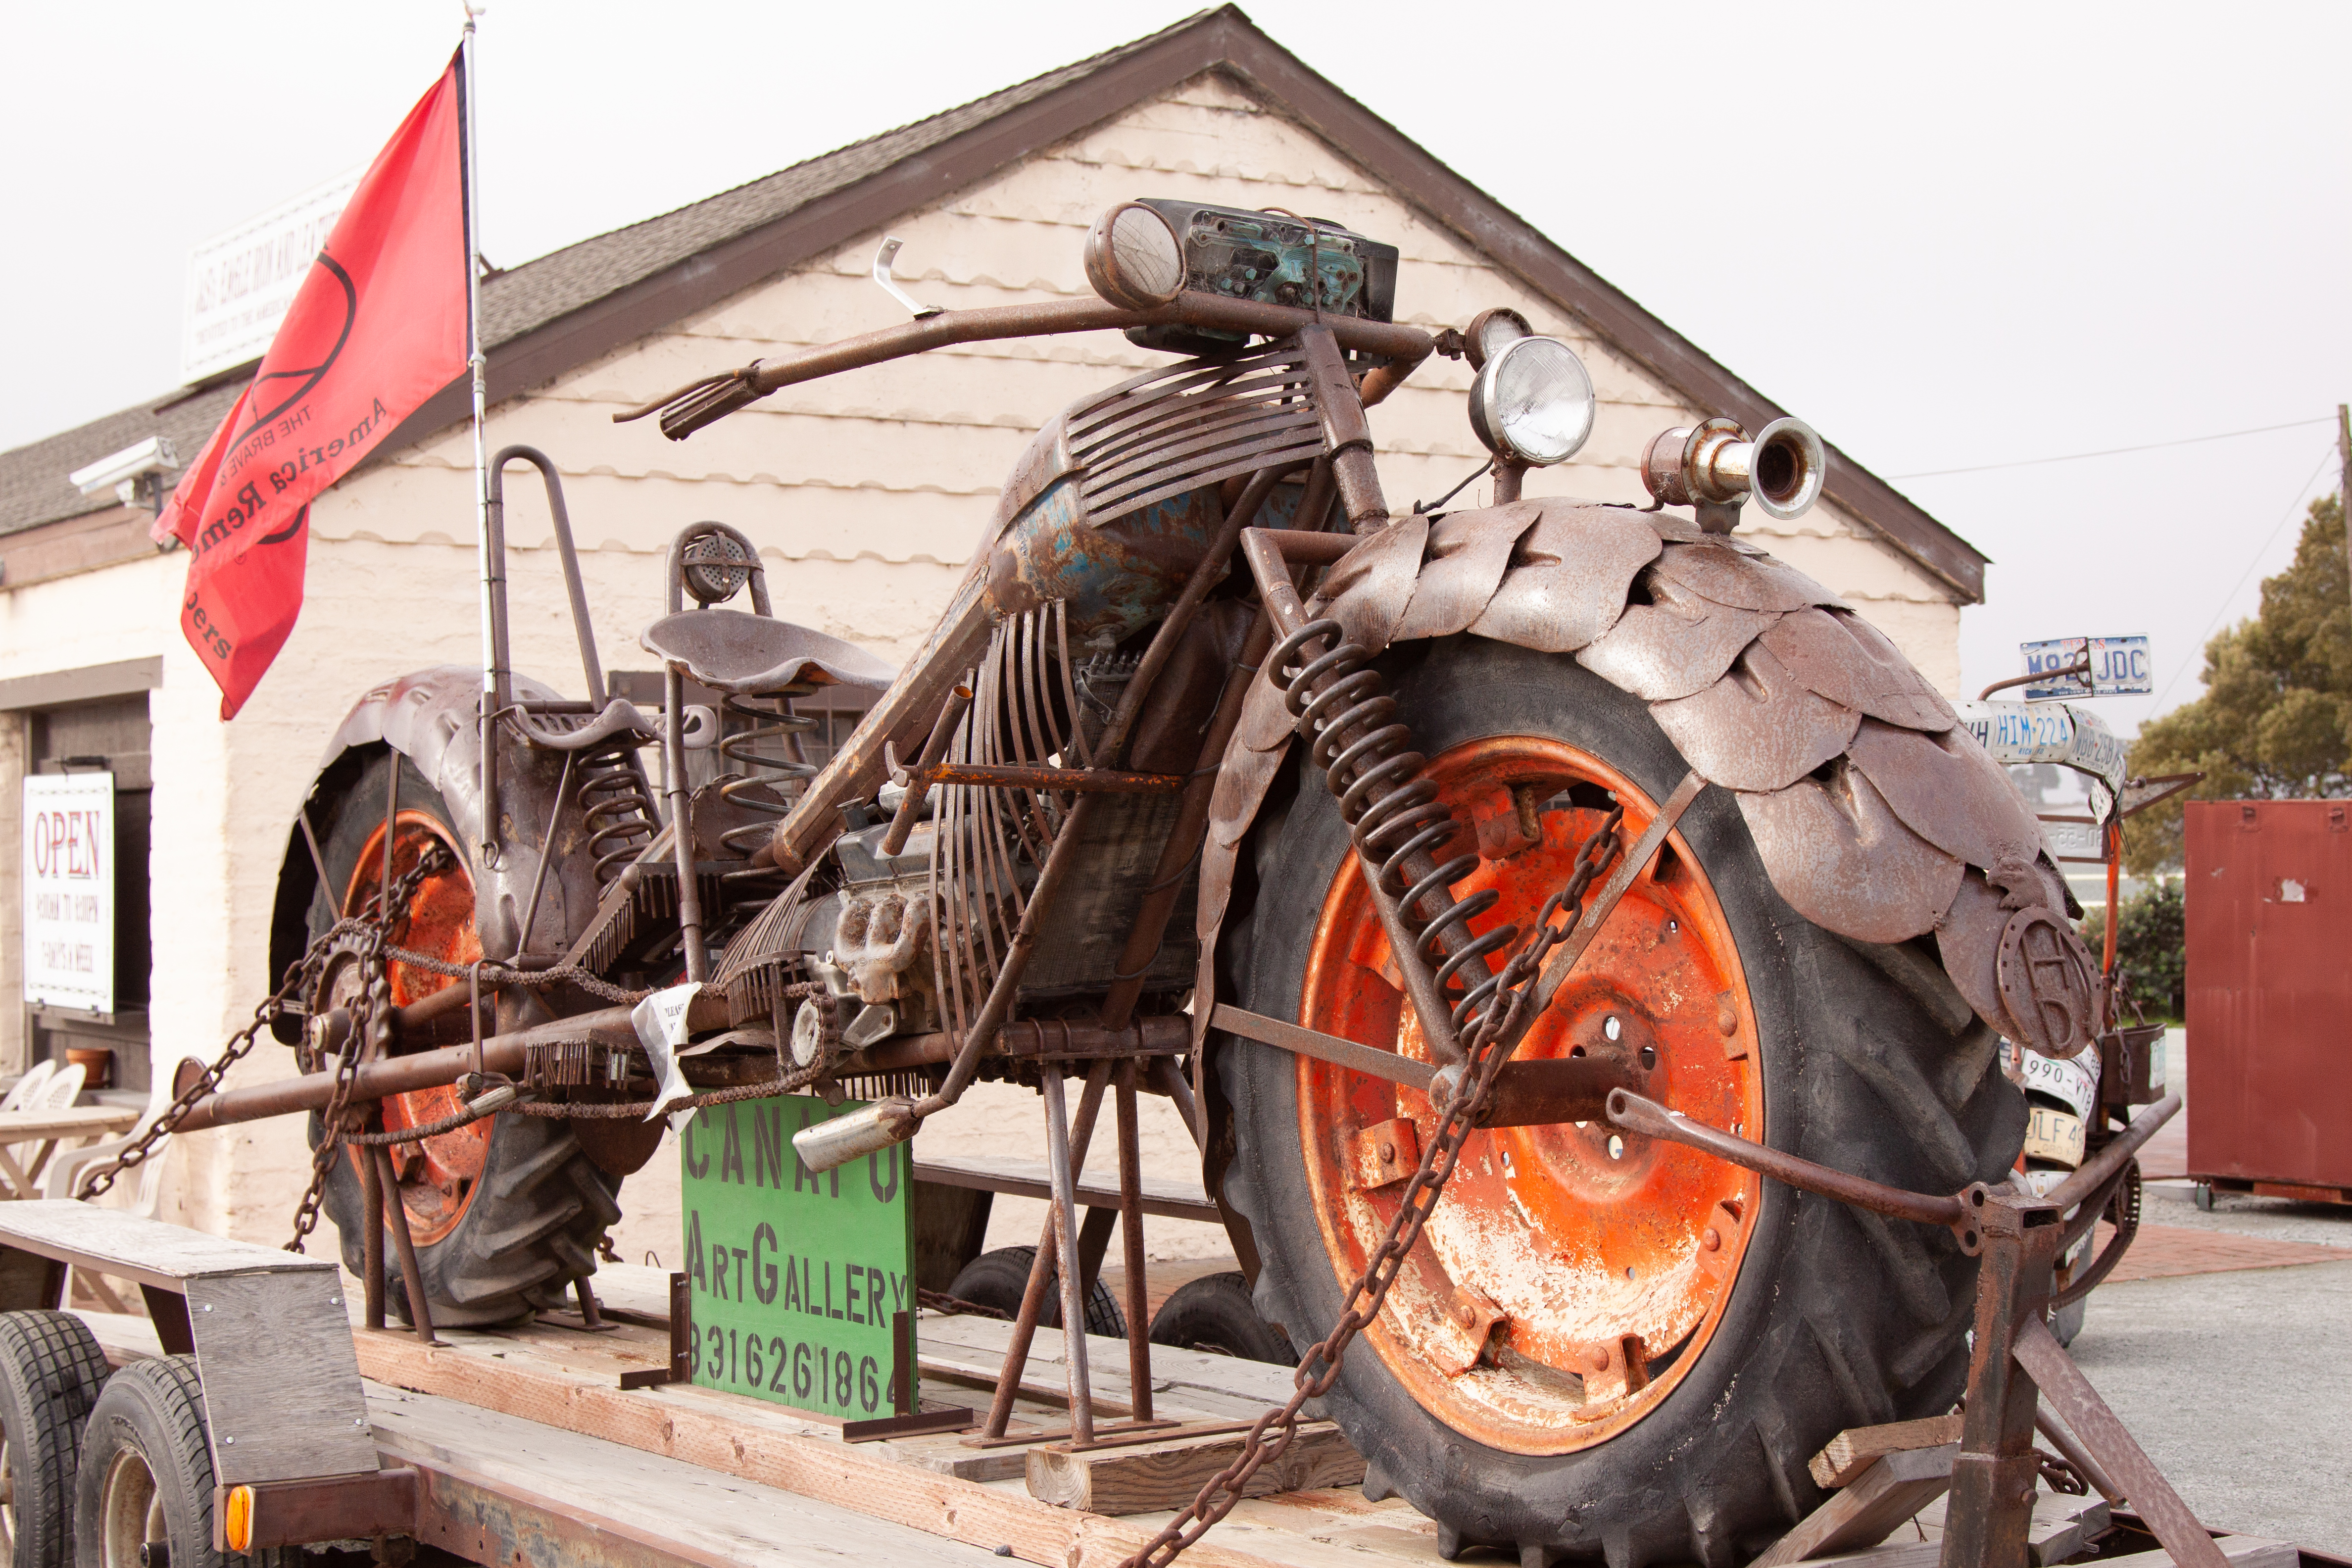
Sea Lions bathing in the sunBig SurBirds taking flightPigeons Point LighthouseRoad trip views drivingRoad trip views drivingCool Roadside Art GalleryCool Roadside Art GalleryCool Roadside Art GalleryLucky Motorcycle
Our last stop just in time for New Year’s Eve was San Francisco. We decided to return the rental car and walk or take BART (Bay Area Rapid Transit) instead. We wrapped up our trip with a nice dinner catching up with some longtime friends.
Fisherman’s WharfChina TownAlcatrazRosie the Riveter Built ThisFamous Cable Car
Thanks, John for this wonderful challenge. It was fun re-living this road-trip and all the wonderful memories Michael and I enjoyed together.
Next week it’s Sofia’s turn. Be sure to follow her at Photographias so you don’t miss out on her theme.